Blogging changed my life. What began as a hobby during my sophomore year of college has grown into a business that supports not just me but also a small team.
Along the way, I’ve learned a ton about design, programming, and how to communicate effectively (to name just a few). I’ve also gotten to attend conferences, meet cool people, and can even work from home.
The point is, starting a blog can open up lots of opportunities and teach you many valuable skills, and I’d encourage you to give it a shot if you’re curious.
If you want to start a blog but aren’t sure how, you’ve come to the right place. In this guide, I’m going to share everything I and the team at College Info Geek have learned about creating, growing, and monetizing a successful blog.
Like most blogging guides, we’ll cover basic stuff like how to choose a topic and set up your website. But this guide also goes way beyond those basics to share a bunch of things I wish I’d known when I started out, including the hard truths that most blogging guides won’t tell you.
Don’t Start a Blog to Get Rich
Before we get into the details of blog creation, I want to make sure you have the right expectations.
It’s very easy to see a successful blogger and think, “Wow, that person is so rich, I should start a blog of my own.”
If your goal is to get rich, however, then starting a blog is not the approach to take. You’re much better off working a steady, well-paying job and investing your money the boring, proven way.
“But what about all those millionaire bloggers? Why can’t I be like them?” Of course, it’s possible to make a lot of money from a blog. But for every super-successful blog, there are thousands of obscure ones that don’t make a dime (or even lose money).
Now, you certainly can make money from your blog; we’ll show you how in this guide. But you need to realize two things:
- Making money from a blog takes a lot of hard work and patience.
- Even when you manage to make money blogging, it’s unlikely to make you rich.
So don’t run out and quit your day job because you plan to strike it rich as a blogger. With time and the right approach, it’s possible to earn a full-time income from a blog. But it won’t happen overnight, and you shouldn’t expect your blog to make you the next Bill Gates.
How to Choose a Topic for Your Blog
Now that I’ve tempered your expectations, let’s talk about choosing your blog topic. This is the phase where a lot of people get stuck and waste tons of time.
Trust me, I’ve been there. I know how much pressure you feel to choose the “perfect topic.” The good news, however, is that:
- There’s no such thing as the “perfect” blog topic.
- Your topic matters less than you imagine.
A lot of would-be bloggers think they have to find an “original” topic that no one else has written about. This results in hours of Google searches, only to end up feeling defeated because everyone has already written about everything.
Luckily, being original doesn’t matter.
To start, if there are other successful blogs about a topic, that’s a good sign. It means that people care about it; in business terms, there’s a market for the idea.
If no one is writing about something, on the other hand, that likely means it will be difficult to make money from it.
Furthermore, people don’t read one blog over another because of the topic. People read blogs that they connect with (and that are well-written, of course). Your unique voice and perspective will come through no matter what topic you’re writing about.
But even once you’ve gotten over the pressure to be original, choosing a topic can still be a challenge. Here are some guidelines for choosing a successful blog topic:
1. You’re Qualified to Write About the Topic
This should go without saying, but don’t start a blog about something you have no business talking about. For instance, if you’re hoping to start a blog about fixing old cars but have never held a wrench, you should probably pick something else.
But beyond obvious examples like that one, what makes you “qualified” to write about a topic?
In general, you just need to know more about the topic than your readers. You certainly don’t have to be an “expert,” and it’s fine to write about something that you’re learning.
In fact, many of the articles on this blog originated with topics that interested us, such as how to get better sleep or how to make better flashcards.
Finally, please don’t start a blog about any of these topics:
- Health/fitness (unless you’re a doctor, nutritionist, personal trainer, or someone actually qualified)
- Marketing/online business (there are way too many of these already)
2. The Topic Interests You
As I’m going to repeat throughout this guide, creating a successful blog takes time. So you need to pick a topic that you can see yourself writing about for years.
Don’t pick a topic just because it has the potential to make a lot of money or because someone on the internet told you it was a good idea.
3. The Topic Has the Potential to Make Money
Assuming you want to make money from your blog, you need to pick a topic with the potential to make money. This means something that has products/services related to it that you can either create or promote (more on this later).
Arguably, you could sell something related to any topic, but some will be an uphill battle. For instance, while you could create a blog about the best air guitar moves, it’s unlikely that anyone is going to pay for an air guitar book or video course (though I’d love you to prove me wrong).
This doesn’t mean your blog has to be about dating, day trading, or supplements, however. Here are some examples of successful blogs with unconventional topics:
- Swim University – A blog that teaches people how to take care of their pools and hot tubs.
- Minimalist Baker – A collection of simple, delicious recipes (many of which are vegan and/or gluten-free).
- Nerd Fitness – Fitness…for nerds? Yep, and it’s one of the best fitness sites out there.
How to Name Your Blog
Naming anything is a challenge. In fact, it can be so challenging that there are even entire businesses that help companies create brand names.
When naming your blog, you don’t need to hire professional help. However, you will need to do a bit of brainstorming. The best blog names are:
- Memorable
- Short
- Relevant to your topic
- Available as a domain name
That last item is one many people forget. Ideally, the name of your blog should also be its domain name. College Info Geek, for example, has the domain name collegeinfogeek.com. This is desirable because it makes your blog easier to find, both for readers and for search engines.
To think up blog names, I recommend you use a technique called mind-mapping. Take the topic of your blog, write it on a piece of paper, and draw a circle around it. Then, start thinking of words that relate to the topic. Each time you think of a word, write it down in a smaller circle branching off from the circle containing your topic.
Eventually, you’ll have a bunch of words that you can combine in different ways to create a name. Once you have a few names, you can see if the domain names for them are also available (a process we’ll discuss in the “Get a Domain and Hosting” section).
How to Set Up Your Blog in 7 Steps
Now that you’ve picked a topic, it’s time to create the actual blog. This is the most intimidating step for a lot of people, but relax.
As long as you can read and use the internet, you already have the skills you need to create a blog. Knowing how to code can be helpful down the line, but you don’t need it to get your blog set up.
Here’s an overview of the process:
- Get a domain and hosting
- Install WordPress
- Configure your WordPress settings
- Install recommended plugins
- Choose and install a theme
- Set up your pages
- Write and publish your first post(s)
I know seven steps seems like a lot, but we’ll walk you through it. Follow along carefully, and you won’t have any issues.
1. Get a Domain and Hosting
To kick this process off, you’ll first get your domain name and hosting.
If you’re not sure what these are, here’s a simple explanation:
- Your domain name is just your URL — like collegeinfogeek.com.
- Your host is the server where your blog will live.
Now, there are a number of ways to host a website. For instance, you could just create a free blog at WordPress.com or Tumblr.
However, if you’re serious about creating a blog that’s more than just a hobby, spend the bit of extra time and money to create a self-hosted blog. It looks far more professional and trustworthy.
You also have complete control with a self-hosted blog, which you’ll appreciate down the line when you want to customize things (or hire a developer to do so).
It used to be that you had to buy your domain name separately from your web hosting. Now, however, you can get them from the same place at the same time. Buying them separately is still an option, but it’s so much easier to get them together (the convenience costs about $3 extra).
Note to your wallet: This is the only part of the process that will cost you any money. Good web hosting isn’t free.
However, it doesn’t have to be that costly, either.
There are tons of hosting options — shared hosting, VPS accounts, dedicated servers, etc.
When you’re starting out, however, I recommend just getting the basic shared hosting plan from HostGator. (Note: I’ll make a commission if you buy through this link, at no extra cost to you.)

There are a ton of good web hosts out there, so HostGator definitely isn’t your only option. However, I’ve been using them for years (since high school), and I love them.
A few reasons I’ve stuck with them for so long:
- Their plans are inexpensive
- I’ve hardly ever had to deal with downtime or problems
- I love the quick-install options for things like WordPress.
- Their customer support is awesome.
Also, you can get a great discount.
Use the coupon code COLLEGEINFOGEEK to get 55.87% off of your initial hosting purchase (or even 62% off if you choose a 3-year plan).
This is actually 30–40% more savings than you’d get with the default coupon code they give you, so definitely use this code if you choose HostGator.
From this point on, I’ll assume you’re using HostGator, and the next part of the tutorial will be specific to it. But if you decide to go with something else, the process for signing up shouldn’t be much different.
What to Do If You Already Have a HostGator Plan
If you’ve already gone through my personal website guide and have a HostGator plan, DON’T buy another one for your blog!
If you’re planning on building your blog on your personal website, you can just skip the entire step about buying web hosting and go straight to Step 7.
If you’d like to give your blog a completely different look and feel from your personal website — but still have it on that domain — then you’ll want to set it up on a subdomain. Read this tutorial to learn how to set it up.
If you want to put your blog on a totally different URL, then you’ll want to upgrade your hosting plan to the next tier, which lets you have multiple domains.
How to Choose a Domain Name
We already covered how to choose a name for your blog, but I want to talk a little bit about how to choose a domain name.
Your domain name is the online “address” for your blog. For instance, this site’s domain name is collegeinfogeek.com.
Ideally, your domain name will be the same as your blog name. If you can’t find a domain to match your blog’s name, then you might want to call your blog something else.
Besides the name of the website, you also need to choose a domain extension. This is the .com, .net, etc. that comes after your domain.
These days, there are all kinds of unusual domain extensions out there, including .pizza and .soy.
However, I recommend sticking with .com if you can (unless your blog actually is about pizza or soy). If that isn’t available, .org, .net, or .co are also good choices.
Oh, and one last thing: make sure your domain name is easy to spell and type. This way, if you tell someone about it, they can easily look it up later.
How to Get Your Hosting Plan and Domain Name
Now that you’ve chosen your blog name and domain name, we can start registering things.
Go to HostGator and click the big button that says “Get Started Now.” (Again, I’ll make a commission if you buy through this link — if you choose to do so, thank you!)
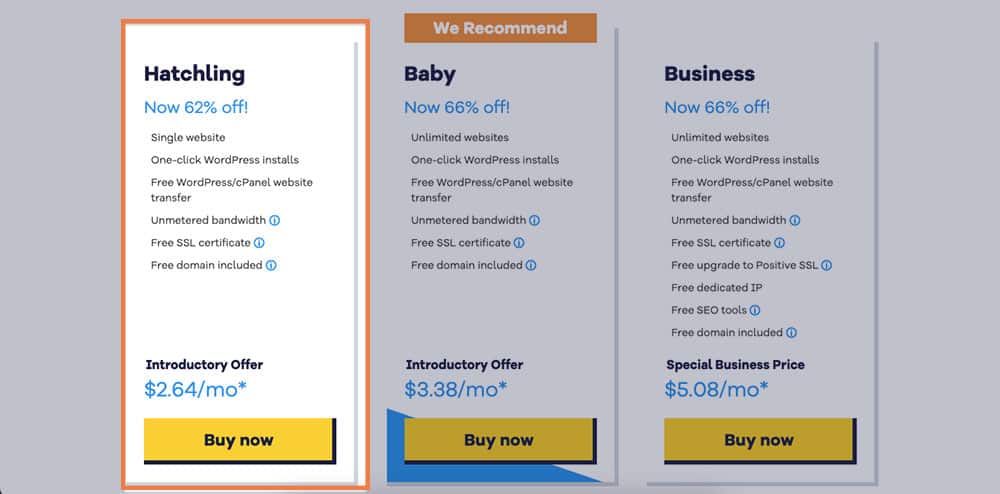
You’ll now see a list of web hosting plans. Choose the “Hatchling Plan,” which is plenty to get you started in the beginning.
Now, assuming you don’t already have a domain name, you’ll need to register one. Type the domain name you want into the box under “Enter Your Domain”:
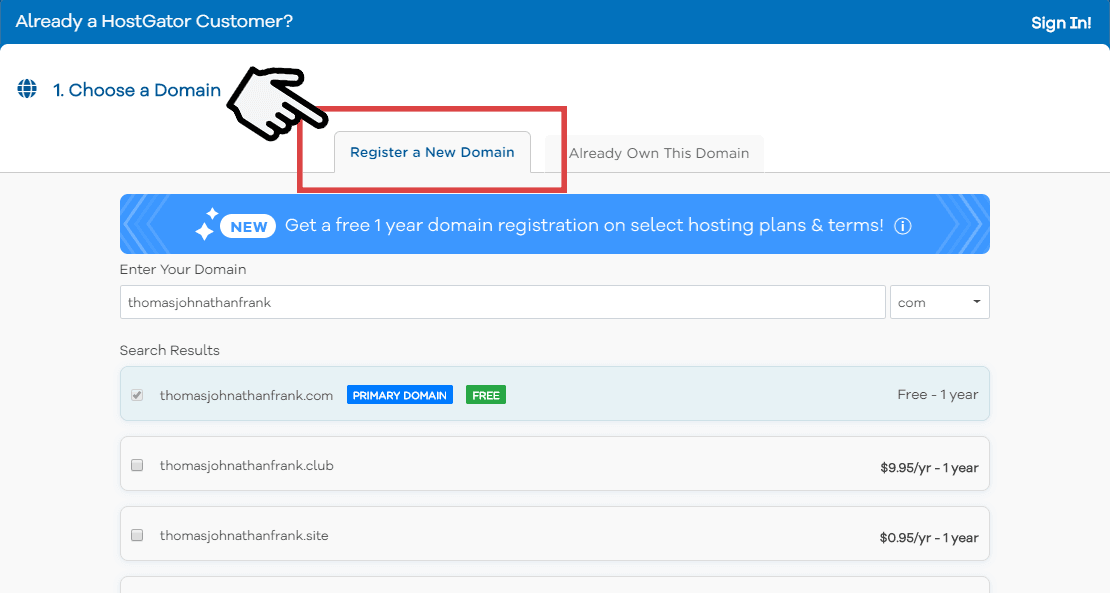
If your domain is available, it will appear in the “Search Results”. If you choose a hosting plan lasting 12 months or longer, you’ll be able to register the domain for free for the first year (assuming you’ve chosen a .com, .net, or .org domain).
Add Domain Privacy Protection
Under the search results, you’ll see a section called “Domain Privacy Protection.” While this does cost a little extra, I highly recommend adding it to your domain.
If you don’t, then anyone can look up the name, address, and phone number associated with your domain using a WHOIS Lookup. This has become an easy way for spammers to send you all kinds of junk.
To add Domain Privacy Protection, just make sure the box is checked next to your domain name:

Now, scroll down and complete these sections:
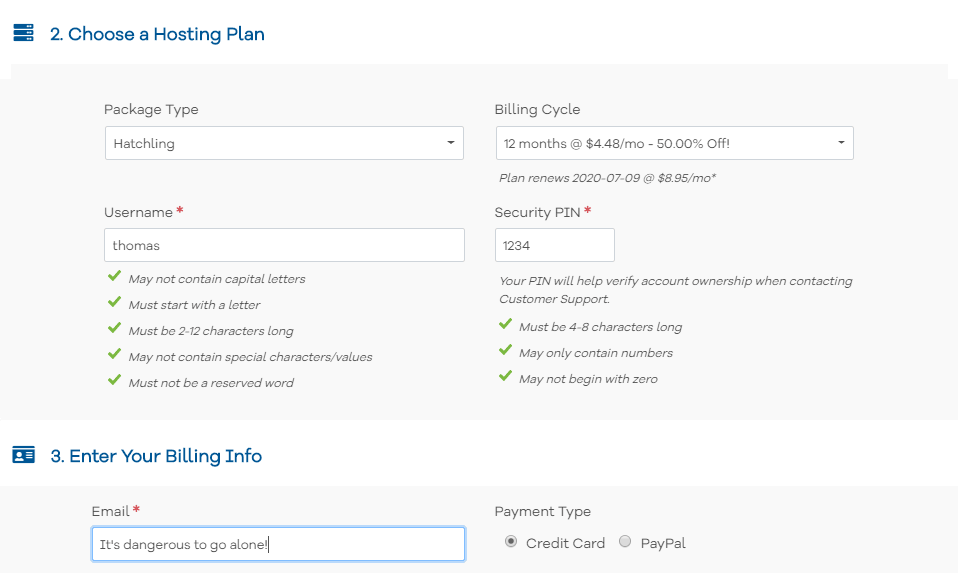
- Confirm that the Hatchling package is selected, and choose how many months of hosting you’d like to get upfront. I recommend at least one year.
- Pick a username and security PIN.
- Enter your personal and billing information.
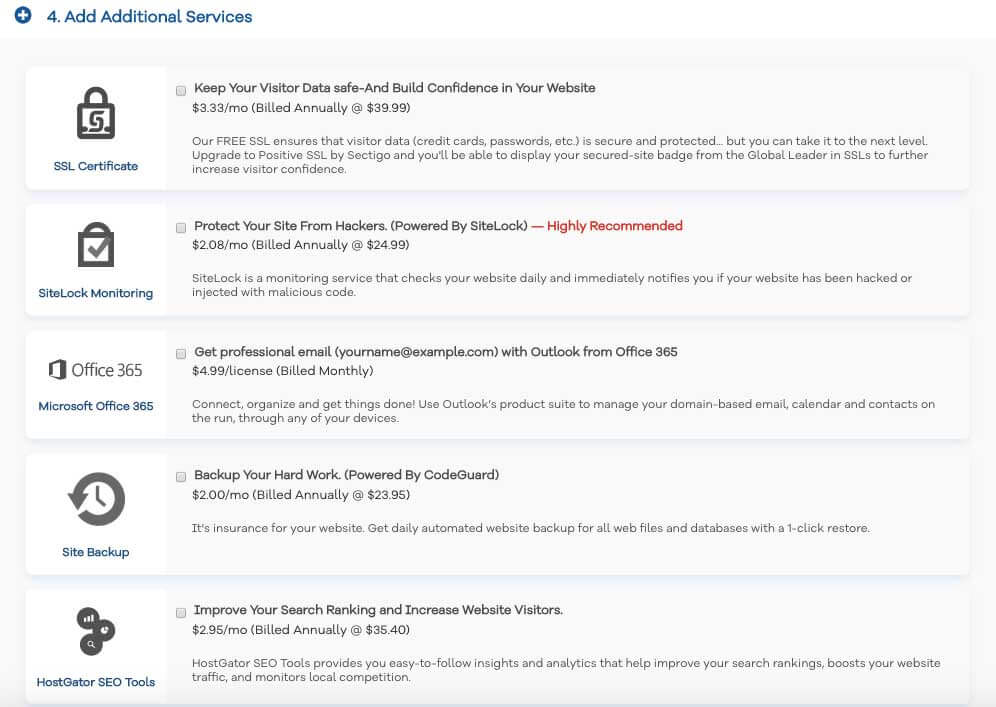
After this, you’ll see a section called “Add Additional Services.” While these aren’t useless, I don’t think you should pay for them. Later in this guide, I’ll show you how to do all of the same things for free. So be sure all of the boxes in this section are unchecked:
Now, review your order details to make sure everything is correct. Be sure the code COLLEGEINFOGEEK is entered into the box under “Enter a Coupon Code”:

Finally, click “Checkout Now!” to create your account:
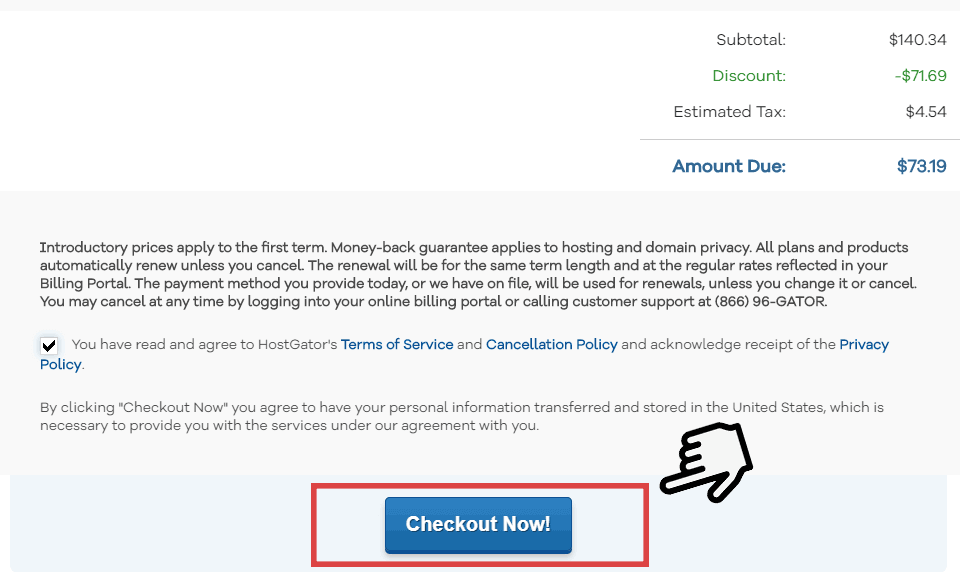
After you pay, you’ll receive an email with the subject “Your Account Info”. This email contains the information you’ll need for the next steps, so be sure to hold onto it.
2. Install WordPress
Now that you have your domain and hosting, it’s time to set up WordPress, the platform you’ll use to manage your blog.
WordPress is famous for its “5 Minute Install” time, but that’s too long. Let’s do it in 2!
One of my favorite things about HostGator is their quick-install options. Along with options for lots of other content management or blogging systems, they’ve got one for WordPress.
Let’s get it installed!
Type this URL into your browser: yourdomain.com/cpanel (but replace “yourdomain.com” with your domain name).
If for some reason you can’t reach your domain yet (sometimes it can take a little while to set up), use the Your Control Panel link you were given in your HostGator email.
Next, log in with the username and password you were given in the email.
You’re now inside the control panel for your website. To install WordPress, click WordPress Installer under the “Essentials” section:
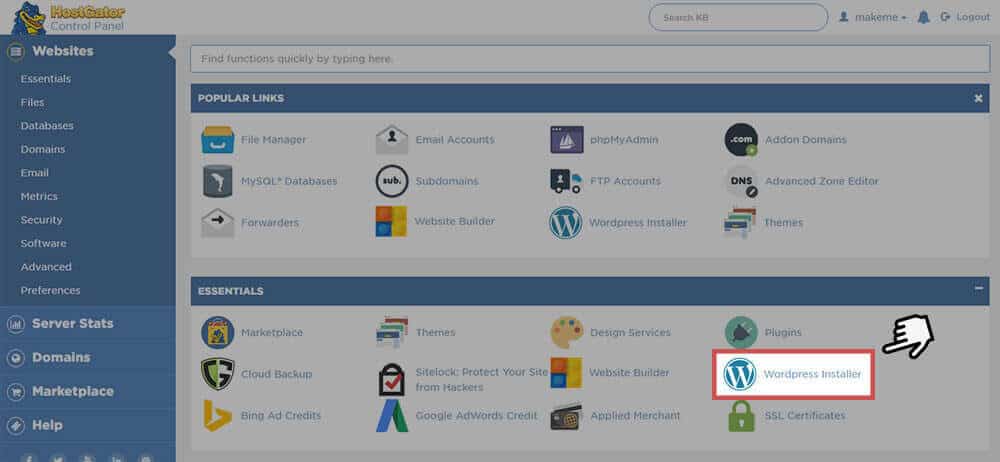
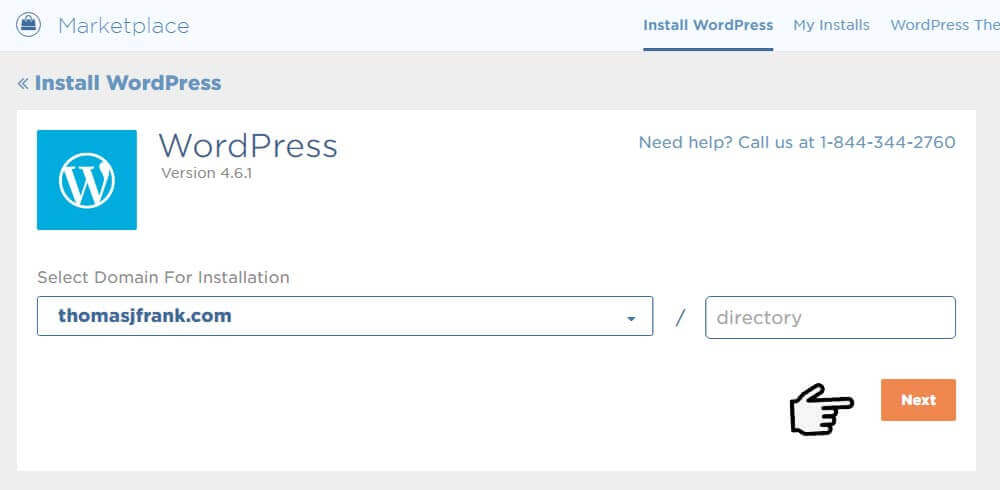
Choose your domain from the drop-down menu on the page that appears. Leave the “directory” box blank and click “Next” to continue:
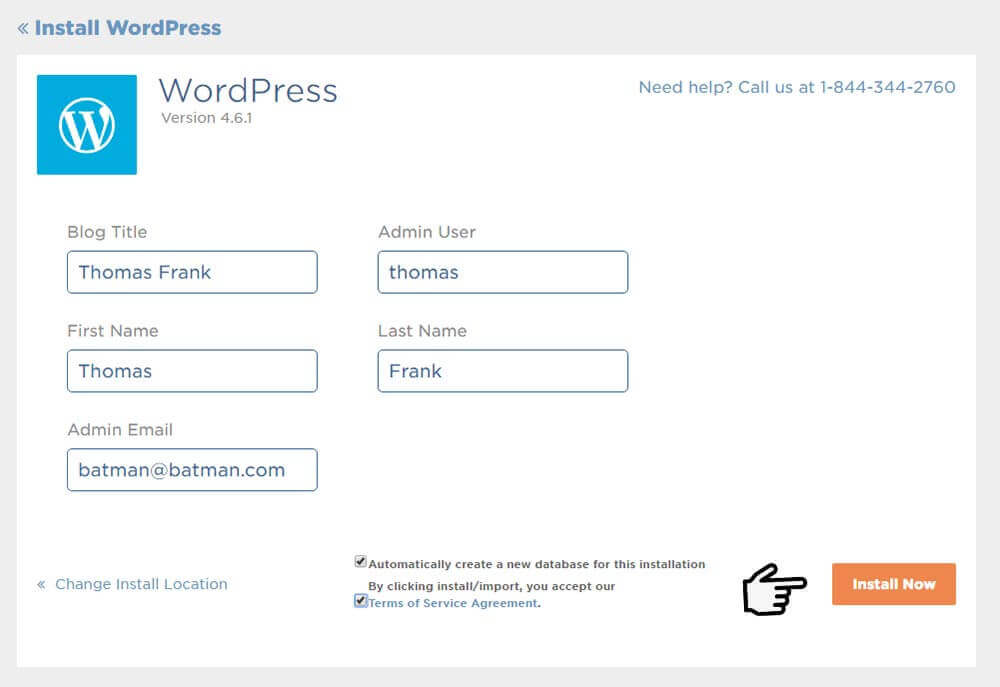
Then, fill in the form on the next page like so:
- Choose a Blog Title. This should be the blog name you chose earlier in the guide.
- Choose an Admin Username. Don’t use “admin”, as it’s unsecure (since it’s commonly used). Anything else is fine.
- Enter your first and last name.
- Enter an Admin Email. Make sure it’s one you can log into.
- Check both of the boxes beneath the text fields.
- Click Install Now.
Assuming everything worked correctly, you should see a large green checkmark and the words “Installation Complete.” Next to that, you’ll see a section called “Installation Details”:

This contains your WordPress username and a randomly generated password. Make note of these for future reference, as you’ll need them to log into your site.
Below this section, you’ll see offers for premium (i.e., paid) WordPress themes. You can skip these; later in this guide, we’ll show you some excellent free themes you can use to get started.
Log Into Your WordPress Dashboard
You should now have a fully functioning WordPress installation! If you visit your site right now, you’ll see a “Website Coming Soon” page – which will go away and be replaced by your new website once you log into the WordPress Dashboard and launch it.
To access your Dashboard, type yourdomain.com/wp-admin into your browser (but replace “yourdomain.com” with your actual domain name). This is the link you’ll need to customize your blog, so you might want to bookmark it.
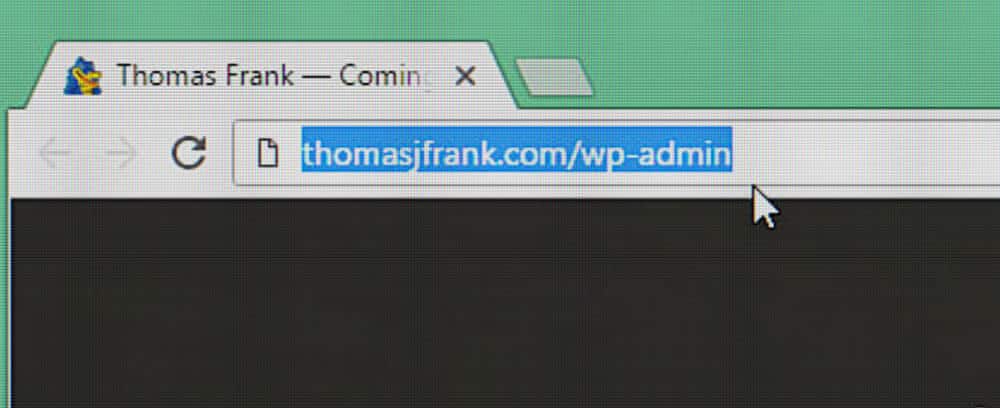
To log in, enter the username and password that you received when you installed WordPress (note that this is different from your cPanel log-in information).
Note: It can sometimes take up to an hour for the web host to set up your account. While you’ll be able to access your cPanel right away, your domain might not be accessible for an hour or so. You can read more about this here.
3. Configure Your WordPress Settings
Once you log into WordPress, you should see a screen like the one below:
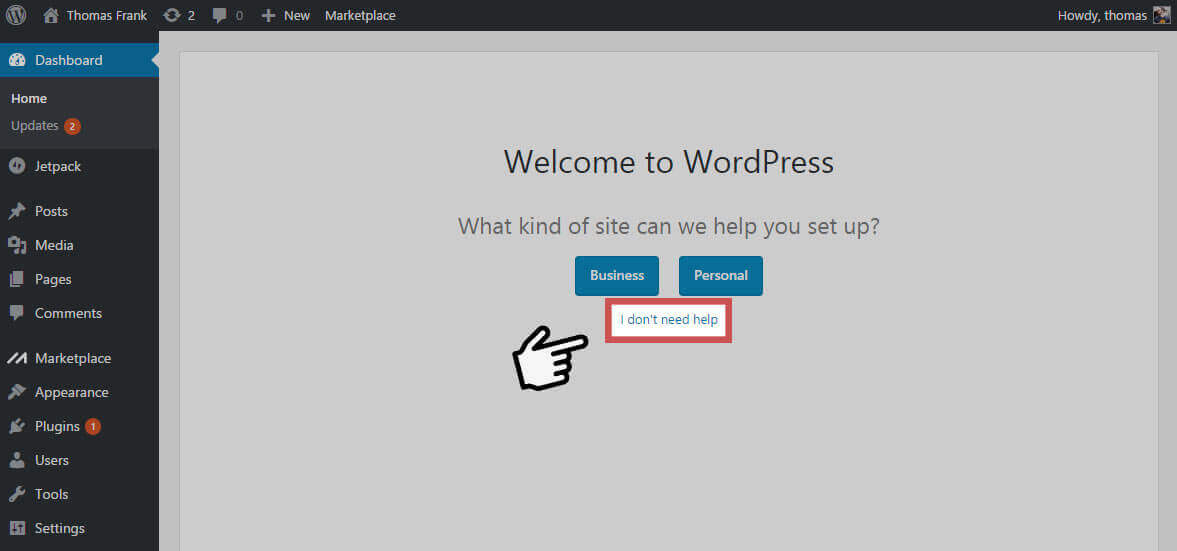
Click “I don’t need help” underneath the Business and Personal buttons, as we’ll be walking you through the process of setting everything up.
Delete Unnecessary Plugins
Now, we can start setting up WordPress, including removing a lot of the default plugins that it comes with. While these plugins are fine, some of them are unnecessary and others are inferior to the options we’ll recommend later in this guide.
So let’s delete them!
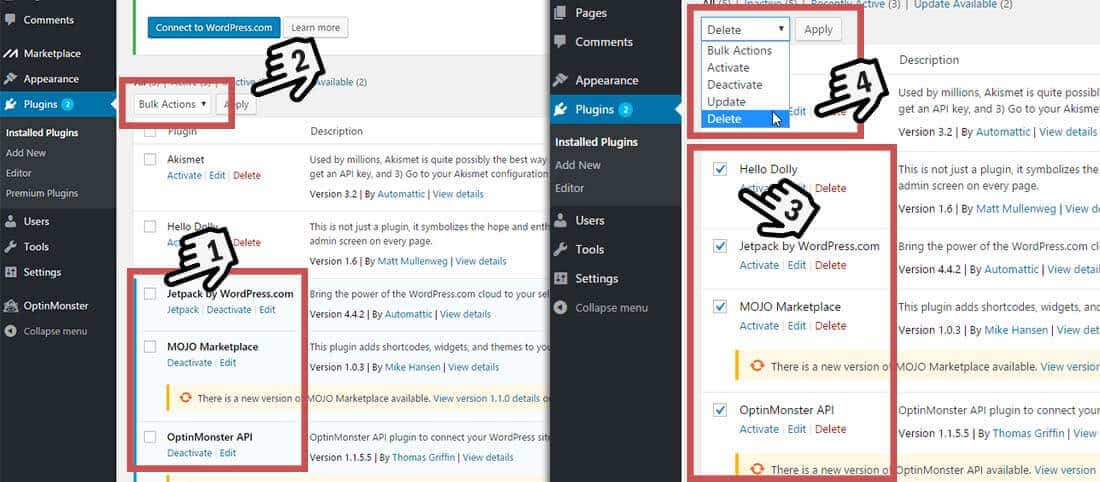
- On the left side of the Dashboard click Plugins.
- Check the box next to Jetpack by WordPress.com, MOJO Marketplace, and OptinMonster API.
- Click the drop-down menu labeled “Bulk Actions” and select Deactivate. Hit Apply.
- Now, check the box next to all the plugins – except Akismet.
- Click the Bulk Actions drop-down once again and select Delete. Hit Apply.
So why aren’t we deleting Akismet? Akismet is a plugin that prevents spam comments on your blog. Trust me, you’re going to want this installed or you’ll spend a lot of time deleting irrelevant comments on your future blog posts.
Activate SSL
Our next step is to activate the free SSL certificate that comes with HostGator.
When you do this, it ensures visitors to your site end up at the secure “https://yourdomain.com” instead of the unsecure “http://yourdomain.com”.
That extra “s” at the beginning may seem like a trivial difference, but it makes your site appear more trustworthy and safe to visitors. When you have SSL installed, visitors will see a “Secure” or “Lock” icon next to your site name in the browser:
Without SSL, visitors may see a message that says “Not Secure” (or another concerning phrase).
If you want to get into the technical details of why HTTPS matters, check out this article from Google.
Luckily, HostGator includes an SSL certificate for free, and it’s easy to install. In the Plugins area of your WordPress Dashboard, complete the following steps:
- Click Add New.
- Search for Really Simple SSL. This is a plugin that will automatically enable SSL on your site.
- Install the plugin, activate it, and then click the button that comes up afterwards in order to fully activate SSL.
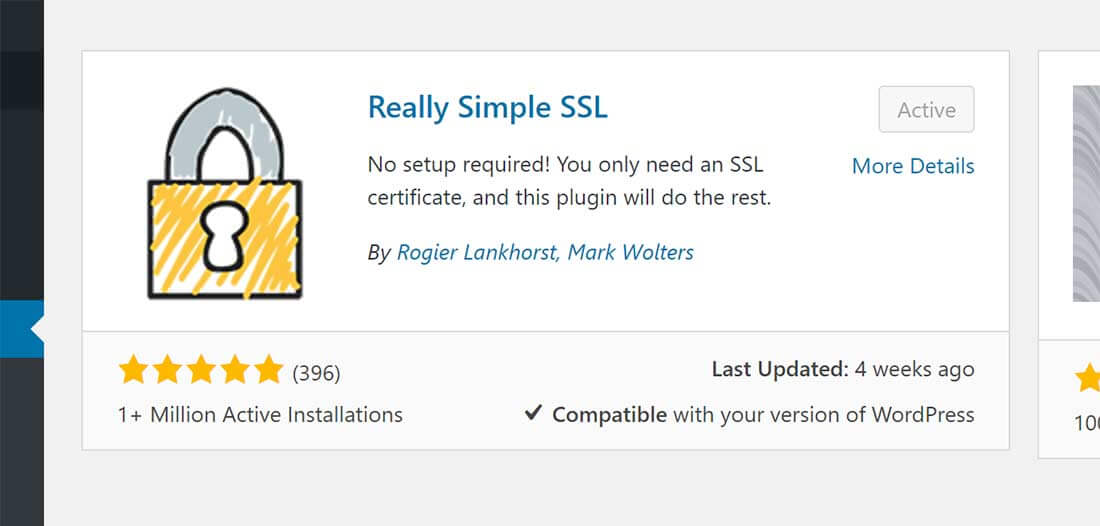
Note: If you’ve already added content to your site, then the process for adding SSL to your site may be a bit more complicated. This article has instructions for dealing with any issues that might come up.
Also, note that it can take up to 24 hours for the free SSL certificate to activate on your account after you purchase hosting. So if Really Simple SSL isn’t working, wait 24 hours and then try to activate it again.
A Quick Tour of WordPress
Here’s what you should see when you log into your site:
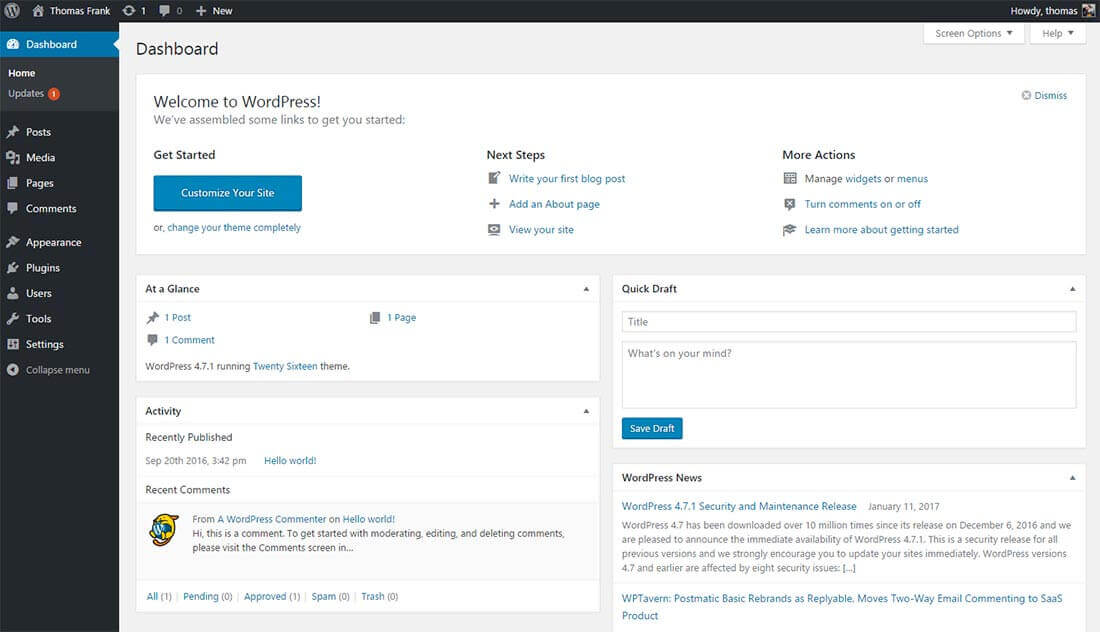
WordPress can look a bit overwhelming at first, but it’s designed to be easy to use. To help you get your bearings, here’s an overview of all the links you’ll see in the sidebar of WordPress:
- Dashboard – The “home base” of WordPress. This is what you see when you log in, and it contains whatever widgets you’ve chosen to show on it.
- Posts – The heart and soul of WordPress. This is where you’ll go when you want to write a blog post or edit an existing one.
- Media – A central repository for any pictures, sound files, video, and other pieces of media that you upload to your site. Here you can browse through and edit media you’ve uploaded to your posts and upload even more.
- Pages – Here you can create Pages, which is what you’ll be using for the main content on your site. Pages are different from Posts because they will show up in your site’s main navigation instead of going on your list of blog posts. This makes Pages good for essential components of your blog such as your Contact and About page.
- Comments – Here you can see the comments on your blog.
- Appearance – This is where you’ll customize the look and feel of your site. There are options for your site’s theme, menus, and the widgets you want to display. There’s also a rudimentary code editor, but it’s not very good. If you’re getting to the point where you want to manually edit your site’s theme, I recommend CodeAnywhere.
- Plugins – This is where you can add and manage your plugins, which are like small apps that can give your site new functionality. There are a number of great plugins you should be using, but we’ll get to those a little later.
- Users – Here you can manage the user profiles on your site. To start, the only one that should be here is your own (though you can add more users later if you decide to have other people contribute to your blog).
- Tools – By default, the only things here are the Import/Export options, the Press This bookmarklet, and a Categories/Tags converter. Right now, you won’t need any of these.
- Settings – This section houses all the general settings for your site. There’s a lot of stuff here.
I hope this helps you understand how to navigate around your site. If you’re ever unsure about what something does, it’s just a quick Google search away.
Change Your Permalink Structure
When you create a new WordPress page, the URL will reflect the page title. For instance, a page called “About” would be available at “yourdomain.com/about”. This is what we want, as it makes URLs memorable and easy to read.
By default, however, WordPress doesn’t do this with the names of your blog posts. Instead, it creates ugly, difficult to read URLs like “yourdomain.com/?p=321”. Let’s change this so that your URLs will contain the name of your blog posts:
- Hover over Settings and click Permalinks.
- Choose the option Post name.
- Save your changes.
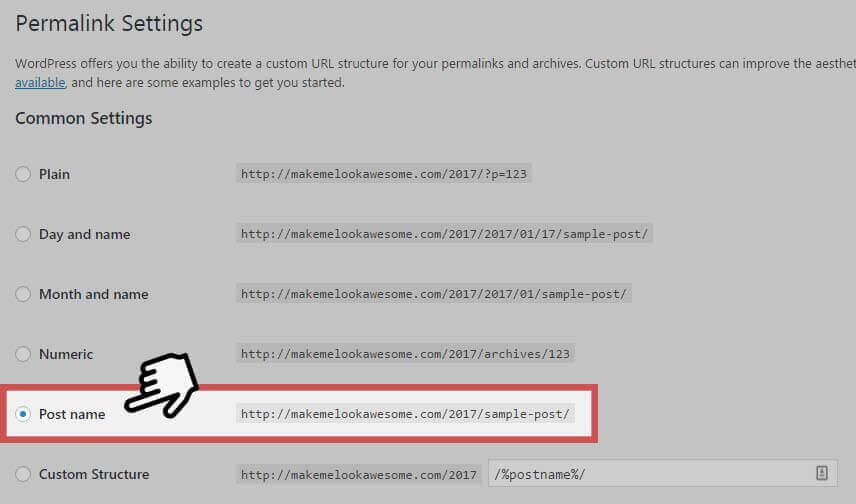
Now, you’ll have much more memorable blog post names.
4. Install Recommended Plugins
Earlier on in this tutorial, I recommended you delete most of the plugins that WordPress comes with by default.
However, there are also a few plugins that I think you should add:
- Ninja Forms – A simple, easy-to-use contact form plugin. Check out the documentation for instructions on how to get everything set up.
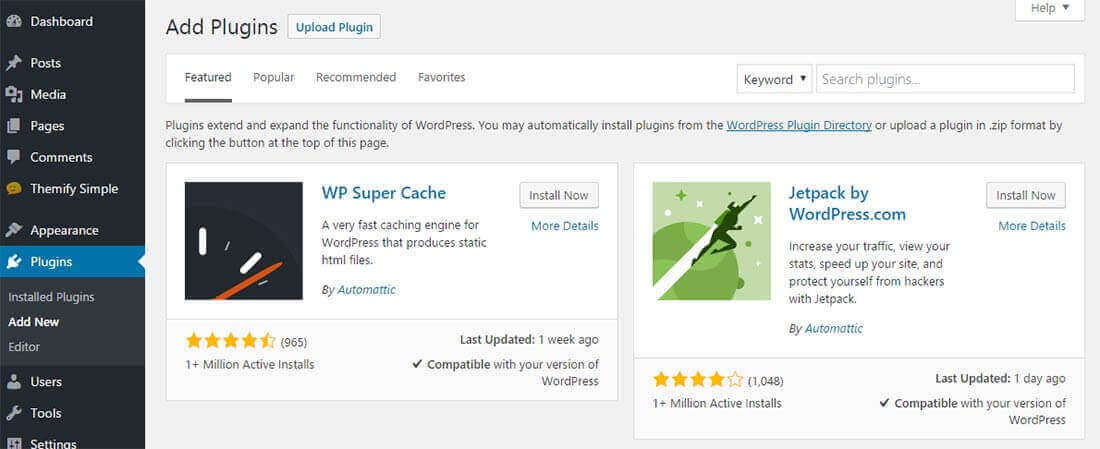
- WP Super Cache – Simply put, this plugin will make your site load a lot faster for your visitors. By default, WordPress pulls information from its database each time a visitor loads a page. This plugin will “cache” a lot of that information, making it load more quickly.
- UpdraftPlus – Probably the best free site backup plugin I’ve seen. Lets you manually back up your database or your entire site. You can also set regular, scheduled backups (which I recommend), and send them off to remote destinations like Dropbox, Amazon S3, email, etc.
- Yoast SEO – A handy plugin for increasing the chances that your blog posts will show up in Google. One of the best features is the ability to change a blog post or page’s meta description (which is the brief description you see under a web page when it shows up in Google results). The free version is plenty to get started.
To install a new plugin, follow these steps:
- On the WordPress Dashboard, hover over Plugins and click Add New.
- Search for the plugin you want. The search function isn’t amazing, so you’ll usually get the best results by typing in the exact name of the plugin you’re searching for.
- Click Details to read about the plugin or Install Now to install it.
- After you install, click Activate.
- If there’s any setup required for the plugin, take care of it.
5. Choose and Install a Theme
Now that we have everything set up in WordPress, the next step is to make your blog look more interesting than the default WordPress appearance. We’ll do this using a WordPress theme.
You can think of a theme as a “skin” that goes on top of the content you write. Themes change your site’s appearance without altering the words you’ve written. Plus, you don’t need to know CSS or any other programming languages to use them.
How to Choose a WordPress Theme
There are thousands of WordPress themes out there, which can make choosing one overwhelming.
To make things easier, here are some guidelines for choosing a theme that will work well for your blog:
- Start with a free theme – While it can be worth it to pay for a WordPress theme, there are plenty of excellent, free WordPress themes you can use when starting your blog. Once your blog is making money, you can decide if it’s worth investing in a paid theme.
- Keep it simple – There are all kinds of fancy themes available, but it’s better to choose a simple, clean design that showcases your content. Not only does this create a better user experience, but it also makes your site faster.
- Download from a trusted source – WordPress is a big target for hackers, so you want to make sure that your WordPress theme comes from a secure, trusted source. Stick to themes available on WordPress.org or recognized third-party marketplaces such as Themify.
While these guidelines are good to know, that still leaves a lot of themes to sift through. So if you just want something to get started, here are a few themes I recommend for beginning bloggers:

This is the theme I used to build my personal website, and it would also work great for a blog. It’s very versatile, letting you drag and drop items to create the design you want. And as the name implies, it focuses on a simple, minimal design.
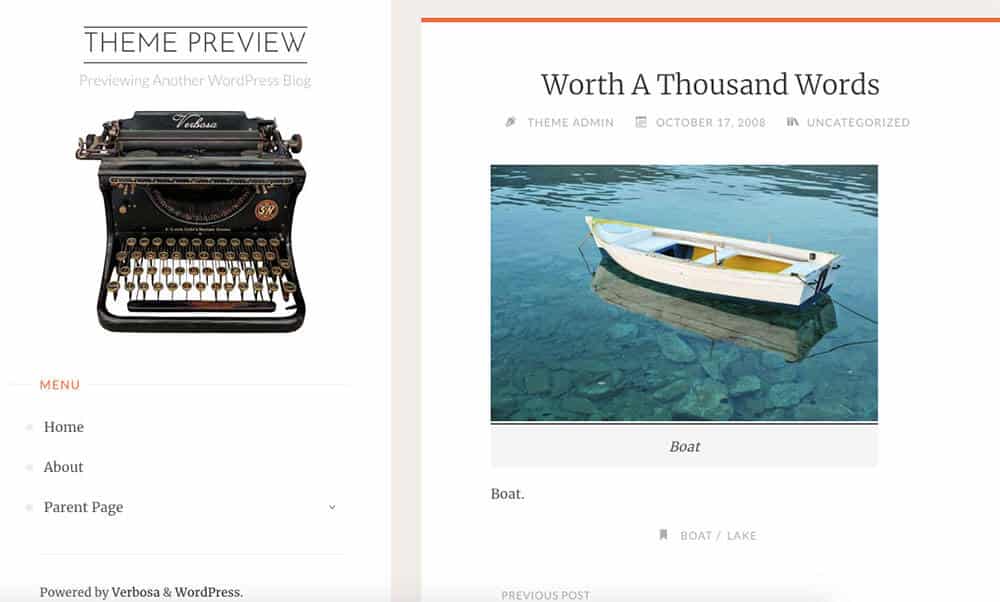
Verbosa is another excellent theme for building a blog. It doesn’t give you as much control over the structure of your site as Simple, but it is a bit easier to learn. I also love the theme’s emphasis on typography, something that’s key for a blog-focused website.
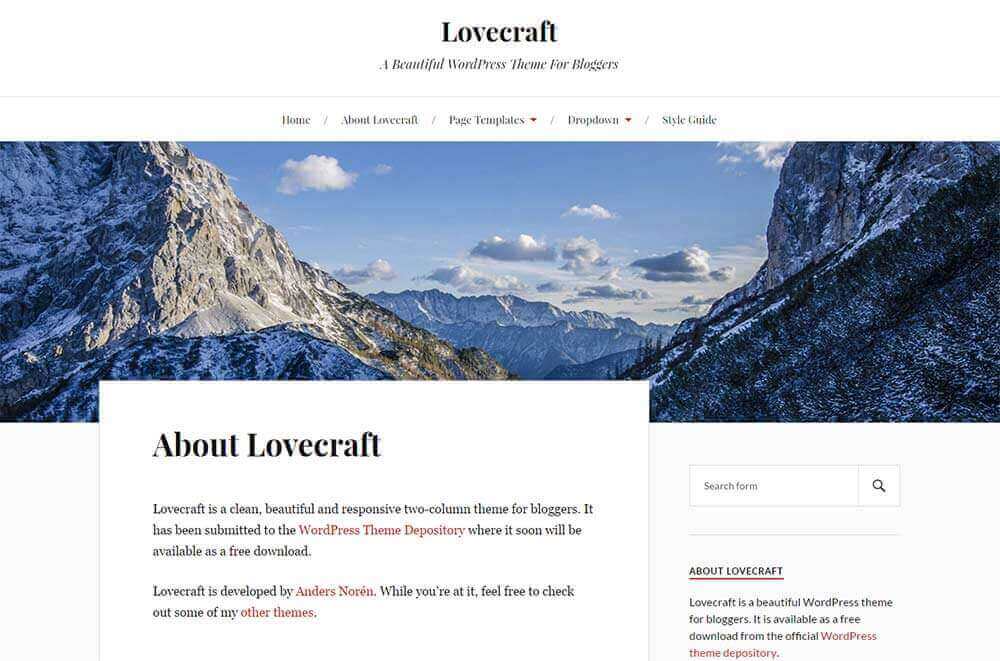
Lovecraft describes itself as “a beautiful WordPress theme for bloggers,” and I have to agree. The theme’s design is clean and modern, putting the focus on your words while still doing a great job of displaying images and other media.
How to Install a WordPress Theme
Once you’ve chosen a WordPress theme, you’ll need to install it.
Follow these steps to install a WordPress theme:
- Download the theme. Usually, it will be a .zip file.
- In the WordPress Dashboard, hover over Appearance and click Themes.
- Click the button at the top that says Add New.
- Click the button that says Upload Theme.
- Click the Choose File button and select your theme’s .zip file.
- Click Install Now.
- Choose your theme from the list and click Activate.
Note: The steps for this can vary a bit depending on the theme you choose; check the theme’s documentation if you have any doubts.
To see the entire process above in action, check out this video of me installing and setting up the Simple theme:
6. Set Up Your Pages
By now, I’m sure you’re ready to publish your first post. Before you do that, however, you need to learn how to use the WordPress Editor. And one of the best ways to do this is to create a few key pages for your site.
While you can of course create however many pages you want, I recommend creating the following:
- About – This page should explain the story behind your blog, as well as who you are.
- Contact – This page should include a way for readers to contact you with questions and suggestions. Please don’t put your personal email address or phone number here; use a plugin like Ninja Forms instead.
Once your blog has grown, it can also be helpful to have a “Start Here” page that shows new readers which posts they should read first. When you’re starting out, however, this isn’t necessary.
How to Use the WordPress Editor
Let’s learn how to use the WordPress Editor by creating your blog’s About page.
First, log into your site, hover over the Pages tab, and click Add New in the menu that appears:
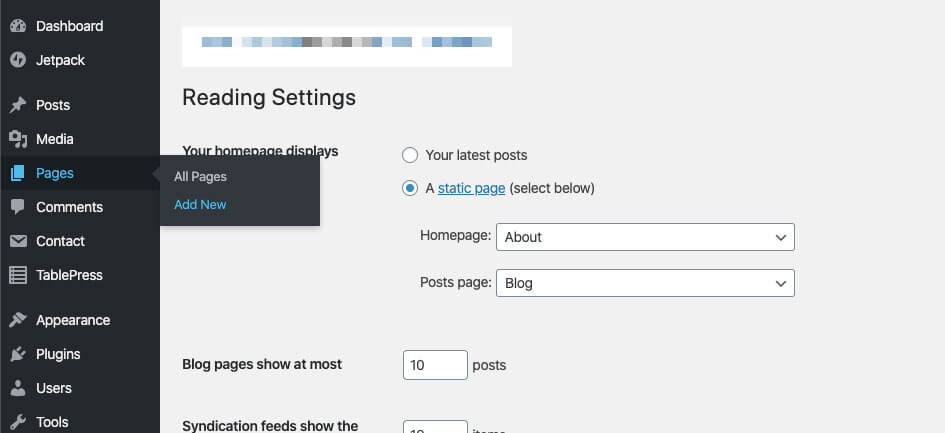
You should now see a screen that looks something like this:

The first step is to add a Title. Type “About” into the box that says Add Title.

To start writing your About page, click in the box that says “Start writing or type / to choose a block.” You can now type a description of your site, information about you, or whatever else you want to tell readers.
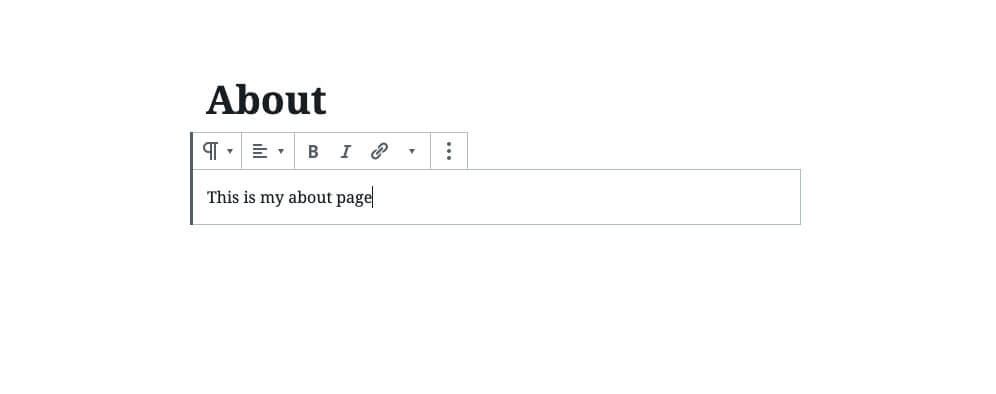
Once you’ve added some text, a menu will appear with formatting options. These are basically the same as in a word processor like Microsoft Word or Google Docs.
You can hover over each menu item to learn what it does, but here are the most important options:
- Bold – Changes text to bold.
- Italic – Changes text to italic.
- Link – The little chain icon lets you add a link to selected text. For instance, this is a link to our personal website guide.
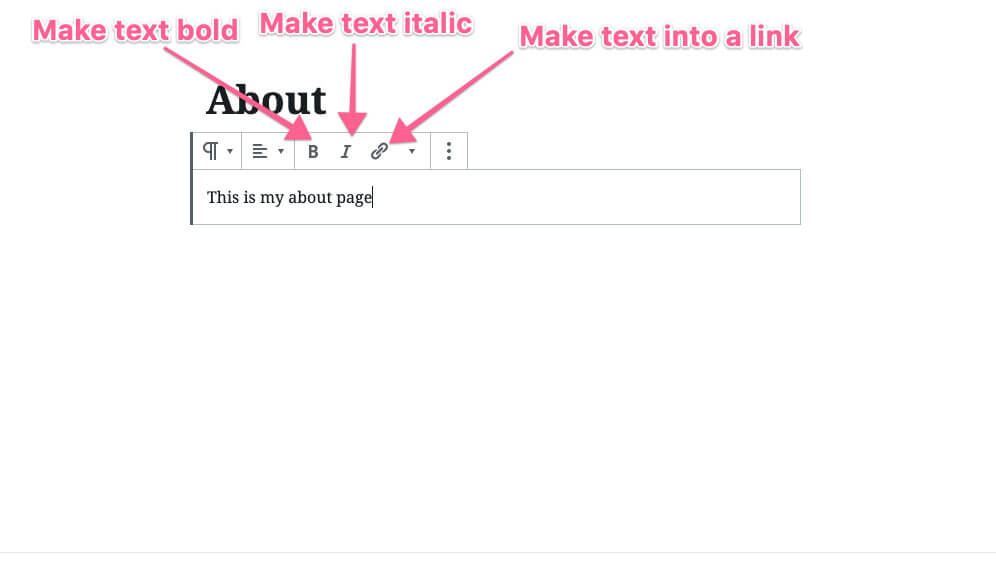
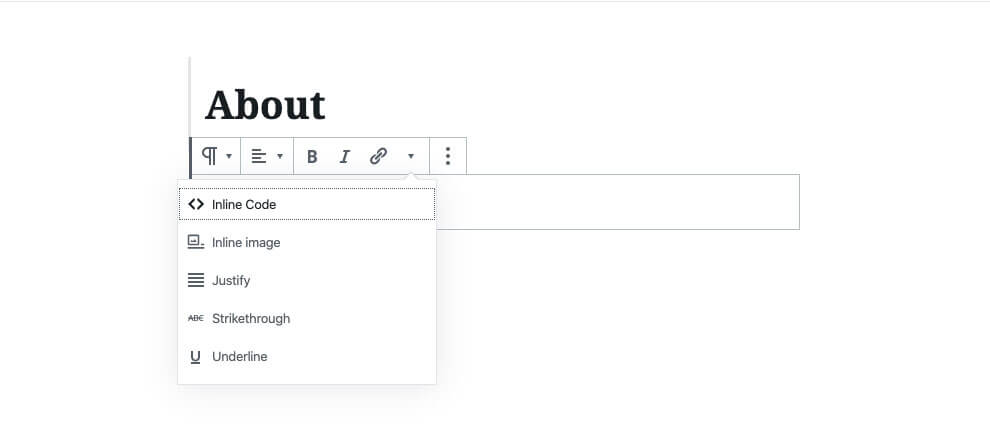
For more text formatting options, click the arrow next to the Link icon. You won’t need most of these formatting options on a regular basis, but they’re good to know about.
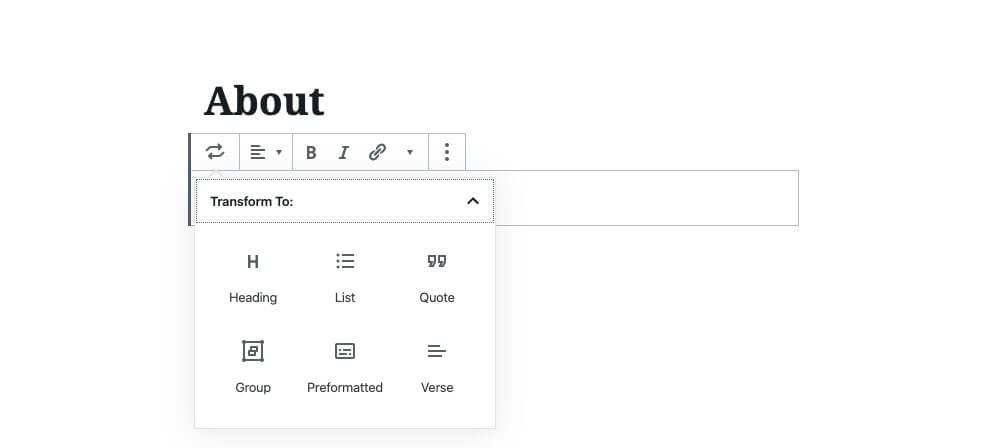
Finally, you can click on the paragraph icon to change the “block type or style” of a section. This is where you can add things like lists, headings, and block quotes:
Note: The full range of things you can do with the WordPress Editor is beyond the scope of this post; check out this guide from WPBeginner for more detailed instructions.
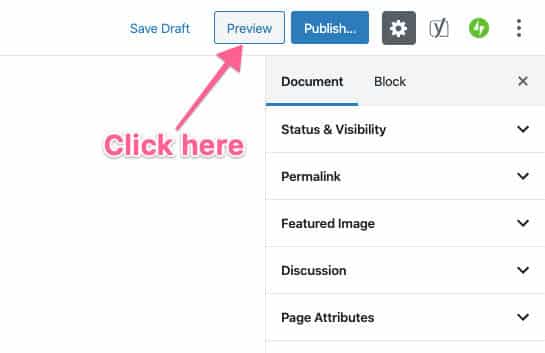
Once you’ve written some content, click “Preview” to see how it will look using your theme:
If you’re happy with the result, click “Publish” to make the page visible on your site:

Congrats! You just published your first page.
7. Write and Publish Your First Post(s)
If your goal is to create a successful blog, you’ll spend most of your time writing and publishing blog posts. Luckily, the steps for publishing a WordPress post are basically the same as for publishing a page. The only difference is that to create a blog post, you go to Posts -> Add New.
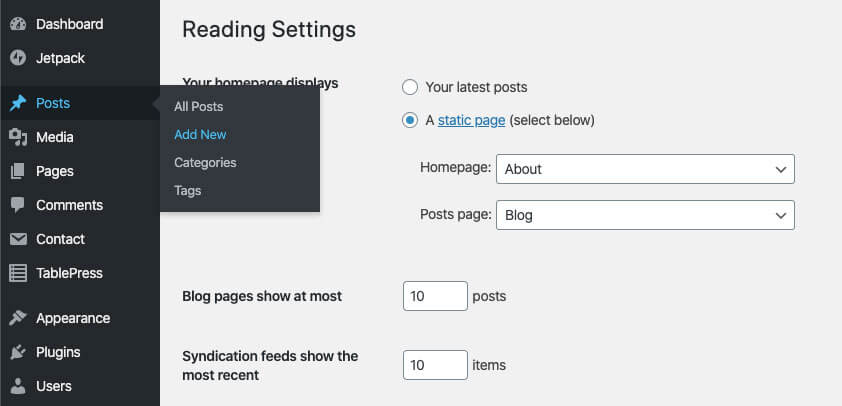
In addition to this difference, there are a couple extra steps I recommend to make sure your posts look great and work well on your site.
Add a Featured Image
First, I recommend adding a Featured Image to each post you publish. Most themes display this at the top of your post, and it’s also the image that will show up when people share your post on social media or in messaging apps:
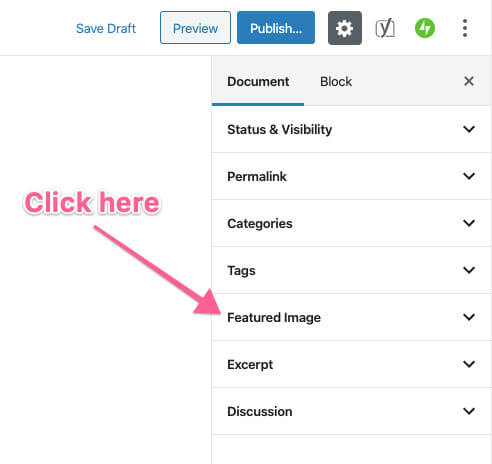
To add a Featured Image, go to the Document tab in the WordPress editor. Then, click the tab that says “Featured Image.”
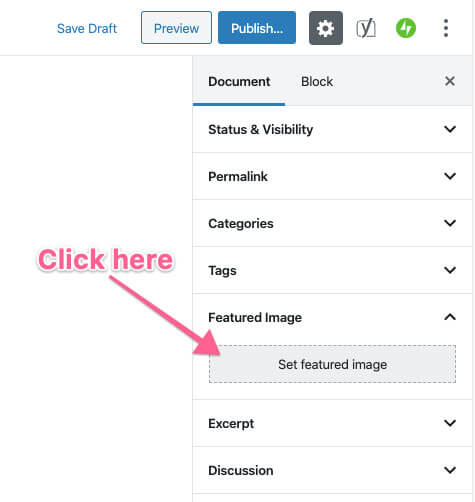
Next, click the button that says “Set featured image.”
You should now see a window with two tabs: “Media Library” and “Upload Files.”
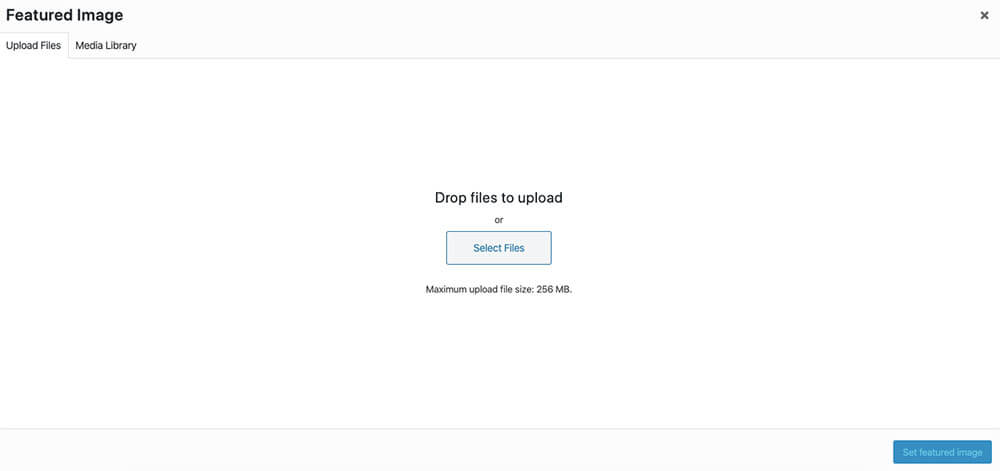
If this is a new blog, your Media Library will likely be empty, meaning you’ll need to upload a new image. To do this, click the “Upload Files” tab (which should be selected by default). Then, either drag an image file into the window or click “Select Files” to choose a file from your computer.
You can use a variety of image formats, but I recommend sticking to .jpg files that aren’t too large (try to keep them under 100 KB). Otherwise, your blog post could take too long to load, causing visitors to click away from it before they’ve even read your words.
To make sure your images aren’t too large, you can either compress them using image editing software or install a plugin that compresses images automatically. We use both techniques at College Info Geek just to be safe.
Here are links to instructions for each technique:
- How to Use the Photoshop Save for Web Tool – This is the workflow we use to optimize images in Photoshop.
- Smush Image Compression and Optimization – This plugin will automatically compress and optimize images that you upload to WordPress.
Add a Category
As your blog grows, it can become difficult for you to keep track of everything you’ve published. To make things easier, I recommend dividing your posts into Categories.
Categories keep your posts organized by general topic. You can create as many categories as you want, but I recommend having no more than 5.
Think of categories as the sub-topics of your blog. For instance, if you have a blog about creating pixel art, you could have categories such as “Tutorial,” “Drawing,” and “Challenge.”
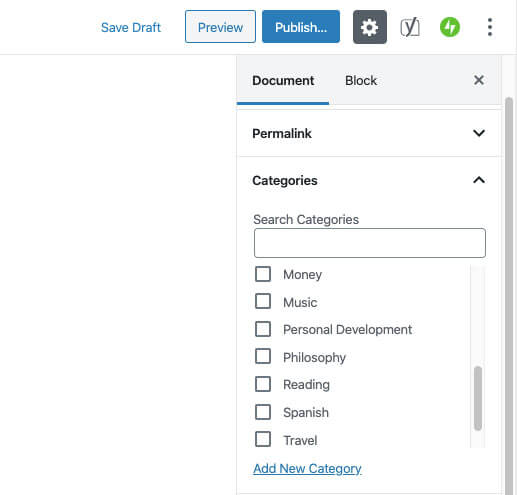
To add a category to a post, click the Categories dropdown under the post’s Document tab. You can choose from existing categories or click Add New Category to create a new category name.
Now, the Real Work Begins
If you made it this far, congratulations! You now know all of the basic information you need to build a website and publish blog posts on it.
However, all of this has honestly been the easy part. The challenge comes from creating a blog that people will read, which means lots of time experimenting and creating content in obscurity.
In the rest of this guide, I’ll share some more advanced blogging advice, including how to create high-quality content and how to start making money from your blog.
How to Create the Best Blog Content: 9 Tips
The difficult part of blogging is creating content that’s better than anything else out there. This can feel like an impossible task when you’re getting started, and it’s still a challenge for us even after nearly 10 years in business.
However, there are some things you can do to make sure your blog content rises in search engine rankings, gets traffic, and ultimately provides a platform for you to make money. Here are 9 tips for creating the best blog posts out there:
1. Your Blog Posts Should Answer a Question
In our experience, the best blog posts start as an answer to a question that a decent number of people have. This could be a big question like “What should I do with my life?” or a small one like “How do I cook pasta?
No matter the question, however, the best blog posts answer people’s questions in a concise, helpful way. If you can create enough posts that do that, people will begin to trust your blog and view it as a definitive resource for a topic.
Note: Not all blogs have to answer questions; there are plenty of blogs that serve as entertainment. However, we’re going to stick to discussing “informational” blogs, as that’s what we have experience with.
2. Make Your Posts As Long as They Need to Be
A lot of new bloggers ask, “How long should my blog posts be?”
Your post should be as long as it needs to be to answer someone’s question.
Many bloggers make the mistake of writing too much, assuming that longer is better. But if you can answer a question in 500 words, then you can stop there. For instance, a blog post on a topic like “How to tie a square knot” doesn’t need to be thousands of words long.
On the other hand, don’t make the mistake of writing blog posts that are too short or superficial. If you’re covering a big topic like “How to play guitar,” then you’ll probably need to write a few thousand words (or even multiple posts).
3. Edit Your Work
This should go without saying, but your blog posts should be free of typos, spelling mistakes, and grammatical errors.
Sure, no one’s perfect, and most readers won’t notice the occasional typo or that comma you forgot to add.
All other things being equal, however, an article that’s free of grammar and spelling errors will perform better than one that’s full of mistakes. If your articles have such basic issues, then why should your readers trust that you know what you’re talking about?
If grammar isn’t your strong suit, no worries. You don’t have to write like an English professor; feel free to use contractions and a conversational, casual tone.
However, I do recommend running your blog posts through the free Grammarly extension. This tool will catch most grammar and spelling errors, as well as show you how to fix them.
4. Format Blog Posts the Right Way
It’s easy to overlook formatting when you’re creating a blog post, but it’s one of the most important things for making sure your content is successful.
Remember: over half of web traffic now comes from mobile devices. Because of this, you should format your posts so that they’re easy to read on a small screen.
This means you should:
- Keep sentences short.
- Use lots of paragraph breaks.
- Break up content with subheadings and lists.
5. Don’t Overuse Images
When I was learning to blog, it was common practice to use lots of images to “break up the content.” While this sounds like a good idea, it’s not something I recommend these days.
The more images a post has, the longer it will take to load. Plus, unnecessary images mean more things people have to scroll past when reading on a mobile device.
Only use images in a post if you need them to illustrate a point (like with a screenshot).
6. Treat Your Blog Like Wikipedia, Not a Newspaper
While you can create a site that focuses on the latest trends and news, I don’t recommend it. For one, it requires you to constantly update the site. Plus, social media is often a better tool for conveying rapidly changing information.
Instead, I recommend you think of your blog like a miniature Wikipedia. Each post on your site should relate (and link to) other posts, creating a web of information that will remain relevant for years to come.
Of course, you’ll still need to update information from time to time, but it will be much easier to maintain than a site composed of hundreds of news posts.
HT to Nat Eliason for introducing me to this concept. Check out his article on “The Wiki Strategy” for more.
7. Learn the Basics of SEO
If you read enough blogging tutorials, you’ll inevitably come across the acronym “SEO.” SEO stands for “Search Engine Optimization,” which is basically the process of getting your website to show up in Google.
Technically, it includes all search engines, but Google is so dominant in the space that you don’t need to worry about other sites (such as Bing).
SEO is a field full of b.s. You’ll find a lot of advice that either a) doesn’t work or b) makes your website worse.
The only SEO advice you really need is this: write the best content on the topic. Google wants to show people the best information out there, and every improvement they make to their search engine serves that goal.
Having said that, there are still a few technical tweaks and best practices that will make it easier for Google to display your articles to searchers. So it’s worth learning a bit about SEO.
To learn the basics of SEO, I recommend these resources:
- The Beginner’s Guide to SEO – This free resource from Moz provides an excellent overview of how search engines work, as well as how to optimize your blog posts for them.
- Personal SEO: A Guide to Actually Showing Up in Google Searches – A guide we created to help you improve your personal website’s SEO.
- SEO for Bloggers – This in-depth video course takes you behind the scenes of the SEO workflow that our friend Matt Giovanisci uses to create his high-traffic websites. It’s one of the few paid resources we recommend in this guide, and it’s absolutely worth it if you’re serious about growing your blog.
8. Link to High-Quality Sources
How is a reader supposed to know if they can trust you? Of course, you can talk about your experience with what you’re writing about, but that isn’t always enough. Inevitably, you’re going to write about a topic where you don’t know everything and need to consult expert resources.
A trustworthy, quality blog is very transparent about the sources that go into an article. Not only does this boost your credibility, but it also provides readers with links to further information if they want to know more about a topic. Plus, citing your sources avoids plagiarism, which can be a serious legal matter.
Since you’re writing a blog and not a dissertation, you don’t need to use a specific format to cite your sources. Just make it clear to the reader where you got information, and then provide a link to it.
9. It’s Not About You
When writing any kind of blog, it’s easy to spend too much time talking about yourself. However, the reader doesn’t care about you. This may sound harsh, but it’s true. The reader only cares about you and your experiences to the degree that it will help solve their problems.
So whenever you’re writing a blog post, always ask yourself, “How does this help the reader? How does this answer their questions and serve their needs?”
How to Make Money Blogging
A blog is not a business. At least, not by itself. However, a blog is a great tool for building an audience of people that you can sell things to, which is the basis of any business.
So how can you make money blogging? There are 4 main ways:
- Products – This could be a physical product like a t-shirt or a digital product like an online course.
- Services – Common examples include web design, freelance writing, or illustration, though you could also sell consulting services.
- Affiliate Marketing – Instead of selling your own product or service, you recommend someone else’s. When a site visitor clicks the link to that product and makes a purchase, you earn a commission.
- Advertising – Usually, this means putting annoying ads on your website, though it could also take the form of a sponsored post.
All of the above business models are valid, and all can make you money. However, our favorites are products and affiliate marketing. We like these techniques because they’re easy to scale and help us create great experiences for our readers.
If you want to sell services, go for it! Just be aware that it can be difficult to scale your services without hiring people or spreading yourself thin.
And please don’t create a blog funded by ads. Not only do they create a terrible experience for your site visitors, but you also need a huge volume of traffic to make decent money from them.
To show you how these business models work in the real world, we’re going to take a look at how two websites use our favorite techniques to make money. We’ll start with the “product” business model:
How to Make Money Selling a Product: A Case Study
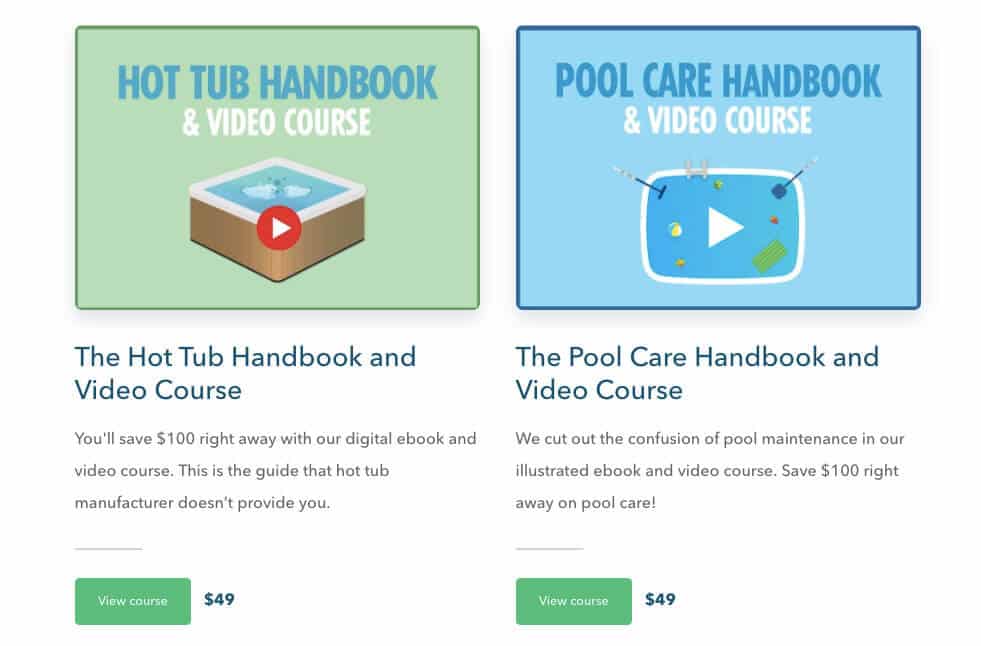
Matt Giovanisci is the founder of Swim University, a website that teaches people how to take care of their pools and hot tubs. After many years of creating the best pool and hot tub content on the web, Swim University now receives around 500,000 unique visitors a month.
But how does Matt make money from all that traffic? Aside from affiliate marketing, Matt also sells two products on Swim University:
- The Hot Tub Handbook and Video Course
- The Pool Care Handbook and Video Course
Matt’s products are a great case study because they tie so neatly into the topic of his site. If someone visits Swim University, they either own a pool or hot tub. Both of these require a lot of work to care for, and it can be a confusing process.
Matt’s courses take the confusion out of this with a mix of video tutorials and guides.
It’s also important to know that Matt didn’t create these products in a vacuum. He waited until he had an audience, noted what they were struggling with, and then created courses to help them.
If you decide to use products to monetize your blog, be sure to create something your audience actually wants. Don’t just guess; ask them.
Finally, note how Matt priced his products. Through experimentation, he figured out that $49 was a price his audience was willing to pay…especially with the compelling promise that each course will help the buyer “save $100 right away.”
If someone owns a pool or hot tub, they likely have a lot of disposable income, meaning that $49 isn’t a big ask. But this isn’t true of every audience; some will be more price-sensitive than others, which will affect how much you can charge for a product.
How to Make Money with Affiliate Marketing: A Case Study
Selling a product is an excellent business model, particularly if you can find an audience that’s willing to pay. In other cases, however, affiliate marketing may be a better business model.
The College Info Geek blog makes most of its money from affiliate marketing. Some of this comes from recommending products on Amazon (through the Amazon Associates program), as well as affiliate links to HostGator.
We also make a fair amount of money through our affiliate links to Skillshare, an online learning platform for creators, as well as a bunch of smaller affiliates.
So what can you learn from all of this?
First, you should only be an affiliate for products that you actually use and trust.
We don’t recommend something unless we’ve tried it out first and determined that it’s high-quality. This respects the trust our audience has in us.
Along with that, we only recommend products that fit our audience and brand.
We get emails all the time from companies who want to work with us, but we turn most of them down. Usually, this isn’t because the company’s product is bad; it just isn’t a good fit for our audience.
For instance, because our audience is primarily college students, we’re not going to promote a brand of dog food. On the other hand, a website that helps students save money on textbooks makes a lot of sense.
The final thing we’ve learned about affiliate marketing is this: promote products with a decent commission. Sure, it’s possible to make millions a year with just Amazon affiliate links, but the commissions are so low (around 4% on average) that you need an insane traffic volume.
In contrast, affiliates such as HostGator, Betterment, and Skillshare all pay a much higher commission.
Of course, you shouldn’t promote a product just because it has a high commission; your affiliates still need to be high-quality and relevant to your audience.
Affiliate marketing is such a vast topic that we can’t cover all the nuances of it here. If you want to learn more, check out this in-depth video course on affiliate marketing.
Start a Blog That Matters
Creating a successful blog takes time, and it’s a continual learning experience. Even after almost 10 years of doing it, we’re still learning new things every day.
I hope this guide has shown you that it is possible to start a blog and make money from it. It requires a lot of research, hard work, and, most of all, patience. But if you’re willing to put in the work, it can be immensely rewarding.
Image Credits: person using MacBook


