

I used to be a terribly disorganized person.
Even as late as high school, my backpack was a mess of crumpled papers, broken pens, and cracker crumbs. It didn’t hurt my academic performance, but it certainly hurt my sanity.
When I got to college, however, I had the good fortune of discovering this website. This led me to become more serious about organization, particularly when it came to my calendar and digital materials. I’m still no Marie Kondo, but these days I would consider myself “more organized than average.”
In this guide, I’m going to take you through the entire process of getting yourself organized in college. As you’ll see, getting organized is the easy part, so I’ll also address the thing that really matters: how to stay organized throughout the semester.
So open up your favorite calendar app, pull out your notebooks, and let’s get organized!
Why You MUST Stay Organized in College (It’s Not Why You Might Think)
“Your brain is for having ideas, not storing them.” — David Allen, Getting Things Done
I knew a lot of really smart people in college who barely got any sleep, mainlined caffeine, and seemed to exist in a constant state of low-grade panic.
You might assume this is because they were taking a heavy course load and were just overcommitted. While that was part of the problem in some cases, more often than not the reason for these people’s hectic lifestyle was that they were severely disorganized.
They were still able to perform well because they were smart, paid attention in class, and could study effectively when they needed to. But their overall quality of life was less than it could have been.
This is the number one reason to get organized: it will drastically reduce your stress levels.
And when you’re less stressed, you’ll feel better and perform better on assignments. You’ll also have more time for the things you enjoy doing, and you’ll just be a more pleasant person to be around.
Note that getting organized will not automatically improve your GPA. You still have to study the material, go to class, take good notes, do the homework assignments, and get help from a professor or tutor when necessary.
But if you’re organized, you’ll also have more time to do the above things…instead of operating in panic mode and feeling like you never have the extra time to study difficult concepts.
P.S. – This guide is really detailed and will definitely get you up and running. However, if you want to see exactly how to set up each system we’re about to cover, you might want to take our founder Thomas’ productivity masterclass:

With a proper productivity system, nothing ever slips through the cracks. In just one hour, you'll learn how to set up your to-do list, calendar, note-taking system, file management, and more — the smart way.
I'll earn a commission if you click this link and make a purchase at no additional cost to you.
How to Get Organized: 5 Key Areas of Focus
Okay, so now that you understand the value of organization, let’s take a look at the key areas that every student needs to organize. If you can get the following aspects of your life organized, then you’ll be off to a strong start for the semester.
And even if you’re reading this halfway through the semester, this advice will still apply — it just may require a bit more work to implement since you’re in the midst of your classes.
1. Your Calendar
If I had to give just one piece of productivity advice for everyone to implement, it would be “use a calendar.” It’s quite shocking to me how disorganized many professionals are, and the issue generally stems from not using (and maintaining) a calendar.
Calendars free up so much space in your head. Instead of having to remember appointments, classes, or due dates using post-it notes or scraps of paper in your wallet, you can have everything organized in a convenient, visual format. And if you use a digital calendar, you can automatically get reminders of important events before they sneak up on you.
What you use for your calendar doesn’t matter. We’re big fans of Google Calendar here at College Info Geek, but you can also use any number of other calendar apps. You can even go old-school with a paper planner, as long as you look at it regularly enough.
Once you’ve chosen a calendar, the next step is to make a big brain dump of every important event for the semester. Here are some key things to include:
- Your class times
- Important due dates from your syllabi (exams, term papers, etc.)
- Exercise times (you do have a workout schedule, right?)
- Meetings with professors/tutors
- Club/extracurricular meeting times
- Dorm/apartment move-in/move-out dates
- Your work schedule (if you have a part-time job)
- Payment due dates (credit card, rent, any other important expenses)
An Example from My Real College Calendar
Once you have a list of all this stuff, it’s time to put it on your calendar.
Here’s an example of a typical week from my calendar during my senior year of college:

As you can see, I have all my classes blocked out. Not only did this make sure that I would never forget a class, but it also ensured that I would never schedule a meeting or other event during class time.
Note: If you’re using a digital calendar, I highly recommend you set your classes to repeat. This way, you’ll never forget when a class happens. Here’s how to create recurring events in Google Calendar.
You’ll also notice I have meetings, rehearsals, time for freelance work, and plenty of blank spots. I didn’t schedule my study time, as I was pretty good about getting that work done, but you could also include study blocks for particular classes if you want.
Of course, your calendar is just part of the equation.
How do you keep track of all the things you need to do on a daily basis?
How do you keep track of homework, tasks around your living space, and other goals you want to accomplish?
For this, you need a to-do list…
2. Your To-Do List/Task Manager
While having a calendar is the bare minimum for being organized, having a to-do list will really take things to the next level.
At first, you might wonder if a to-do list is even necessary at all. After all, can’t you just put all the things you have to do on your calendar?
While this method can work, it tends to fall apart if you have more than a couple things to do each day.
Plus, mixing your calendar and to-do list ignores the fact that each tool is better for different organizational tasks:
- Your calendar is for keeping track of events. That is, things that occur at a specific day and/or time that generally require you to physically be somewhere.
- Your to-do list, on the other hand, is for keeping track of tasks. Tasks are things you need to accomplish (sometimes on a specific day), but they generally don’t require you to be in a specific place or keep an appointment of some kind.
I realize the difference between events and tasks can sometimes be murky, so here are a few examples:
- Events:
- A meeting with a professor
- A class you have to attend
- A music ensemble rehearsal
- Tasks:
- Drafting an essay to bring to a meeting with a professor
- Completing a problem set for a class
- Learning how to play a piece of music for a rehearsal
How to Set Up a To-Do List
Now that you understand the difference, how do you actually set up a to-do list?
Again, you have a variety of options, and what you choose will depend if you want to use a digital or physical system.
On the digital side, we recommend Todoist. It’s free, intuitive, and easy to set up.
If you want a physical method, the bullet journal system is a great option. You can even create a hybrid digital-physical system, as Thomas discusses in this video:
But ultimately, it doesn’t matter what system you use. You could use a whiteboard or a blank notebook if you want. What matters is that you keep an updated list of the tasks you need to accomplish, as well as, you know, actually doing said tasks.
To make your to-do list, you should first create a brain dump of everything that you need to do on a regular basis. Here are some tasks that most college students need to do:
- Homework assignments
- Cleaning your dorm/apartment
- Preparing meals
- Club tasks (particularly if you’re an officer)
- Anything you’re learning outside of class
Next, you’ll need to put all of these tasks into your to-do list system. If you’re using a digital system, you can set certain tasks to recur (think “take out the trash” or “complete calculus problems for the day”). And then, as you think of new tasks, you can add them to your system.
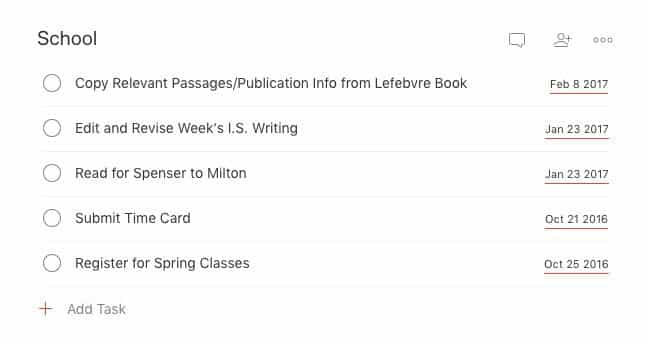
Here’s an example of what my to-do list looked like in college:
3. Your Notes
Taking good notes is key for comprehending and retaining any lectures or presentations that your professors give.
But taking notes on its own isn’t enough — to get the most value out of your notes, you need to keep them organized.
For some people, this could be as simple as having a different notebook for each class and referring back to it when you need to study for an exam.
While this can work, it’s not ideal. This is particularly true when you’re studying for a midterm or final and need to refer to weeks of notes.
To keep your notes extra organized, we recommend using a digital system such as Evernote. With Evernote, you can create a different digital “Notebook” for each class and type your notes there.
If you prefer to take notes by hand (which some studies indicate can help you better process information), then you can also digitize your notes afterwards. To make this simple, just do it after all your classes are done for the day, before you start your homework.
When you use this system, you’ll be able to review material much more easily. You can even search for key terms and Evernote will help you find them in your notes, saving you the trouble of flipping back through a physical notebook.
4. Your Class Materials and Files (Digital and Physical)
In addition to your notes, each of your classes will likely have a syllabus, handouts, and presentations that you need to keep track of. You’ll also likely have assignments that the professor (or their grader) has returned to you, which can be valuable materials to review when you’re studying for an exam.
It’s key to keep all of these materials organized. Sure, you can probably get the syllabus, handouts, and PowerPoint presentations online. But that’s one extra step you have to go through when it comes time to study. Plus, you never know when the internet or school website might be down.
To be safe, I recommend you keep all of your class materials organized either in a physical three-ring binder or in some kind of digital system.
You could put all of the material in Evernote along with your notes, or you could have dedicated Google Drive folders for each class (other cloud sync apps like Dropbox and OneDrive work here as well, but Drive offers the best value for students unless you specifically need Microsoft Office).
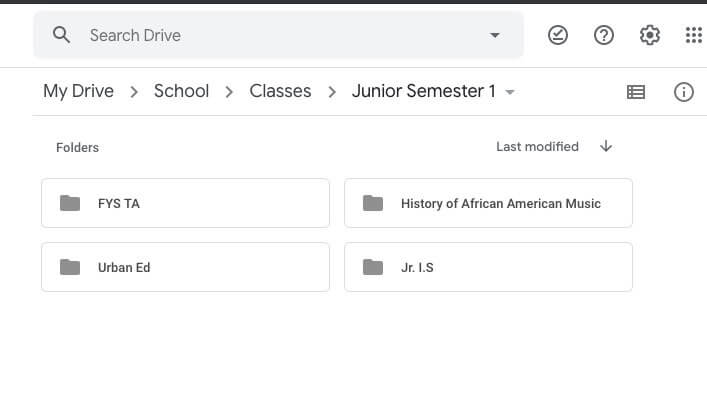
Here’s an example of the Google Drive file system I used for my classes during the first semester of my junior year:
For extra redundancy, you could also keep folders on your computer with these materials in case the internet is down and you can’t access them.
Want more info on how to keep your files organized? Check out this guide Thomas created.
5. Your Backpack
We couldn’t talk about organization in college without discussing something that almost every student has: a backpack.
Even with an increasingly digital world, you still need to carry around your computer. And many classes will still have physical textbooks that you need to bring, as well as assignments that you have to complete on paper.
Your backpack (or briefcase or purse or whatever you use) is key for keeping all of these materials organized and at the ready.
Organizing your backpack isn’t hard — the key step is to remember to fill your backpack with the things you need for the day.
After all, there’s nothing worse than showing up in class, only to get that sinking feeling in your stomach as you realize that you don’t have the book or paper you need.
In some cases, not having the right materials could even hurt your participation grade, so organizing your backpack is something you must not overlook.
To make sure you bring everything to class, pack your bag the night before. This was the advice my mom gave me when I was in elementary school, and it still applied in college.
Packing the night before ensures that you don’t forget anything due to being in a hurry. And it also allows you a night of sleep to recall something you forgot.
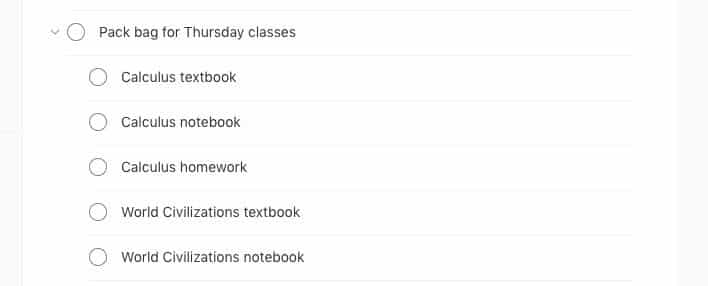
If you’re really having trouble remembering to bring everything you need to class, you can add a task to your to-do list that says something like “Pack bag for [day of the week] classes.” Under this task, write a list of the things that you need to bring. This way, you can check off the items as you’re packing.
Here’s an example of what this would look like in Todoist:
Curious what should be in your backpack for college? Check out this list.
How to Stay Organized with Weekly Productivity Planning and Reviews
If you went through all the steps in the previous section, you should now have a system for keeping all aspects of your life organized. However, creating the organizational system is actually the easy part.
The challenge comes from keeping things organized. So in this section, I’ll show you two crucial habits that will help you maintain your organizational system:
- Weekly planning
- Weekly review
These two habits are complementary, and they take 30 minutes a week at most. Yet they can have a massive effect on whether or not you actually stay organized:
1. Review Your Previous Week
So you put your organizational system into place, and you now feel more motivated than ever.
However, what you’ll quickly realize is that real life isn’t as neat and precise as your beautiful to-do list and calendar.
Inevitably, unexpected things will come up that will prevent you from completing certain tasks or even attending certain events.
It’s tempting to get frustrated when things don’t go as planned, but it’s more effective to accept that this will happen and correct your system accordingly.
One of the best ways for dealing with unexpected changes or challenges to your organization is to create a weekly productivity review habit.
This 3-step process only takes a few minutes:
1. Compare what you planned to accomplish with what you actually accomplished.
We start each week with the best intentions, but then life happens.
You planned to spend an hour each day practicing integral calculus, but you only did that 3 days out of the week.
You signed up for a Thursday evening yoga class, but then you ended up having too much homework to attend.
You get the idea. The point is to look at the gap between what you planned and what actually happened.
2. Use this information to make changes to your system.
Recognizing the gap between your plans and accomplishments means nothing if you don’t use that information to inform your future plans.
Once you’ve identified what you didn’t accomplish, you need to examine why. Then, you can adjust what you plan for the coming week.
For instance, if you didn’t get in your hour of integral calculus practice each day, what prevented you?
You might realize that it was because you were studying in the student center and kept getting distracted by friends passing by. Recognizing this, you could plan to do your studying in the library basement, a place with no distractions except some dusty geological survey maps.
As you make this process a habit, you’ll get better about planning realistic goals and schedules. Which brings us to the next habit…
2. Plan Your Upcoming Week
Once you’ve reviewed the previous week, it’s time to plan for the week to come.
If you’re adjusting what you do based on the previous week, then you’re already on the right track. But in addition to reviewing the previous week, I recommend the following weekly planning steps:
1. Clean up your task management system and calendar.
During the course of the week, there will be tasks on your to-do list that you either forget to check off or just don’t do. Your calendar may also end up with stray events that are no longer relevant, or with things that you need to reschedule for the coming week.
When you’re planning the week to come, first make sure to clean out all the existing junk in your organizational systems.
Find new, realistic due dates for tasks you didn’t get to last week, and make note of any rescheduled events on your calendar. This could also extend to organizing any binders you have for class, securing loose papers, and digitizing any notes you haven’t gotten around to.
2. Plan for the week to come.
Once you’ve cleaned out everything from the previous week, you can turn your attention to the upcoming week.
To start, make a list of any upcoming tasks you can think of. I recommend looking at the syllabus for each of your classes, as well as any online systems that your professors use to post assignments. Then, transfer your tasks into your to-do list system.
Next, take a look at your calendar. See what events are coming for the week, and add anything that isn’t currently on your calendar. Check your syllabus for impending due dates, and review your work schedule to make sure it’s accurate.
Finally, make sure that your backpack is organized and packed for the following day. This will help you avoid forgetting an assignment or book you need to bring to class.
This weekly review and planning process may sound time-consuming when you read through it, but in reality, it should take no more than thirty minutes.
And if you do it every week, you’ll find that it takes you less and less time as you become more organized. To make sure that you go through the process each week, block off time for it on your calendar (man that just got meta).
Staying Organized Sets You Up for Success
This ended up being a massive guide, so here are the key takeaways for easy reference:
- Use Google Calendar (or another calendar app) to keep your events organized.
- Organize your task with a to-do list system such as Todoist.
- Digitize your notes for easier review.
- Keep your physical and digital class materials organized using a three-ring binder and Google Drive.
- Keep your backpack clean and stocked with the materials you need to bring to class.
- Take 30 minutes each week to review the previous week and plan the week to come.
And above all, don’t let your organizational system get in the way of what really matters: accomplishing the things you want to do.
The right organizational system will help you do the things you want without getting too stressed. But at the end of the day, you still have to sit down and do the work.
So go out there this semester and do something epic!
Need help staying organized while taking online classes? Check out this guide.