
This guide was originally published in March 2012. Since then, hundreds of students (and even non-students!) have created their own personal websites using it. As it is one of the most-viewed articles on College Info Geek, I keep this guide very up-to-date, and it’s current for November 2023.
What’s the #1 networking tool you can have in your arsenal as a student? I’ll tell you this right now: it isn’t your resume.
Resumes are boring. Career experts tell you to make your resume a one-page, size 11 Time New Roman document printed with black ink with no pictures. Seriously? How are you supposed to represent — and differentiate – yourself with that?
Plus, your resume becomes static and outdated the moment you hand it to someone. You can’t update resumes you’ve already given out – you have to make new copies.
That’s why you need to create a personal website.
A website is the complete opposite of a resume. Everything bad about resumes can be fixed simply by having a website. I’d go as far as to say that not having a website is like shooting yourself in the foot – it’s that useful.
4 Reasons Why You Need to Make a Personal Website
1) A website isn’t static; it’s dynamic. It’s ever-changing. The moment you accomplish something, you can add it to your website. When you complete a project, you can put it in your portfolio for all to see. You don’t need to print new copies of it and send it out to your contacts over and over; you just update it. People can continually come back and see what you’re up to.
2) Having a website makes you more findable. If all you have is a resume, you have to go out and hand it to people to get your name out. If someone wanted to look you up on the internet and you didn’t have a website, all they might get is a Facebook or Twitter profile.
However, if you have a website, you can be found by a much wider audience and control what it is they see first. This is key for establishing your personal brand and for highlighting your accomplishments.
I’ve been offered jobs, met clients for my web design work, and gotten interviews simply because I have a website. If I didn’t take the time to create one, I’m confident that I wouldn’t have been found.
Make sure you can be found!
3) Not many people have one. Personal websites may be more common in 2023 than they were ten years ago, but the vast majority of students and job seekers are still relying on resumes and job search websites.
Succeeding today requires that you make yourself stand out, and having a website can help you do that. It shows that you’ve taken the time to learn how to do something fairly technical, and it shows that you have some skills other people don’t have.
4) You gain some new skills that can be very useful in the future. Learning how to build a website involves a number of different skills, especially if you get into customizing and optimizing things. Even if you’re not looking for a job in a tech field, having these skills can give you a leg up.
Say you’re applying for a job in advertising. If you can tell the interviewer that you’re not only a great marketer, but that you also have knowledge of the web, you become a much more attractive candidate.
Convinced Yet?
I sure hope so, because this guide is going to teach you exactly how to build that awesome website!
I spent over 15 hours writing this guide (as well as taking screenshots and editing them) with the intent of making it the ultimate resource for getting yourself online. When you’re done, you’ll have established a great online presence.
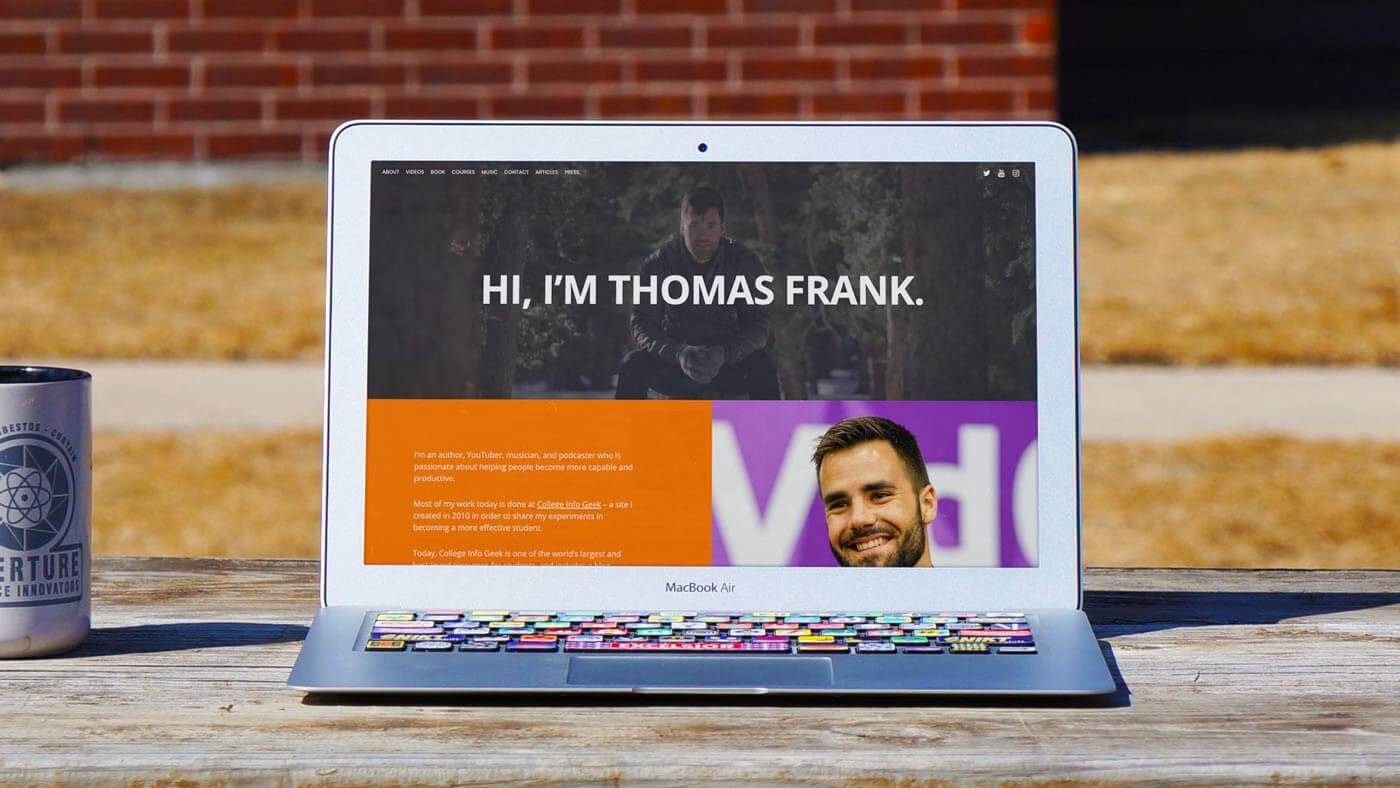
If you want to see some personal website examples before you get started, here’s what mine looks like today:

(By the way – if you like my website’s design, later in the guide you’ll find an in-depth video tutorial that will show you how I created it using a free theme. Keep an eye out for that in Step 3.)
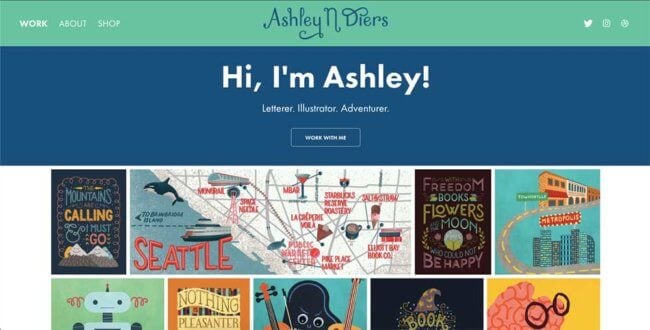
For another great example, check out Ashley Diers’ website. Ashley does all the illustrations and graphic design for this website. And she uses her personal site to showcase both her illustrations and lettering work:
I’ve worked hard to make this guide as comprehensive, yet accessible as possible. It’s a bit of a long read, but that’s because it takes you from literally nothing to having a finished website.
In this tutorial, you’ll learn how to:
- Get a domain name and web hosting for your site
- Easily install WordPress (my website builder of choice) and get all of your content up on the web with no coding knowledge needed
- Make your site look good with a great-looking theme
- Optimize your website’s speed, security and more with plugins and widgets
- Improve your site’s SEO and find resources that can teach you how to take your site even further if you want
You can treat this list like a table of contents; if you’d like to jump to a specific section, just click it. Otherwise, feel free to truck through the whole guide in order.
What you need to know beforehand:
- How to use the internet
- How to follow directions
What you don’t need to know/have beforehand:
- HTML, PHP, CSS, Javascript, JQuery, XML, XSLT, Ruby, Zend, Python, Flash, MySQL, Nginx, Apache, or any other language
- Photoshop, Dreamweaver, or any other program – these can be very useful for customizing things later down the road, but to get up and running all you’ll need is a web browser.
- Kung-fu, Naruto jutsus, or rocket surgery
Seriously, building a website isn’t hard and you don’t need to know any code. Knowing code can be useful for tweaking and customizing things later, but you can get the basics down without knowing so much as a lick of HTML!
Estimated time to complete this tutorial: 1-2 hours (you’ll spend the most time on non-techy stuff like writing your content).
Full Disclaimer: If you choose to use the domain and hosting option I recommend in this tutorial and click my links to get to it, I’ll earn a commission (though there is no extra cost to you). I want to be very clear that there are definitely other good choices for your domain and hosting out there. This is simply the one I’ve been using since the beginning, and I’m very satisfied. If you do choose to use my link, thank you!
Alright, enough with the preliminary stuff. Let’s start building your site.
Step 1: Get a Domain Name and Hosting
The first step to building your personal site is to choose how you’re going to have it hosted. There are a number of ways to put up a website. For instance, you could just create a free blog at Weebly or WordPress.com, or even Tumblr.
However, I believe it’s a lot more impressive to have a self-hosted site with an actual domain name (not a subdomain). This will look a lot more legitimate and will show that you’ve taken the time to learn how to actually build a website, which can differentiate you from the crowd.
I’m not the only one who thinks so. One of my favorite entrepreneurs, Srinivas Rao, gave this tip for aspiring bloggers:
“If you want to be taken seriously , then make sure you have a self-hosted WordPress blog.”
So while it’s up to you in the end, I would recommend self-hosting your site. Still, having a free site on WordPress.com or another place if you’re on a tight budget is much better than not having a site at all!
Now, before we get into all the nitty gritty step-by-step stuff, there’s one thing I want you to think about first: your domain name. And the first rule of choosing a domain name is…
Don’t register SailorMoonFreak94435.biz, dummy.
I can’t stress this enough: you need a good domain name. What makes a good domain name? For a personal website or portfolio, I’d recommend sticking to the following criteria.
How to Choose a Great Domain Name
First, if it’s at all possible, make your domain name your first name + your last name.com. That’s seriously the best option for memorability and SEO (aka how high you show up in Google).
If you have a common name (like I do), this will likely to taken already. I certainly couldn’t get thomasfrank.com, so I had to go with thomasjfrank.com instead. If your name is taken, you can throw in a middle initial or maybe even your full middle name if it doesn’t make the domain too long.
You can also use a clever play on your name if none of the above works. For example, my Instagram username is TomFrankly – so I’ve also registered tomfrankly.com.
Don’t use numbers in your domain name, and only use dashes if you absolutely must.
When it comes to domain extensions:
- Use: .com (preferable), .me, .org, .co
- Avoid: .info, .biz, and anything that sounds unprofessional
There are also lots of weird new domain extensions these days, like .limo and .pizza – but my opinion is that going with a more established and recognizable extension will help you avoid confusing people.
Above all, make sure your domain’s spelling is very easy to get correct for someone just sounding it out. This way, you’ll be able to mention your domain easily in casual conversation, and the person you’re talking to will be able to find it without worrying about the spelling.
So once you’ve thought of a good domain name, let’s kick off this whole website-building process by getting your domain and hosting.
Time to Get a Domain Name and Web Hosting.
It used to be that you had to buy your domain name separately from your web hosting. Now, however, you can get them from the same place, right at the same time. Buying them separately is still an option, but it’s so much easier to get them together.
I’m going to use the combined method in this tutorial to keep things simple; however, you can always get in touch with me if you want help setting them up separately (or for anything else).
Note to your wallet: this is the only part of the process that will cost you any money. Hosting isn’t free. However, it doesn’t have to be that costly, either – and I believe the small cost is worth the boost having a website gives to your personal brand and credibility.
There are literally a zillion options for web hosting out there. You can go with a shared account, a VPS, or go crazy and pay for your own dedicated server.
You could even get geeky and host your site from your own computer – though I don’t recommend this as you probably don’t want to deal with the security risks of running a web server, and any time your computer gets turned off (e.g. during power failures and when you have to move out of your dorm), your site will go down. Still, it’s an option.
Since you’re probably a college student and, like me, not swimming in a vault full of money, I’m going to assume you just want something cheap that works.
With that in mind, I recommend just getting the basic shared hosting plan from HostGator. (Again, full disclosure, I’ll make a commission if you buy through this link — if you choose to do so, thank you!)
There are plenty of good hosts out there, so HostGator certainly isn’t the only one you can use; however, I’ve been hosting all my sites through them for over three years and I’ve always been more than satisfied because:
- Their plans are pretty cheap (and, notably, less expensive than premium plans from companies like Squarespace and Wix)
- You get a free domain name (provided that it’s a .com, .org, or .net, you’re a new customer, and you get a 12-month plan or longer)
- There’s almost never any downtime
- I love having quick-install options for installing website builders like WordPress (what we’ll be using in this guide)
- Their support is just plain badass
One time, I needed an obscure PHP server setting changed for a school project, and it was something their level-1 techs couldn’t do for me.
So within 20 minutes of me asking, one of their higher-up system admins not only changed the setting, but also sent me a screenshot of the directories and commands he used to do it just in case I needed to do it on another server in the future.
This tutorial assumes you are using HostGator; however, if you choose another host, these instructions should be pretty similar to what you need to do.
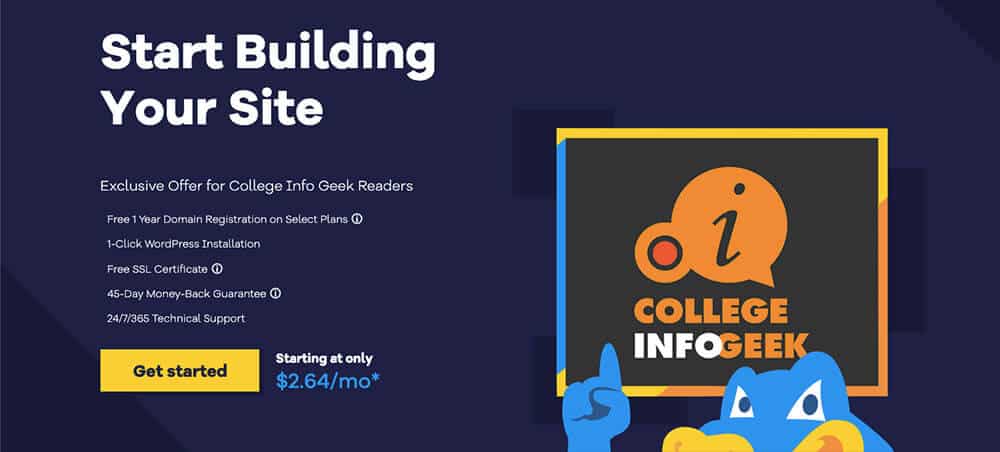
Head to HostGator and click the big button that says “Get Started Now.” (Again, I’ll make a commission if you buy through this link — if you choose to do so, thank you!)
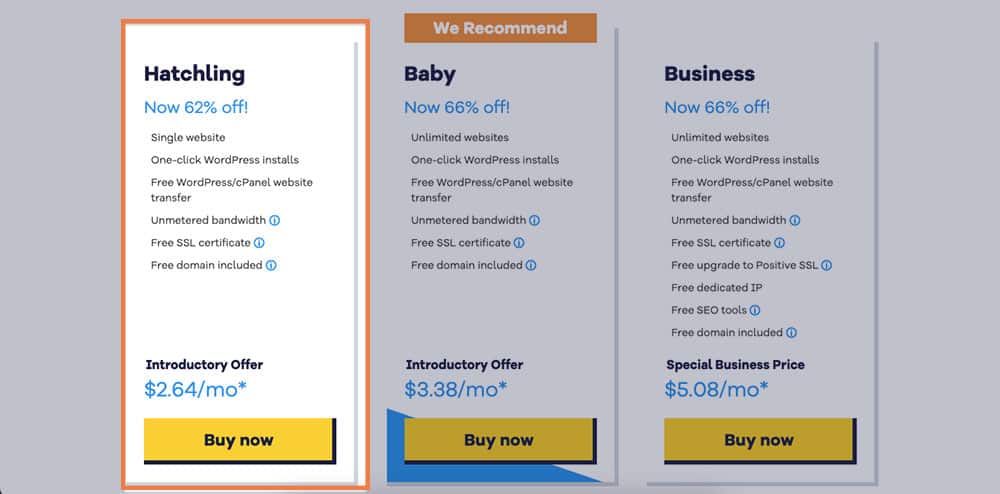
Start your journey by choosing the Hatchling plan, which is the cheapest one and is all you need if you’re just building a single website.
Next, you’ll want to pick a domain name. Assuming you don’t already own one, stick with the default tab Register a new domain, and type the one you’d like to see if it’s available. If it is, you’ll see a screen like the one below! If not, tweak it a bit until you find one that hasn’t been taken.
Also, if you choose a hosting plan that’s 12 months or longer, you’ll be able to get your domain for free for one year. There are a few caveats – it’s only for .com, .net, and .org domains, you need to be a new customer, and you have to buy it at the same time as you buy your hosting – but it’s still a pretty great deal.
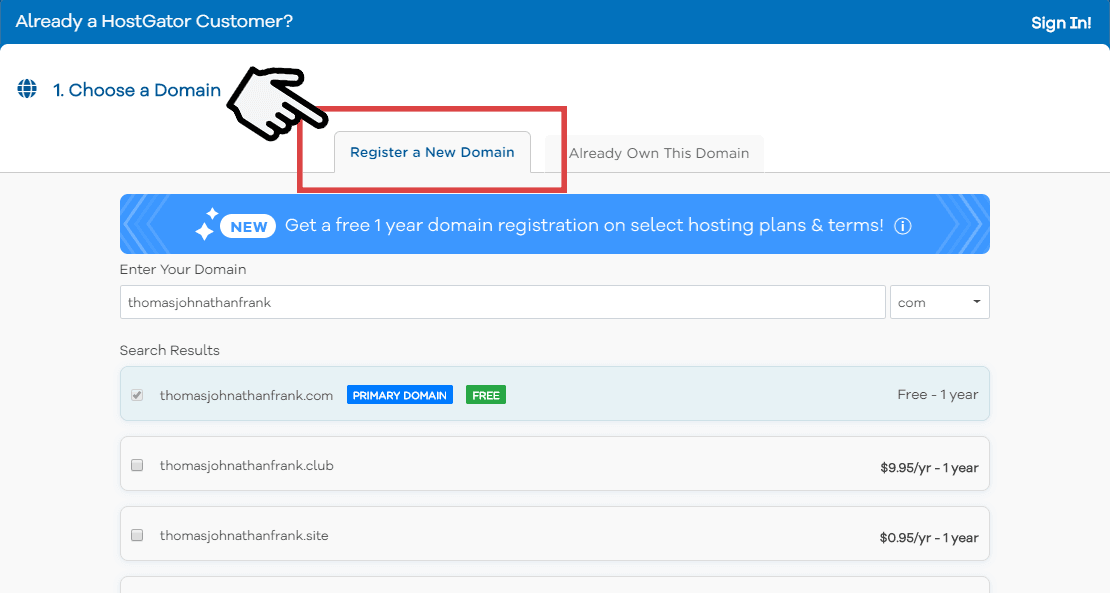
Beneath all the domain extension options, you’ll see an option for adding domain privacy protection.
This is a service that prevents your name, address, and phone number from coming up in WHOIS searches. Most people don’t know about WHOIS, and it used to be the case that you could get away with not having it.
Today, however, spammers like to write bots that search the WHOIS database for new domains and then send spam emails to the people who registered them.

As a result, domain privacy protection is something that I recommend adding. However, it’s also an option you can add to your account later on, so if you don’t do it now (or you already signed up and forgot to include it), you’re not out of luck.
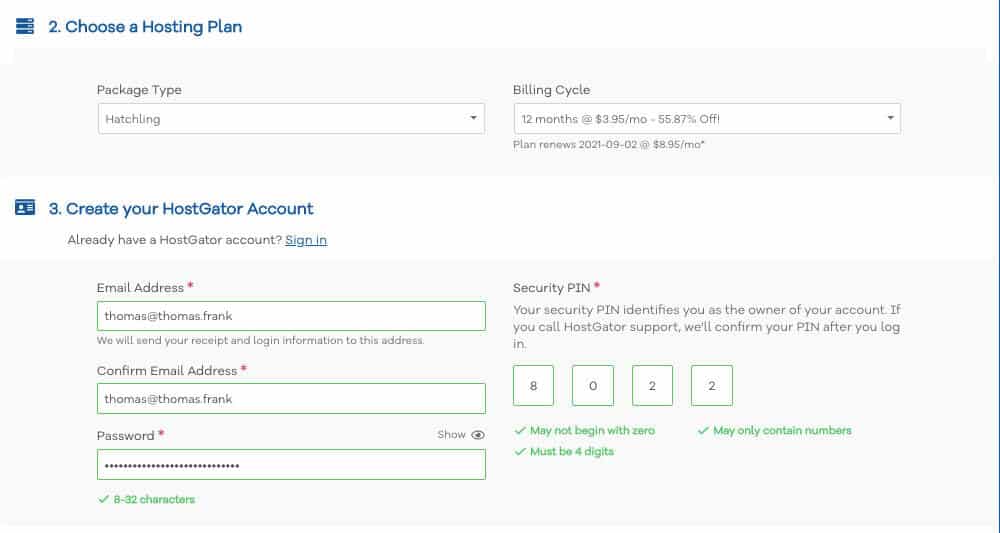
Next, scroll down and complete the next few sections:
- Confirm that the Hatchling package is selected, and choose how many months of hosting you’d like to get upfront. I recommend at least one year.
- Choose a username and security PIN.
- Enter your personal and billing junk.
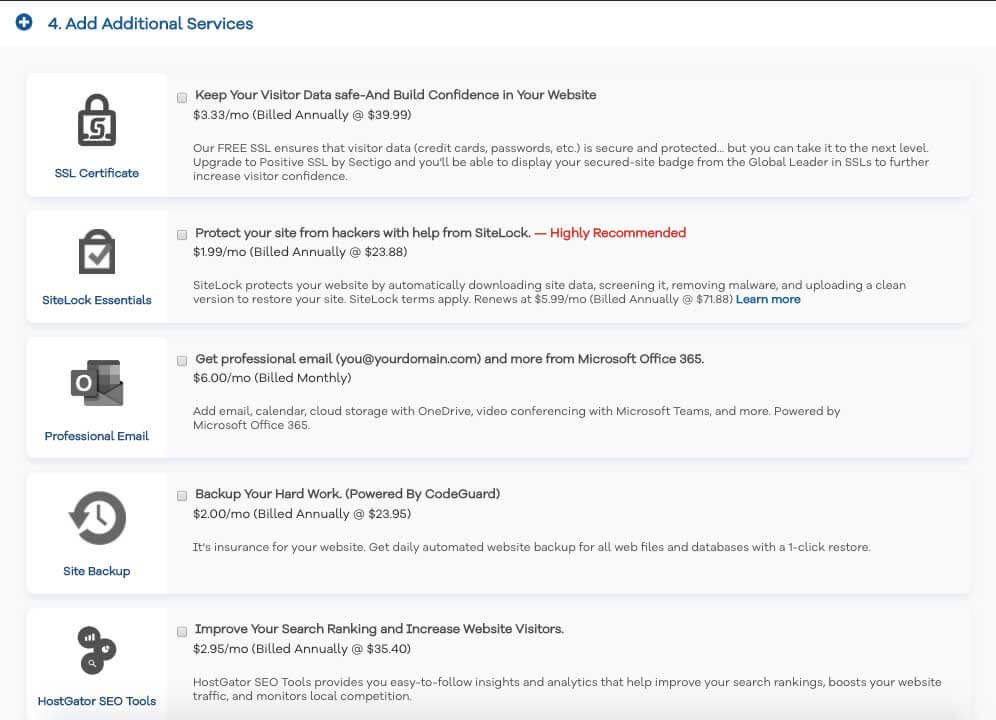
Next, you’ll see a section for Hosting Add-ons. Honestly, I don’t think you need any of these, including the SSL certificate add-on.
To be clear, I do think you should have SSL. This will enable your site to have that little “Secure” lock icon, which you can probably see up in the address bar for this site. Having that there makes your site more trustworthy to visitors.
However, if you read the fine print under the add-on, you’ll see that HostGator already includes a free SSL certificate. The add-on is just an “upgraded” SSL certificate that’s totally unnecessary.
So you can leave all the boxes unchecked to save yourself some money. In the section on Plugins, I’ll show you some ways you can keep your site secure, backed up regularly, and more likely to show up highly in Google search results (or “optimized for SEO” as we web geeks like to say) – all for free.
Finally, review your order to make sure everything’s copacetic, and hit the big blue button to create your account.
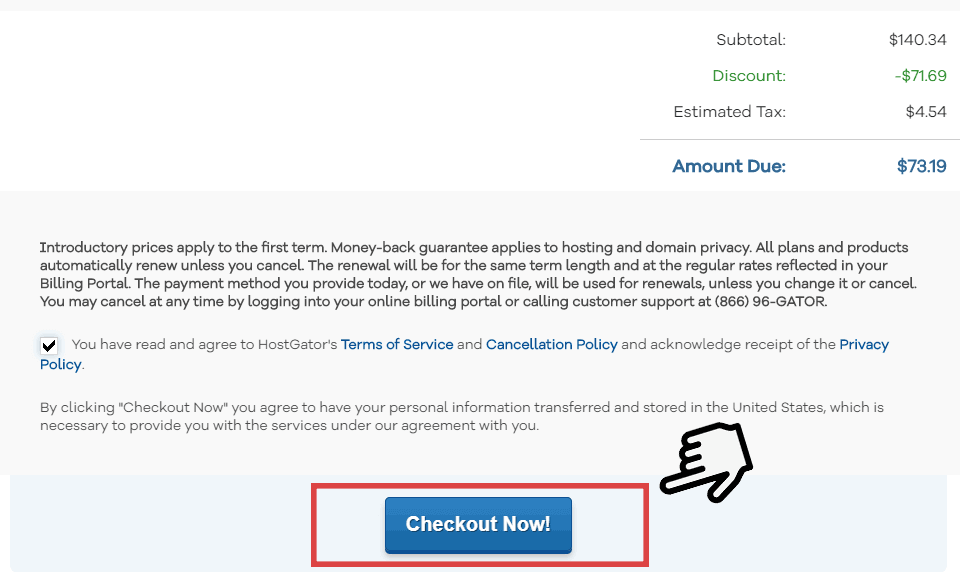
Once you’ve paid, you’ll receive an email that contains “Your Account Info” in the subject link – that’ll have all the information you’ll need to continue.
Step 2: Install WordPress and Set Up Your Site
Time to start actually building your site.
As I mentioned in the beginning, you’ll be using a tool called WordPress (self-hosted, not WordPress.com) to set up your site. You may have heard that WordPress is mainly a blogging platform, which is completely true.
However, in recent years WordPress has become so popular and well-supported that it makes a perfect platform for building non-blog sites as well.
WordPress is famous for only taking 5 minutes to install; I say that’s way too long. Let’s do it in 2, shall we?
One of the best things about HostGator is their quick-install options for almost every popular CMS (Content Management System). Of course, they have one for WordPress. Let’s get it set up. (Again, I’ll make a commission if you buy through this link — if you choose to do so, thank you!)
To start, type this URL into your browser (but replace “yourcoolnewdomain” with your website’s domain name): yourcoolnewdomain[dot]com/cpanel. (Note: I don’t control “yourcoolnewdomain[dot]com”, so I don’t recommend visiting that URL.)
If for some reason you can’t yet reach your domain yet (sometimes it can take a little while to set up), use the link you were given in your HostGator email listed Your Control Panel.
Log in with the username and password you were given in the email.
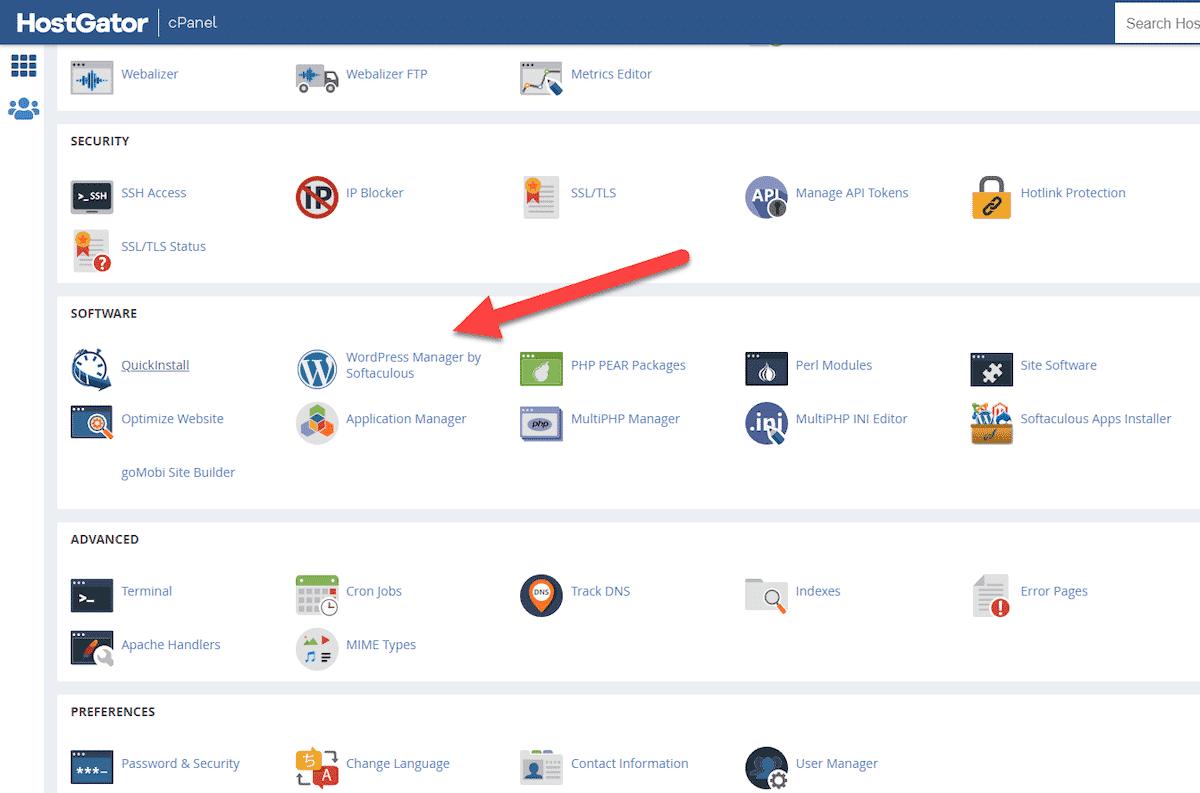
You’ll now be looking at your control panel. To install WordPress, look in the “Software” section and find the link for WordPress Manager by Softaculous.
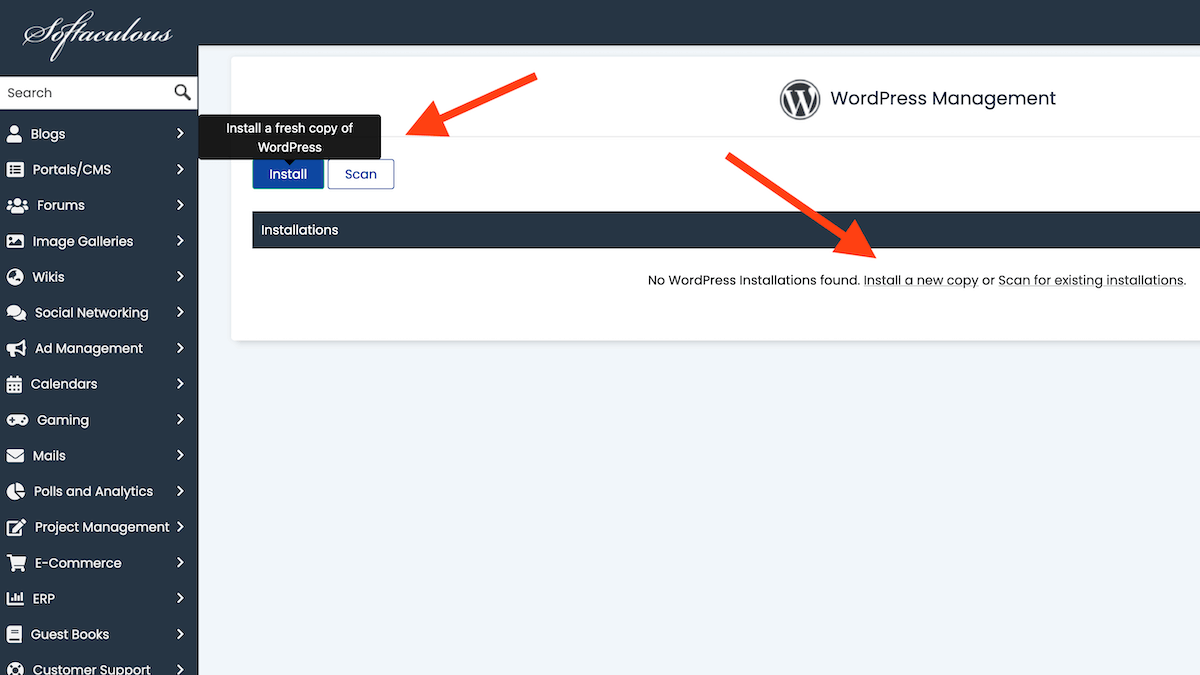
On the page that comes up, click the button to install a new copy of WordPress.
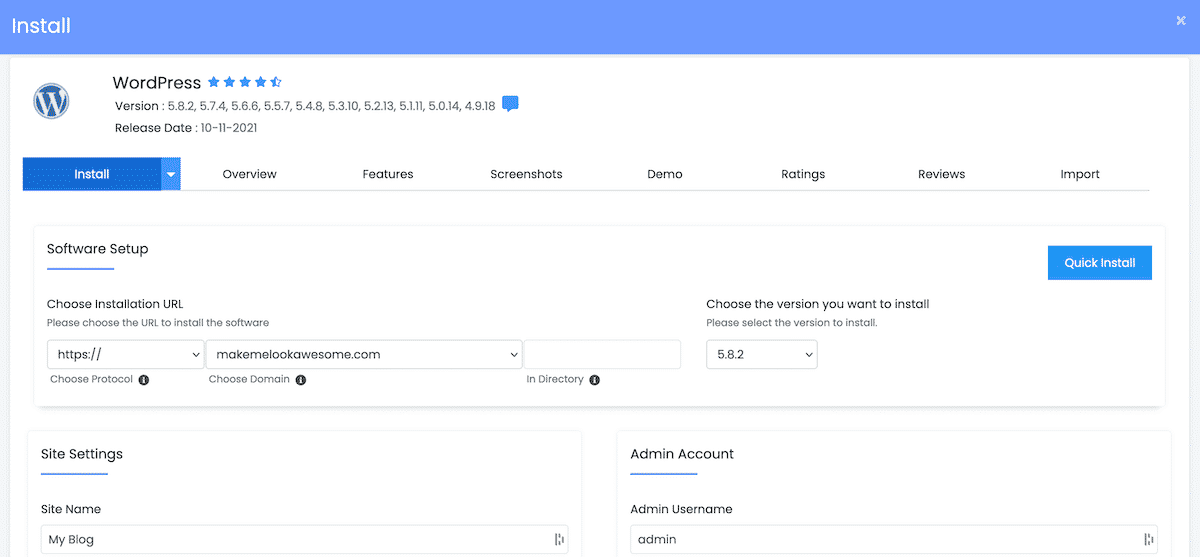
Then, a setup box should show up with all the options you’ll need to get started. Don’t worry; there are only a few that we need to look at.
The first thing you’ll need to do is select your domain name from the drop-down menu. It should be the only option listed.
Make sure you leave the directory field blank – that way, your homepage will be set to your domain (i.e. yourcoolnewdomain[dot]com) instead of a sub-folder.
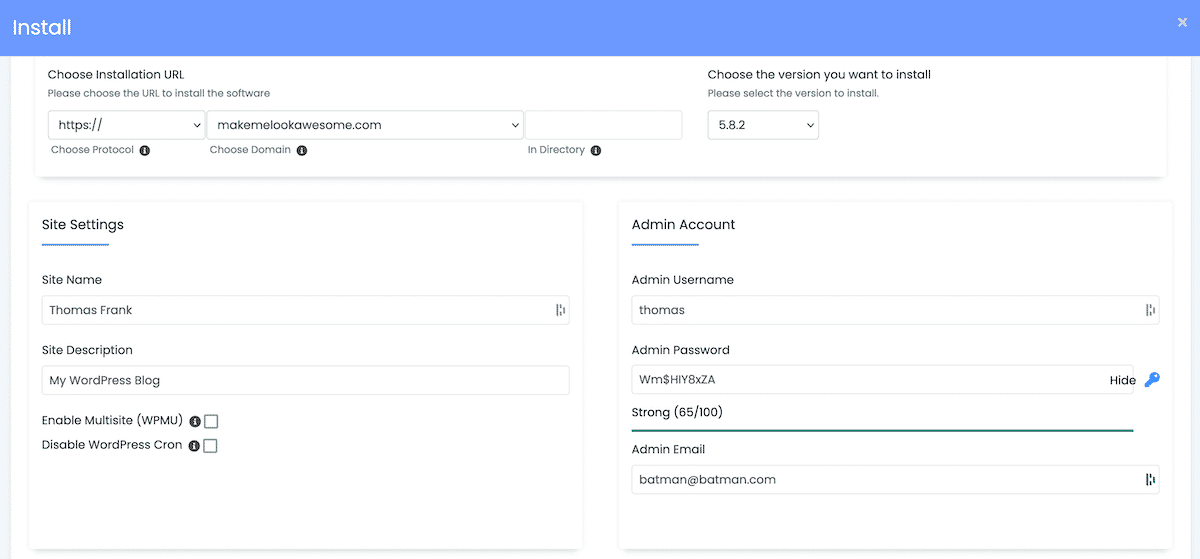
Then fill in the form below like so:
- Choose a Site Name. If you’re creating a personal website, use your name. This can be changed later.
- Set a Site Description. This can also just be blank if you don’t know what to do with it. Not every theme uses it, and this can be changed later.
- Choose an Admin Username. Don’t use “admin”, as it’s unsecure (since it’s commonly used). Anything else is fine 🙂
- Enter your first and last name – these can also be changed later if needed.
- Enter an Admin Email. Make sure it’s one you use.
- Check both of the boxes beneath the text fields.
- Set a new password or save the password it generates for you. Keep it somewhere safe.
- Scroll to the bottom and click Install.
Below your installation details, you’ll see some offers for premium themes you can use. I’d recommend skipping over these – I’ll point you to some awesome free themes later in this guide. In fact, my own personal website is built on a free theme.
Once you’ve done that, you should see some new text pop up telling you everything was installed successfully.

You should now have a fully functioning WordPress installation! If you visit your site right now, you’ll see a “Website Coming Soon” page – which will go away and be replaced by your new website once you log into the WordPress Dashboard and launch it.
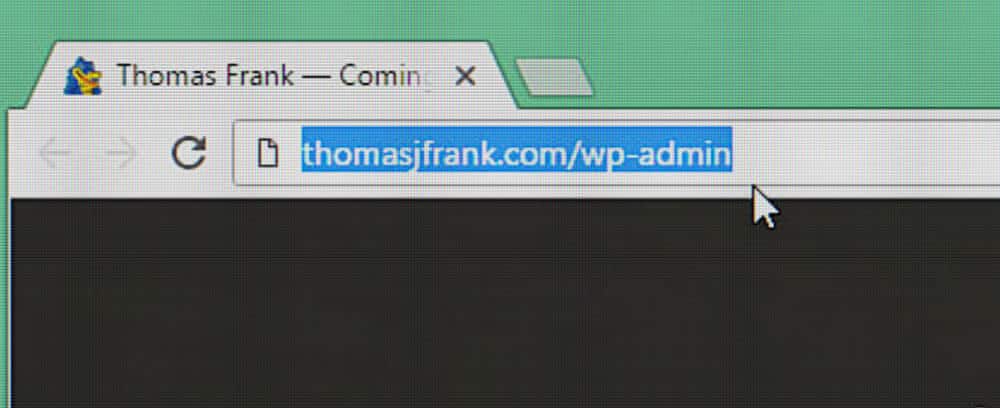
To get to the Dashboard, type yourcoolnewdomain[dot]com/wp-admin into your browser – this is where you’ll do everything else related to building/customizing your site. It’d probably be a good idea to bookmark that link!
Note: It can sometimes take up to an hour for the web host to set up your account. While you’ll be able to access your cPanel right away, your domain might not be accessible for that hour or so. You can read more about this here.
Setting Up Your Site
Normally, WordPress doesn’t do any hand-holding; once you log into the Dashboard, you’ve got access to all the tools and it’s up to you to figure out what they all do.
However, the version of WordPress that HostGator’s Softaculous cPanel script installs comes with a few plugins that you either don’t need, or that are inferior to the ones I’ll recommend a little later in the guide. Let’s get rid of them in order to keep things simple and clean. If you change your mind, you can always reinstall something later.
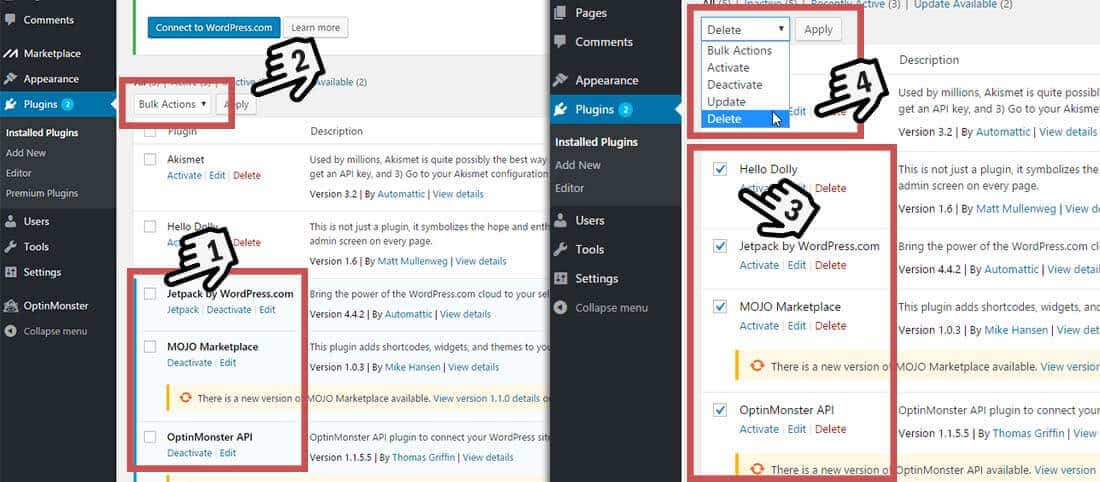
- On the left side of the Dashboard click Plugins.
- Check the box next to Creative Mail by Constant Contact, Jetpack, MOJO Marketplace, OptinMonster, and WPForms Lite.
- Click the drop-down menu labeled “Bulk Actions” and select Deactivate. Hit Apply.
- Now, check the box next to all the plugins – except Akismet. And maybe Yoast SEO, which you may end up wanting again later anyway.
- Click the Bulk Actions drop-down once again and select Delete. Hit Apply.
What’s Akismet, you ask? Akismet is a plugin that helps keep blog comment sections free of spam. If you decide to add a blog to your website (which is really easy with WordPress), and you’d like to enable comments on your posts, Akismet will come in handy.
Meanwhile, Yoast SEO helps make sure that search engines like Google see your site the way you want them to, and can be very helpful after some really basic setup.
If you don’t need these either, you can always come back later and delete them.
Activating SSL on Your Site
Before adding any content to your site, you’re going to want to go through the quick process of activating your site’s free SSL certificate.
Doing this will ensure that visitors automatically end up at the secure “https://yourcoolnewdomain[dot]com” rather than the unsecure “http://yourcoolnewdomain[dot]com”.
If this difference means nothing to you, well… all you need to know is that doing so makes your site appear more trustworthy and safe. For example, if you look up in the address bar for this site, you’re probably going to see either a lock icon, or the word “Secure” next to my site’s URL.
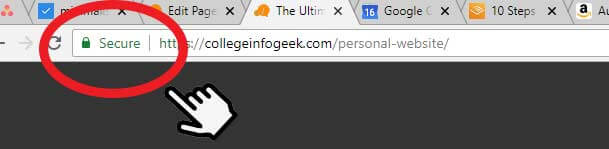
That’s there because I have an active SSL certificate for my site. Without that, the address bar would say, “Not Secure”. If you care to know any more about this, check out Google’s article on why HTTPS matters.
Fortunately, HostGator includes a free SSL certificate with your account, so all you need to do is activate it on your WordPress site.
And – even more fortunately – that’s really easy to do, as long as you do it before adding any content to your site.
(If you already added content to your site for some reason, hope is not lost. However, this process may be a bit more involved. Check out this article for a step-by-step process for dealing with the complications that might come up.)
So – before you start building your site – let’s do one quick thing. If you’re not already there, head to the Plugins area of your Dashboard:
- Click Add New.
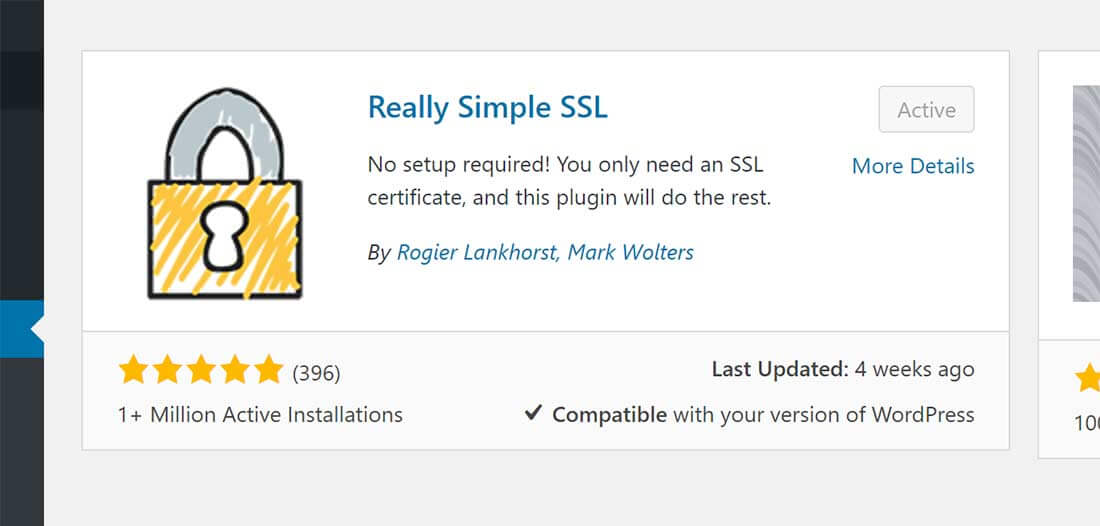
- Search for Really Simple SSL. This is a plugin that will automatically enable SSL on your site.
- Install the plugin, activate it, and then click the button that comes up afterwards in order to fully activate SSL.
That’s it!
(Note: The free SSL certificate can sometimes take up to 24 hours to activate on your account after you purchase hosting. If Really Simple SSL doesn’t work at first, please try waiting 24 hours and then activating it again. In this case, you can still safely create new pages and add text in the mean time – I’d just advise you to wait on uploading any images until Really Simple SSL is active.)
Now, before we get our hands dirty with the business of creating pages and all that, let’s take a few minutes to get a feel for the WordPress Dashboard.
Getting to Know WordPress
WordPress is a system that’s pretty easy to use and navigate. However, I’d still like to give you a quick overview of what’s available to you.
Here’s a shot of what you should see when you log in:
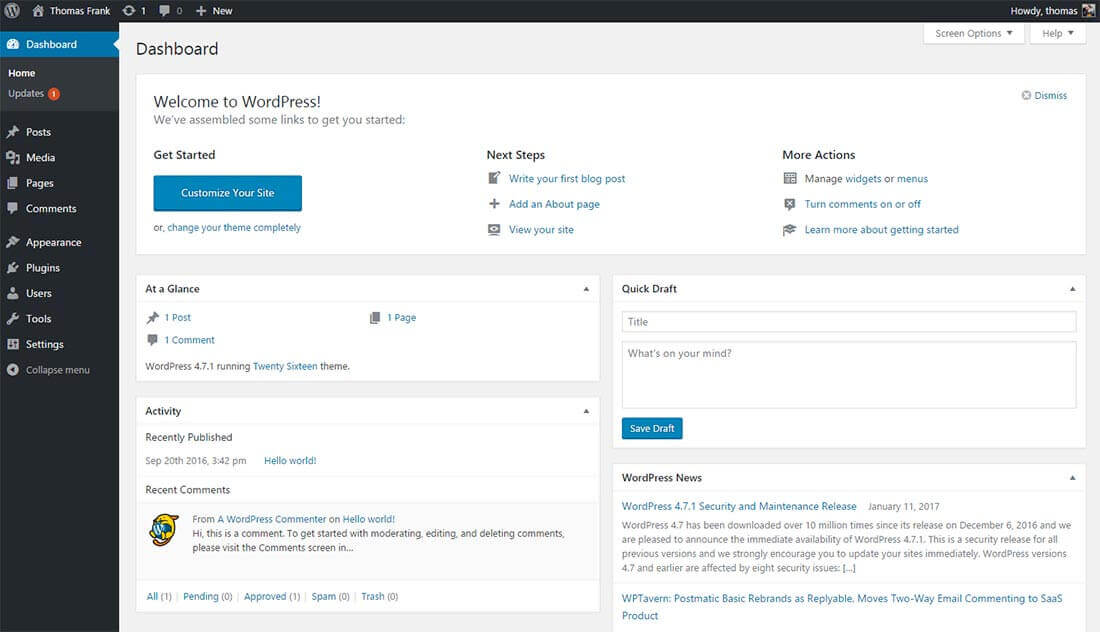
The big welcome message in the middle is there to help you while you’re first getting started, so it’s good to check it out. Beneath this message are a bunch of widgets, but you won’t need to do much with them right now.
What I’d like to go over are the links in the sidebar – these are all the core functions of WordPress. Note that hovering over each of these links will cause additional options to show up. Also, the one that’s active will show its additional options by default right underneath it.
- Dashboard – the “home base” of WordPress. This is what you seen when you log in, and it contains whatever widgets you’ve chosen to show on it.
- Posts – the heart and soul of WordPress. This is where you’ll go when you want to write a blog post or edit an existing one.
- Media – a central repository for any pictures, sound files, video, and other pieces of media that you upload to your site. Here you can browse through and edit media you’ve uploaded to your posts and upload even more.
- Pages – here you can create Pages, which is what you’ll be using for the main content on your site. Pages are different from Posts because they will show up in your site’s main navigation instead of going on your list of blog posts. This makes Pages good for “timeless” content like your biography, work history, and contact info.
- Comments – here you can see the comments on your blog (if you decide to have one).
- Appearance – this is where you’ll customize the look and feel of your site. There are options for your site’s theme, menus, and the widgets you want to display. There’s also a rudimentary code editor, but it’s not very good. If you’re getting to the point where you want to manually edit your site’s theme, I recommend CodeAnywhere.
- Plugins – this is where you can add and manage your plugins, which are like small apps that can give your site new functionality. There are a number of great plugins you should be using, but we’ll get to those a little later.
- Users – here you can manage the user profiles on your site. Since this is a personal site, the only one that should be here is your own.
- Tools – by default, the only things here are the Import/Export options, the Press This bookmarklet, and a Categories/Tags converter. Right now, you won’t need any of these.
- Settings – this section houses all the general settings for your site. There’s a lot of stuff here.
Now that you know what does what, you should have an easier time navigating WordPress and creating your site.
Before you start making your pages, however, let’s take care of a couple important things!
Change Your Permalink Structure
When you create a page, WordPress makes the URL reflect the page title. For example, a page titled “Contact” would get a URL like yourcoolnewdomain[dot]com/contact. This is what you want.
However, by default WordPress doesn’t do this for blog posts. Instead, it creates these ugly numeric URLs like yourcoolnewdomain[dot]com/?p=123. These URLs don’t mean anything – it’s much better to make your blog post title be the URL.
To do this, you need to change your permalink structure. This is pretty straightforward:
- Hover over Settings and click Permalinks.
- Choose the option for Post Name.
- Save your changes.

Now your blog post URLs will be much more memorable.
Now that you’re done taking care of that little detail, it’s time to create your pages and get your content up on the web!
Setting Up the Page Structure
If you recall from the section detailing each part of WordPress, Pages are used for timeless content such as your biography and contact information. These pages will appear in your site’s top-level navigation, or 2nd-level navigation if you decide to create child pages.
Take a look at my site’s navigation once more to get a feel for what you’re going for here:

Since my current personal website primarily uses a one-page design (clicking the links simply moves you to the corresponding section of the page), you can also take a look at one of my previous website designs, which used a multi-page approach:

As you’re looking at these two different approaches, you might be asking yourself:
“Should I go with a one-page or multi-page design?”
This is up to you, but what you should keep in mind when deciding is that your site’s #1 job is to showcase your work and expertise. The better it does that, the more likely people are going to want to hire you or work with you.
If you study my current site, you’ll see that most of my main sections link out to other places on the web – my YouTube channel, my podcasts, the speaking page here on College Info Geek, etc. This is a strategic decision – as a professional YouTuber/writer, those are the best places for me to be directing people, since I benefit from people subscribing to my content rather than evaluating it.
When I was a student, however, my priority was to get hired. As a result, going with a multi-page design gave me a way to give potential employers a one-stop shop to see my resume, bio, and a detailed look at my best work.
So ask yourself – What’s my website’s purpose? Who is the intended audience? Use that information to guide your decision.
If you’re a student, it’s likely that your main priority is getting hired or selected for scholarships/research opportunities/etc. I think a multi-page design works best for those purposes. In the end, though, it’s your choice!
With that being said, here are a few pages/sections that I think should absolutely be included somewhere on your site if you’re trying to get hired. These include:
- A brief About Me page, which you’ll set as your home page
- A more detailed Biography page
- A Resume page where you can list your education, work, etc (remember how I said I hate resumes? Having your resume on your website fixes all those things I hate)
- A Contact page that tells people how they can get in touch with you. It might have a contact form as well. Note: I don’t recommend publicly listing your email address, phone number, or physical address on your site – spammers can easily grab that info. A contact form, along with links to your social profiles, is a much better option.
Other pages you might think about adding, if they’re applicable to your life:
- A Portfolio to show off any kind of work you’ve done – graphic design, programming projects, writing – whatever. On my previous site, I created a portfolio of my web work using a normal page template. You can make yours this way, or you can get a theme with a specific portfolio template. Check out my girlfriend Anna’s site for an example.
- A Hire Me page. I strongly suggest you make this page, even if you aren’t currently looking for full-time work or freelance gigs. This page tells people what you’re looking to do, and can help them picture where you’d fit better.
- A Blog. WordPress is set up for blogging by default, but you’re going to set your homepage as a static About Me page. Therefore, you’ll need to set up your blog manually, which is still really easy. You can also choose to leave the blog out if you want, but I think having one is a great way to show off your knowledge and thoughts. Here’s how I’ve implemented a blog on my personal site.
- A Press page, where you can list any interviews or mentions you’ve gotten in the media. Check out my Press/Media page for an example.
- An Impossible List. I think creating a page like this is really fun, and can help you solidify your life goals.
If you’d like a more detailed explanation of the pages you should include, check out my post on essential website components – which also includes some great examples of other personal websites. (Want even MORE examples? Check out the collection of 50 awesome personal websites and portfolios we recently published.)
It’s really up to you to decide what pages you want to have on your site. I’m going to show you how to create your About Me page, and you can use the same steps to create the rest.
Before you do that, though, you should delete the sample page and post that WordPress automatically puts up on your site.
First, get rid of the sample post by going to Posts on the WordPress Dashboard. Find the post titled “Hello World!” and click Trash.
Then go to Pages and do the same thing for the page titled Sample Page.
Creating the “About Me” Page
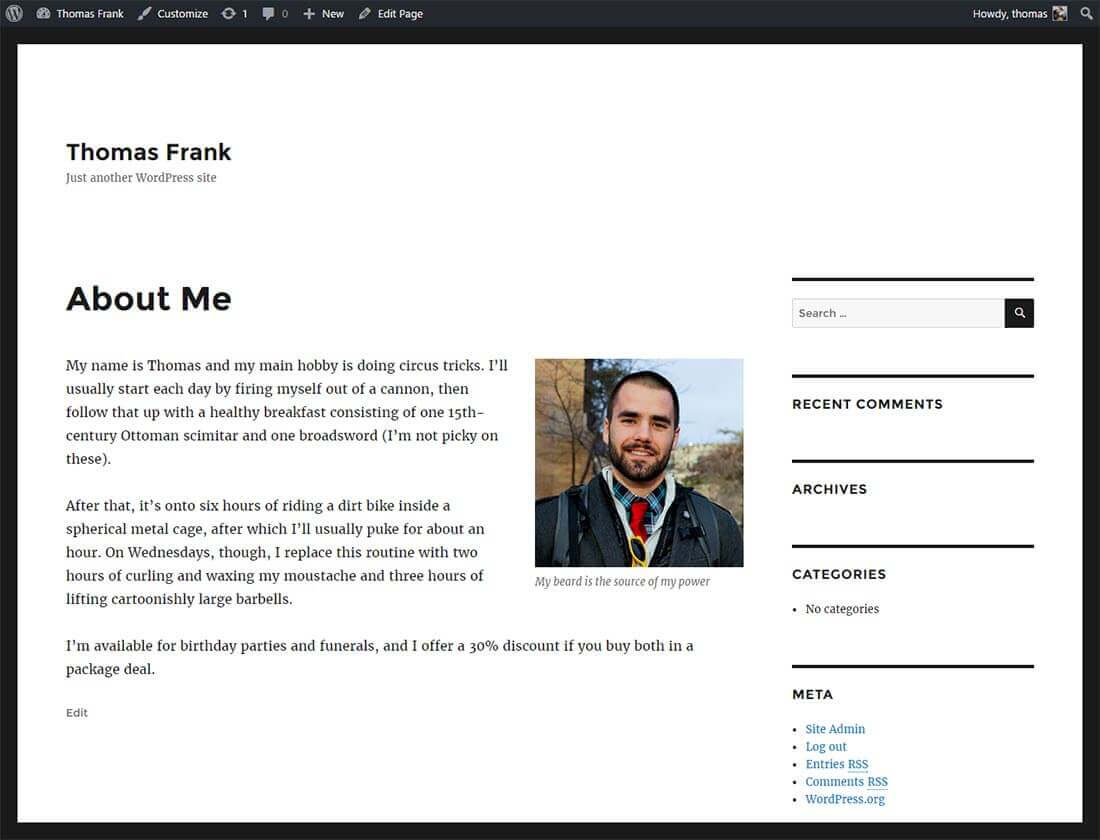
Your About Me page will be the landing page of your site – the place visitors will see first. Here you’ll want to have a short summary of who you are, what you’re studying, and the what work you do. It’s also good to have a picture of yourself, and maybe even some quotes about your work from other people.
Let’s create it!
You should already be at the Pages section of the WordPress Dashboard. Find the button near the top that says Add New. You’ll see this screen when you do:
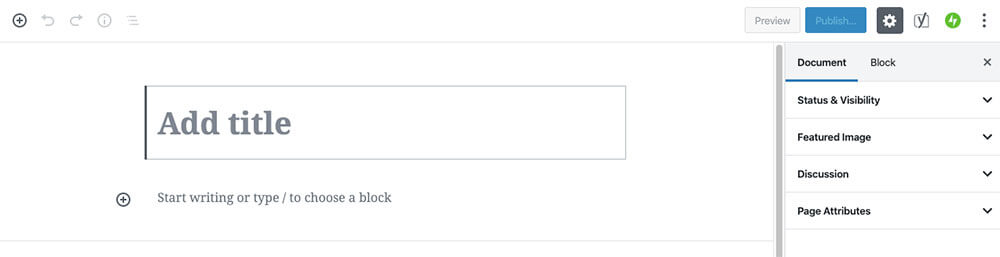
As you can see, creating pages in WordPress is pretty easy. To get your About Me page started, first enter a title in the Title Bar. It would probably make sense to title this page “About Me” or “About <your name>”.
Next, you’ll find the body area. In most cases, you’d use this space to enter your content. However, depending on the theme you choose (more on that in the next step), you might be entering your content somewhere else – so for now, just enter a sample sentence or two.
Take a look at the different tools available for formatting your content; as you’ll find out, using WordPress isn’t all that different from using Microsoft Word.
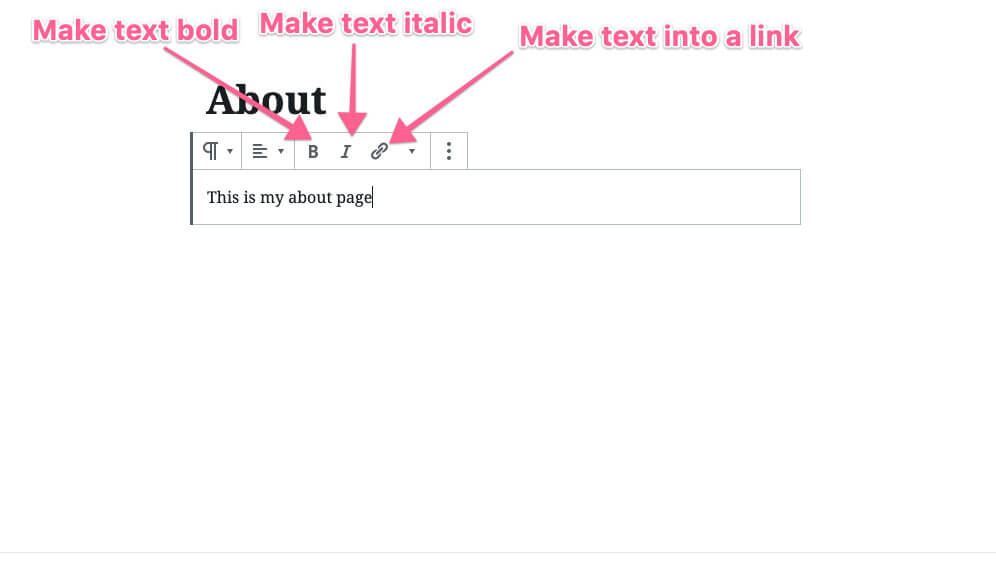
Most of these tools will allow you to format your text, add links, and so on. You can also add images to your post by creating an Image block.
To do this, place your cursor at the point in your content where you want the photo to appear. Then, click the “Plus” icon to the left of your content and select “Image” from the list that appears.
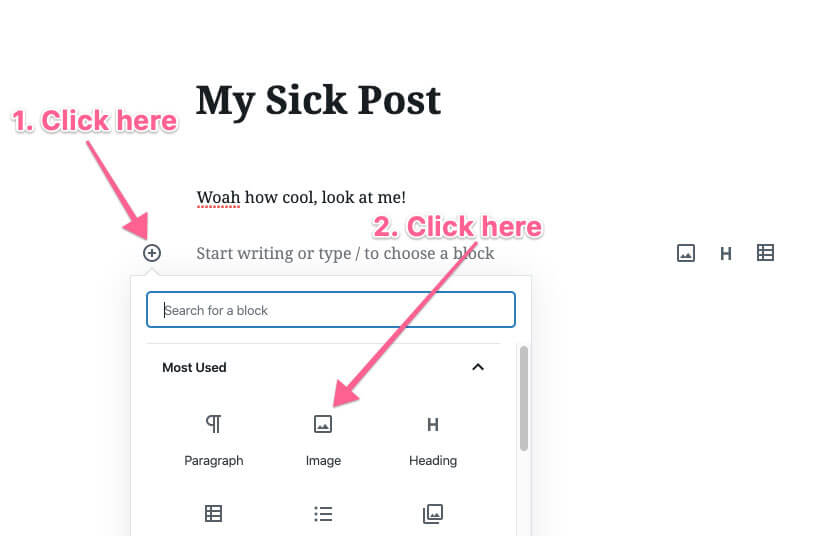
Now, choose one of the options that appear.
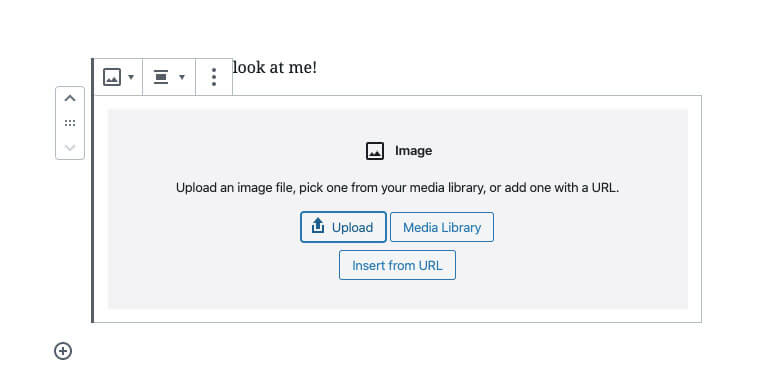
Boom – you’ve got a photo on your page.
Once you’ve got your photo and some text, go ahead and hit Publish. This will make your page go live.
Note: As of the most recent update to this guide, the default WordPress editor is now Gutenberg. We’ve updated our screenshots to reflect the new editor, but we honestly still prefer the Classic WordPress editor. If you’re curious about the difference (and how to switch your site to the Classic editor), check out this guide.
Set Your “About Me” Page as Your Home Page
At this point, your About Me page should look something like this:
However, WordPress will show you blog section as the homepage by default rather than this page.
Since this is a personal site rather than a blog, you’ll want this page to be the first page visitors see when they get to your site. Let’s set it as the home page:
- In the sidebar, hover over Settings and click Reading.
- In the Front Page Displays section, click the radio button that says A Static Page
- Choose your About Me page to be the home page.
- If you want to have a blog, create and publish a blank page called Blog and set it as the Posts Page.
- Save your changes.

Now, go back the the Pages section of WordPress and create the rest of your pages. This process should be relatively straightforward; the only one that may be more complicated is your Contact page.
This page can be really easy to create if all you want to do is link to your social media profiles. However, you may also want to link your email address or add in a contact form.
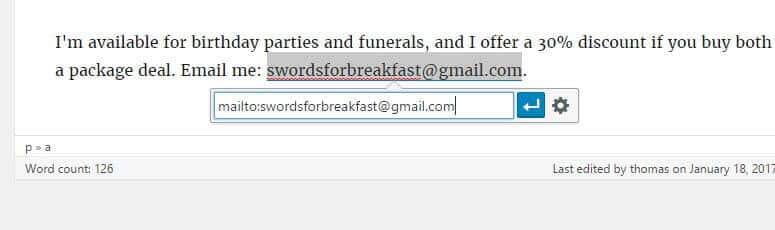
Making your email address clickable is really easy – just highlight any piece of text (I’ve actually typed out the [fake] email in this example, but you can use any text), click the Link icon (or hit CTRL/CMD+K) and type “mailto:[email protected]” without the quotes.
However, do note that making your email address public enables anyone to send emails to it – even spammers and bots. This is why I prefer using a contact form instead.
If you decide you want to add in a contact form, you have two options. You can either find a theme that has a built-in contact page template, or you can use whatever theme you want and add a contact form using a plugin. Either way, it’s really easy. I’ll cover the first option in Step 3 and the second in Step 4.
Optional: Adding a Blog Page
If you’d like to add a blog page to your site, it’s ridiculously easy.
Simply make another new page on site called “Blog” (or whatever you want, it doesn’t matter). Then on your Dashboard go back to Settings -> Reading and set your Posts page as that page you just created.
From there, all you have to do is go to Posts and start writing. All your published blog posts should show up on that Blog page.
If you’d like to learn more about creating a successful blog, then be sure to check out my comprehensive blog-building guide.
It’s All Coming Together Now.
At this point, you should have all your pages set up, assuming you’re going with a multi-page setup.
Now it’s time to make sure visitors are impressed when they hit your site. Let’s look at customizing your site’s look and feel.
Step 3: Customize Your Website’s Design with a Theme
One of the best things about WordPress is the stupidly large amount of themes available for you to use. Using a theme, you can change the look of your site without needing to know any CSS or have any graphic design skills.
A theme is basically a template or skin for your site. It changes the look while retaining all the content you created.
The first step in customizing your site’s look is to simply find a theme you like. This can be easier said than done, due to the huge amount of themes out there. I’m going to try and help you pick one out.
4 Great Theme Recommendations
I’ve gone out and found four WordPress themes that I think work well for personal sites. Keep in mind that there are literally thousands of themes out there, so this is just a starting point.
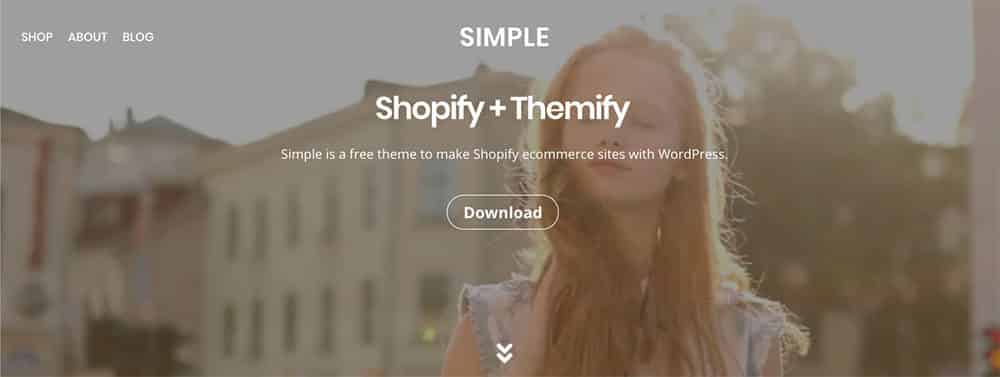
This is the theme I’m using on my personal website. It’s incredibly versatile, as it’s a builder-style theme that lets you customize each page to a huge degree. Also, it’s free.
If you don’t have a strong theme preference, or don’t know where to start, Simple is my top recommendation. I even created an in-depth video tutorial that shows you how I used it to create my website:
In addition to the tutorial, you can also check out the official documentation for more answers to questions you might have.
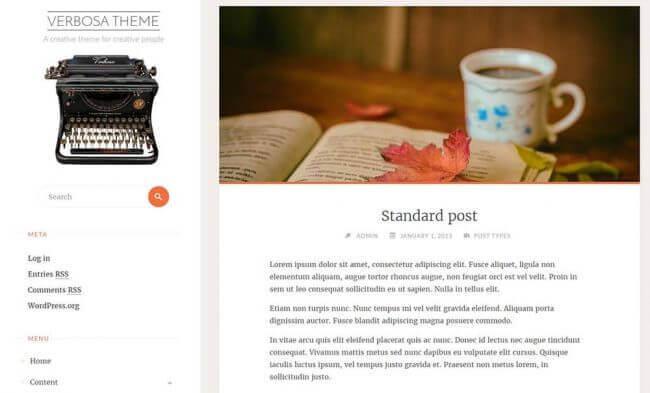
Verbosa is another great free theme that gives you a lot of room for customizing the look and feel. It’s not a builder-style theme, so you can’t edit the structure as much as you can with Simple, but you do have a lot of other options.
In my opinion, Verbosa is easier to learn than Simple, which is a fair trade-off for its lower level of flexibility.
Check out the theme’s homepage for updates and documentation.
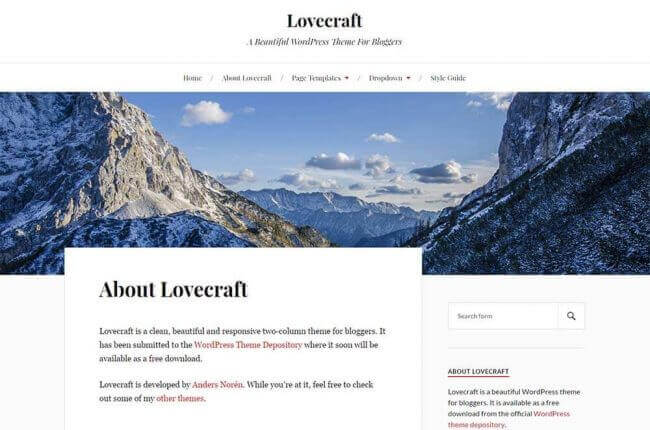
Lovecraft is, by admission, a theme for bloggers – but with its great typography, clean menu, and large image area, you could also use it to make a great-looking personal website.
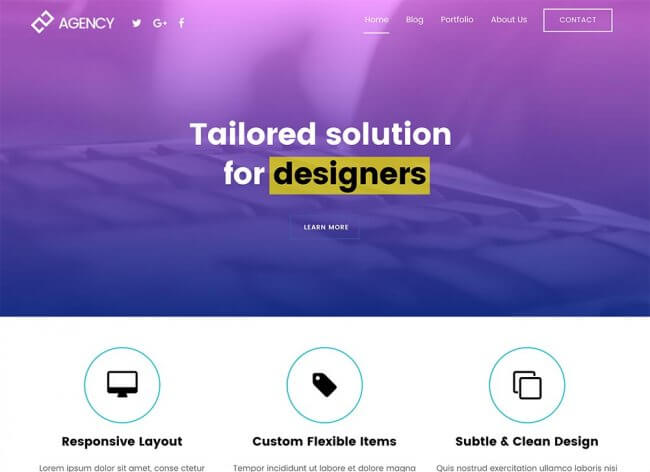
Unlike the previous three themes I’ve listed here, Ultra is a premium theme. That means it costs money – around $50 as I write this. So why pay for a theme when there are so many free ones out there? Simply put, it’s flexibility.
Ultra is a theme made by Themify – the same people who made Simple, which is the free theme I mentioned above. While Simple is indeed very flexible – especially for a free theme – Ultra takes things up a notch.
For instance, Ultra includes 15 different header styles, which means you can put your logo and menu items wherever you want. You also have a lot more choice when it comes to colors, fonts, and pre-built page layouts. Additionally, there’s a portfolio feature that lets you easily showcase your work.
Personally, I find the free Simple theme to be enough for my needs. If you need additional features and even more flexibility, though, Ultra is my top recommendation. Note: Since Simple and Ultra are made by the same people and use the same foundation, you can start out with Simple and transfer everything you’ve created to Ultra if you end up needing it.
Want even more themes? Here are some great places to look:
- Official WordPress theme repository – the biggest source of free themes
- Themify – my current favorite place to find WordPress themes
- Elegant Themes – my girlfriend Anna uses their Divi theme for her site
Like I said, the theme options you have are literally endless. Explore and find something you like! Also, see if the theme you’ve chosen has a template for a contact page. If it does, you’ll be able to put up a contact form without using a plugin.
Once you’ve found something that you like well enough, let’s get it installed.
Install Your Theme
Wherever you found your theme, download it to your computer. The theme will probably come in a .zip file. Look inside this zip file.
If you see files like index.php, header.php, and footer.php in that very first folder, you’re good. If you find that those files are buried in sub folders, you’ll need extract everything and create a zip folder of whatever folder contains those files.
Most themes will come with documentation that tells you how or even if you need to do this, so consult that for help if you need it.
Once you have the final .zip file, it’s time to install it.
- On the WordPress Dashboard, hover over Appearance and click Themes.
- Click the tab at the top that says Install Themes.
- Find and click the link that says Upload.
- Choose your .zip file and and click Install Now.
- Make sure the theme was installed successfully, and click Activate.

From this point forward, I can’t really cover theme setup in this tutorial. Themes are so diverse that it’d just be impossible for me to cover everything. Luckily, most good themes come with documentation that will walk you through setting them up.
Check Out the Customize Tool
Almost every WordPress theme out there will give you some options for customizing your site’s logo, colors, and other features. Some themes might come bundled with special menu areas in the Dashboard for certain settings, but most of your customizing will be done at the built-in WordPress Customize Tool.
To access it, hover over Appearance, then click Customize.
Once you’ve opened the tool, you’ll see a live preview of your site, along with a number of options on the left. Every theme will include different options, so you’ll have to play around with it yourself to see what’s possible with the theme you’ve chosen.
Here’s an idea of what it looks like:
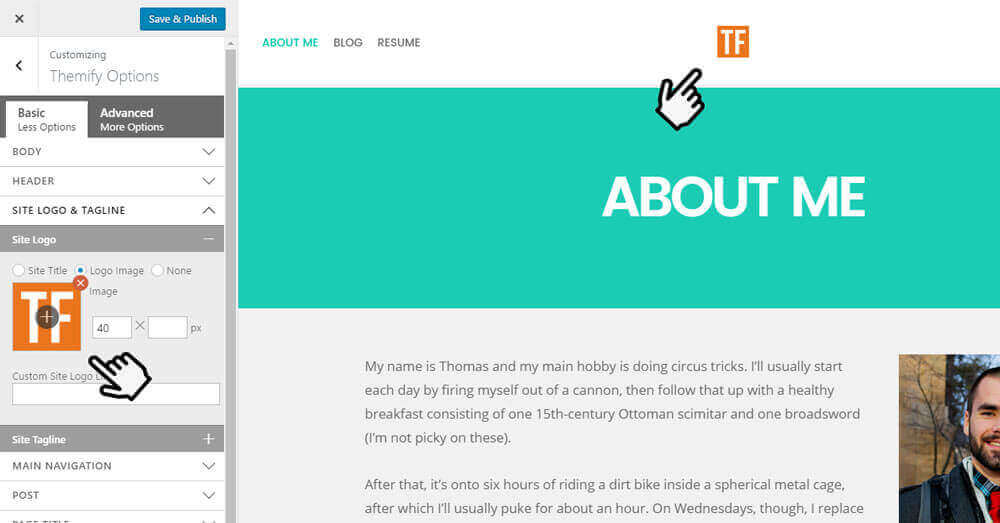
Once you’ve made all of your changes, click Save & Publish at the top of the menu to make your changes live.
Remember: Depending on your theme, the Customize Tool might not be the only area where you can make changes! For example, the theme I’m using on my personal website, Simple (linked above), features an entire page builder tool that can be accessed on every page.
Always make sure to check out the documentation for your theme so you know what all your options are.
Set Up Your Menu
One thing I’ll go over before we head into the next section: WordPress’ Custom Menu functionality.
Since I published this tutorial, a lot of people have asked me how to create custom menus on their sites. Specifically, they wanted to do things like:
- Change the order of the pages in their menu
- Create menu items that would drop down to display more pages related to a main page
Ask, and ye shall receive. I’ve created a short video that will guide you through the whole process of creating a custom menu for your site.
Now that you’ve got your theme, it’s time to tweak things a little bit further by adding plugins and widgets.
Step 4: Improve Your Site with Plugins and Widgets
Alone, WordPress is a great system with a lot of functionality. However, the true beauty of WordPress lies in its ability to work with plugins – small (or large) pieces of packaged code that add functionality to your site.
There are a few plugins that I believe are absolutely essential to any WordPress site, and more still that you may want to install as well.
Installing plugins is pretty straightforward. Unlike themes, almost every plugin you’ll ever need is kept in the official WordPress plugin repository. Therefore, you don’t need to upload .zip files – you can actually just search for plugins right from your Dashboard and install them! To do this:
- On the WordPress Dashboard, hover over Plugins and click Add New.
- Search for the plugin you want. The search function isn’t amazing, so you’ll usually get the best results by typing in the exact name of the plugin you’re searching for.
- Click Details to read about the plugin or Install Now to install it.
- After you install, click Activate.
- If there’s any setup required for the plugin, take care of it.
Important Note: Plugins work directly with the guts of your WordPress installation. It’s important that you be discerning on what plugins you choose to install on your blog; make sure you trust what you’re installing.

I recommend looking up plugins at the WordPress Plugin Directory before installing them. If a plugin has a low star rating, it might be broken – or even worse, it could have security vulnerabilities that can open up your blog to attacks. Be careful out there, trooper.
Essential Plugins
There are a few plugins that I wouldn’t be caught dead without on these high seas of the Internet. I recommend you use them as well. I’ll link to each one’s repository page, but remember that you can install them directly from your Dashboard just by searching.
- Ninja Forms – a simple, easy-to-use contact form plugin. Check out the documentation for instructions on how to get everything set up.
- WP Super Cache – simply put, this plugin will make your site load a lot faster for your visitors. By default, WordPress pulls information from its database each time a visitor loads a page. This plugin will “cache” a lot of that information, letting it be loaded really quickly without the need for a database call.
- UpdraftPlus – probably the best free site backup plugin I’ve seen. Lets you manually back up your database or your entire site. You can also set regular, scheduled backups (which I recommend), and send them off to remote destinations like Dropbox, Amazon S3, email, etc.
- WP MyLinks – a free plugin that will let you create a simple “links page” – a la LinkTree – but hosted on your website instead of relying on a third party. These are great for Instagram bios, as they let you link to several things. Here’s mine if you want an example.
These plugins are just the tip of the iceberg. If there’s something you want to do with your site, there’s probably a plugin that can help you do it.
Alright, now that you’ve got your plugins installed, let’s move on to the final bit – widgets.
Let’s Widgetize!
Widgets are elements that you can place on any part of your theme that has been “widgetized” – that is, set up for widgets to display. There are already a few widgets displaying on your site by default, like Category, Recent Posts, and Meta (though some themes might not display them everywhere).
Note: If you’re using a builder-style theme like Simple (the one I recommended above), you probably won’t need to worry about WordPress widgets. Builder themes typically include these types of things in their builder tools.
To edit the widgets that are displayed on your site, follow these steps:
- On the WordPress Dashboard, hover over Appearance and click on Widgets.
- On the right side of the screen, you’ll see all of the widget areas that have been created for your theme.
- Drag the widgets you want from the middle area into the correct boxes.
- Change any specific widget settings you need to change.
Widgets are automatically saved when you drag them in or out of a box. By the way, you can use the Widget Context plugin if you want to specify certain pages that a widget will or won’t be displayed on. This keeps things from getting redundant.

Since this is a personal site, there are some specific widgets you might want to show:
- Links – if you have friends who also have personal sites, it can be cool to link to them. I did this on my previous personal site’s sidebar; it was a cool way to build a visual network of student entrepreneurs.
- Text – as it says, this is a widget for “arbitrary text or HTML”. You can put anything in this list, granted that you know a smidgen of code. For instance, you could add a picture of yourself and a super-short bio like I’ve done on this site. Or you can embed your tweets using Twitter’s Profile Widget. There are a lot of possibilities here.
You’re Done!
You should now have a fully functional website! You’ve got all your pages created, your menus set, an awesome theme, some great plugins, and a maybe a few widgets in your sidebar.
Congratulations! You’ve just upped your internet cred +1000 and simultaneously made yourself a much more attractive candidate for any job you might want to go for.

Here’s a quick to-do list to make sure you get the most out of your site:
- Most important: Add your URL to the top of your resume – and if you’re displaying any work on your site, consider labeling it “portfolio” so recruiters know to check it out.
- Make yourself some custom business cards and be sure to include your URL on them
- Put your URL in your Twitter bio
- Add your URL to your other social networks – Facebook, Pinterest, LinkedIn, Google+, etc.
- Start thinking of your site as your online “base of operations”
At this point, you can consider your site “done”. In the next step, I’ll outline some ways you can take your site to the next level. Whether you decide to do that or not, I’d like to ask you to do one thing…
Send me your new site’s URL on Twitter! I’d love to check it out and see what you were able to come up with.
Alright, so for those of you who want to go above and beyond, let’s take the final step.
Step 5 (Optional): Make Your Website Even Better
The purpose of this tutorial was to get you from zero to having a working website as easily as possible. However, you can do so much more to optimize your site’s design, speed, SEO, security, navigation, typography… your options are endless.
That’s why I want to show you some of the things you can do to take your site to the next level. I’ll also point you to some resources you can use to get started!
Personal Website SEO: Making Sure You Show Up in Google Searches
One of the most common questions I get related to creating a website is:
“How do I get my site to show up in Google searches?”
This brings us to the topic of Search Engine Optimization, or SEO. Now, I’m going to be honest – SEO can be a complex business. After all, we’re talking about trying to make our websites look good to a mindbogglingly complicated algorithm, which has details that Google keeps closely guarded. Oh, and of course, millions upon millions of other sites are trying to do the same thing.
The good news is that Google’s algorithm (as well as the algorithms of other search engines) has gotten much, much better over time. Its mission has always been to serve up the most relevant results for what a person searches, and it’s gotten pretty good at doing that.
It’s also a lot faster at indexing new sites that pop up; when I started building websites, I remember having to manually submit them to search engines and then sometimes wait months to see them show up. Now, Google will index your site automatically – often in just a couple of days.
With all that being said, I want to share some things you can do to improve your website’s SEO. To keep things simple, we’ll take an 80/20 approach here – as in 80% of the results come from 20% of the efforts. Yes, there are lots of tiny little tweaks you can make to marginally improve SEO – and if you’re curious about them, you might want to check out this set of tutorials.
What I’m going to recommend is a set of three simple steps, which can each have a big impact:
- Have the right content on your site
- Get links from other authoritative and highly-trafficked sites
- Make sure your site is mobile friendly
Let’s start with your website’s content. The main way that Google figures out what’s on your site – and hence how relevant it is to a person’s search terms – is pretty simple: It reads your site! Google uses small pieces of code called spiders to “crawl” the content of the internet and index it.
As a result, the top question you need to ask yourself when creating your site’s pages, headlines, and biography is:
“What do I want to be associated with?”
Clearly, the main thing you want to be associated with is your name. However, many people share the same name – in fact, I’m a prime example.
I’m Thomas Frank, but Thomas Frank is also a well-known political author with several published books, bylines in high-profile websites and newspapers, and a Wikipedia entry.
Until quite recently, his fame ensured that I didn’t show up anywhere on Google’s first page when you searched “Thomas Frank”!
However… were you to search for “Thomas Frank YouTube” or “Thomas Frank college”, I did come up. Often first.
That’s because I worked to associate myself with terms that describe my career, industry, and interests – and I made sure my website mentioned them.
Here’s the first paragraph on my website:
“I’m an author, YouTuber, and speaker who is passionate about helping students succeed. Most of my work today is done at College Info Geek – a site I created in 2010 in order to share my experiments in becoming a more effective student.”
Notice that it lists author, YouTuber, and the words “students” and “college”. Google picks up on those terms and feeds them into its algorithm. They don’t guarantee that I’ll rank highly for them, but they help.
So let’s say you’re a graphic designer like my girlfriend Anna. If that’s the case, then you’ll naturally want to mention that on your website – ideally on the home page. But don’t just stop at “graphic designer” – what do you specialize in that you could mention? Maybe:
- Illustration
- UI design
- Wedding invitations
What about your location? If you live in Portland and you’re hoping to land a job or a freelance gig locally, then you’d do well to list yourself as a “Portland-based graphic designer and illustrator”.
Secondly, you need to understand the role that links from other sites play in your own site’s ranking. To put it simply, your site will rank more highly when it has:
- Links from a lot of sites (if they’re gotten legitimately – not in paid or spammy ways)
- Links from authoritative sites (typically sites with either a lot of traffic, or sites run by institutions like governments or universities)
The more competitive a search term is, the more authoritative links your site will need to rank for it. Ranking for “baseball” would be really hard, while ranking for “gorilla swallowing 18 baseballs” would be easier (and yes, I’d watch that).
This is why it’s important to link to your personal website from other sites if you can. This includes:
- Websites for teams you’re a part of (school organizations, etc)
- Social profiles – LinkedIn, Twitter, Goodreads, etc.
I will note that many social media websites are set up in a way that doesn’t let a link on your profile directly boost your ranking; however, making sure to have it there can lead other people to it (since Twitter and LinkedIn have a lot more traffic than your website), and they may end up linking to it from other sites.
If you want to go further, consider writing guest articles for sites in your industry or for your school newspaper. Links from those sites can help, especially if your name has a lot of competition like mine does!
Lastly, I do want to mention that Google puts a high priority on mobile-friendliness.
More than 50% of internet traffic now comes from cell phones and mobile devices, and Google has taken notice. Luckily, most good WordPress themes today are tuned for mobile responsiveness out of the box – meaning you probably won’t need to do much work to make sure your site is mobile friendly.
Still, it wouldn’t hurt to check out your site on your phone after you’ve built it in order to ensure that it’s easy to navigate and read.
For a deep dive into getting your site to rank in Google, check out our detailed guide to personal SEO.
Upgrading Your Brain
I started building websites when I was 12. At first, I was just using the super-old school Geocities site building tool to drag and drop elements. It was fun, but it wasn’t enough. Eventually I found that I needed to learn some code, and I began teaching myself HTML.
Luckily, the web has come really far in recent years. With content management systems like WordPress, anyone can make a beautiful website (as you just did) without knowing any code whatsoever.
Still, clicking around WordPress can only get you so far. There comes a point where you want to take your site to the next level, and you’ll need some web development knowledge to do it. With that in mind, here are some resources you can use to kickstart your web development education.
To keep things free, stick with these online resources:
- DevDocs – an amazing wiki chock-full of tutorials and references. If you’re a a reading-based learner, this is a great place to start.
- Mozilla Doc Center – another awesome place to learn the basics. I prefer the DevDocs, but this is a great alternative.
- Codecademy – a site that offers interactive courses on HTML, CSS, programming, and more. Definitely a good choice for those who learn by doing.
- Code Combat – a super-fun, video game-style site that can teach you either Javascript or Python.
- Design Tuts – the place to go if you’re looking to brush up your graphic design skills. They’ve got lots and lots of great tutorials.
- Codecourse – an amazing channel to watch free video tutorials on all different kinds of coding languages, including PHP, which is what drives WordPress.
- Web Design Tuts – part of the very large Tuts+ network ran by Envato. I’ve linked to one of their great beginners’ series.
- WordPress Codex – the official documentation of WordPress. There are a lot of great tutorials here, as well as a complete function reference for when you start getting really geeky.
- Smashing Magazine – an amazing online magazine with articles about every aspect of web development.
One additional resource I recommend, but that isn’t free, is Lynda.com. This is an amazing site to hit up if you’re looking for video courses on literally any web development topic. In fact, many universities offer their students free subscriptions to this site. Ask your school’s IT department to find out if yours is one of them.
Another great video-based learning library is Treehouse. Their library isn’t as extensive as Lynda’s, but they still have a lot to offer – especially in the area of web development. I actually prefer Treehouse over Lynda, as they include code challenges and quizzes with their video-based projects. In fact, I learned to build an iPhone app in just two days by using Treehouse. Unfortunately, I have yet to see any schools offering free subscriptions to their students – but that doesn’t stop your from asking!
Of course, another great way to learn web development is to simply look at code. If you’re using Google Chrome, you can hit CTRL+U (or if you’re on a Mac, just go to View -> Developer -> Source) to see the HTML for the page you’re on. You can also use the Web Developer extension to dig in even deeper. This method won’t work for viewing server-side code like PHP, but it’s great for digging into HTML, CSS, and Javascript.
If you’re a book learner, I have a few recommendations for your library:
- HTML and CSS: Design and Build Websites by Jon Duckett – a beautiful book that provides a great introduction to the basics of web development. This is a great starting point to any web development education.
- WordPress 24-Hour Trainer by George Plumley – if you’re looking for a book for beginning WordPress. Honestly, I think you can learn well enough by using the Codex and just playing with things. If you really want a book, though, this is it.
- Professional WordPress: Design and Development by Hal Stern – for the serious geek only. This book digs deep into WordPress. Only buy this if you’re interested in learning how the Core and Loop work or how to start building themes and plugins.
- Don’t Make Me Think by Steve Krug – the kickstart guide to web usability. A great way to learn how to make websites usable and accessible.
Web development education is a huge field, and I’m not going to pretend I can cover it all in one post. These resources will get you started, but know that there are lots of other great ones out there. One of the best ways to learn is simply talking to other developers!
Upgrade Your Site
Now that I’ve gone through ways you can learn web development, I’ll round out this post with some links that will teach you specific things you can do to make your site even better.
Here are some of my favorite WordPress-related blogs, which I read regularly to learn how to make my sites awesome:
And to get you started, one thing you may want to do is enable Google Analytics to track visitor statistics (thanks to Shep McAllister for reminding me to add this)
Conclusion: Where to Go From Here
You might not feel the weight of that word, especially if you just browsed through this article first before getting started. For me, though, it’s amazing to look at after spending over 15 hours writing this tutorial.
Hopefully, you now have a completely functional website and a budding knowledge and interest in web development. If you’ve gained either of those things, I’ve done my job!
Remember, if you need any help, you can contact me. I’ll either help you directly or point you to people or resources that can be of assistance. You can also just connect with me on Twitter without a need for help – I’d love to meet you!
You can also check out our list of 50 awesome personal website examples if you’re looking for ideas on how you can improve your own site even further.
Good luck!
***********
Did you find this tutorial useful? Want to give back a little? It only takes a second to share this post on Facebook or Twitter, and it helps other students find College Info Geek. Or, you can use the image to the right for sharing on Pinterest! Thanks!!!
If you want to get updates when I release more great content like this in the future, be sure to sign up for my email newsletter below!
***********