

When someone searches for your name in Google, what will they find? Probably your Instagram, maybe Twitter, and perhaps some old photos of you on your mom’s Facebook page.
While none of this is inherently bad (unless you have questionable content on your social media), it’s also not particularly impressive.
What if a prospective employer, business partner, or person you met at a networking event Googles you? You’d probably want them to find more than your random Instagram pictures.
Instead, you want to present a professional image, a picture of the work you’ve done and the work you hope to do. At the very least, you want your information to come up instead of someone else’s. The process of making this happen is called personal SEO (Search Engine Optimization).
That may sound obscure and technical, but it’s actually quite simple. In this guide, I’ll demystify personal SEO and show you how to make the right information show up when someone googles your name.
What Is Personal SEO?
The term “personal SEO” still isn’t that widespread. I think this is because SEO seems like a technical, complex subject to most people. People are more likely to ask, “How can I get my website or LinkedIn to show up when someone searches my name?” Or, “How can I make it easier for recruiters to find me online?”
But both of these questions are, at their core, about SEO. Search Engine Optimization means making online content easy for people to find using search engines. And, going a step further, it’s about making sure people find your online content instead of someone else’s.
There are lots of technical details and strategies to achieve those goals (some of which we’ll discuss later in this article). But the core principle is simple: make it easy for people to find your online content.
Personal SEO, then, means applying SEO principles to your personal online presence. This could include your LinkedIn, personal website, and anywhere else you “hang out” online.
So how can you use SEO principles to start increasing your online visibility? First, you need to determine your goals.
Define Your Personal SEO Goals
A lot of people want to show up when someone googles their name. And while that’s a good start, you won’t achieve much if you stop there.
Instead of focusing just on your name, I invite you to think more broadly about what you want people to find when they search for you:
- Why do you want to be found?
- What do you want to be known for?
- And who do you want to find you?
If you can answer these questions, then it will be much easier to start building and optimizing an online presence.
For instance, let’s say I’m a recent mechanical engineering graduate living in Denver, CO. I know there are recruiters looking to hire people with my skills, and I know they’re searching online. I also know that I have a particular interest in working for a smaller company in the aviation industry. And I’d like to stay in the Denver metro area if possible.
Using this information, I can start to define some personal SEO goals and answer the above questions:
- Why do you want to be found? I’m looking for mechanical engineering jobs at smaller companies in the aviation industry.
- What do you want to be known for? I want to be known for my interest in applying my skills to aviation projects.
- Who do you want to find you? Recruiters or hiring managers working for the types of companies that interest me.
This is a somewhat simplified example, but it gives an idea of the thought process you should go through to determine your personal branding goals.
Taking some time to do this exercise will make the rest of the process a matter of filling in the blanks. If you try to create your online presence before you figure out your goals, you’ll have a much harder time.
But once you’ve figured out your goals, how do you start building a relevant, discoverable online presence?
How to Build an Optimized Online Presence in 8 Steps
This section will take you through the process of building an optimized online presence. “Optimized” means that it’s easy for search engines and humans to find the right information about you.
A lot of guides to personal branding consider this “advanced” information that you should learn later, but I think this is a mistake. Because if no one can find you online, the brand you build is irrelevant.
Having said that, I recognize that some of this information can be a bit intimidating. So I’ve organized this section in order of importance, starting with the most important steps. Feel free to work through each item at your own pace and build on previous steps as you gain more knowledge.
Fill Out and Optimize Your LinkedIn Profile
If you do nothing else on this list, take the time to create and fill out a LinkedIn profile. LinkedIn has put a lot of resources into making their site easy to use (and optimized for search engines). This makes it an easy way to get started. Plus, you can often use your profile in lieu of a resume.
I won’t talk too much about the minutiae of making a LinkedIn profile, as we already have a very detailed guide on that. But there are a couple of specific things you can do to make it easier for people to find your LinkedIn:
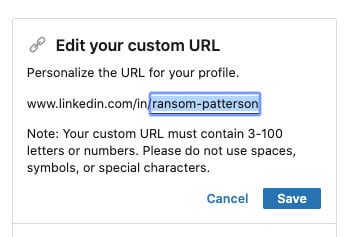
Claim Your Unique URL
By default, the URL for your LinkedIn profile is likely a string of gibberish with parts of your name mixed in. While this doesn’t affect the functioning of your LinkedIn profile, it can make it harder for search engines to find you.
To improve your chances of showing up in Google, take the time to change your URL to your real name (here’s how).
If you have a common name, you may not be able to get your exact name. But you can still get something close by adding your middle name or initial.
Include Keywords in Your Profile
While it’s possible that someone is searching for your name alone, it’s often more likely that they’re searching for “your name + job” or “your name + city”. And if a recruiter is using LinkedIn to search for candidates, they might just search for “job title + city” or “job experience + city”.
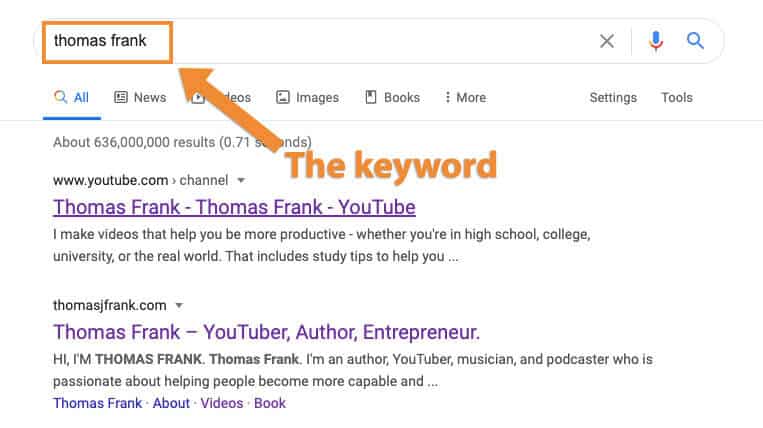
To increase the chances of your profile appearing in these searches, include some keywords relevant to what you do. A “keyword” just means whatever word(s) someone uses when they perform a search in Google or another search engine.
So, for instance, if you worked in accounting, you’d want to include the word “accounting”, “CPA”, or whatever describes you in your LinkedIn Summary, Experience section, and other parts of your profile. It may seem obvious, but you’d be amazed how few people think to do this.
For more tips on creating a LinkedIn profile that will get you hired, check out our full guide to LinkedIn.
Make a Personal Website
So you have a high-quality LinkedIn profile. Congrats! You’re already ahead of many people.
But while a LinkedIn profile massively increases your online visibility, it’s still limited. You can’t change the way it looks or easily showcase work you’ve done. And it’s all still under the control of LinkedIn. If LinkedIn shuts down for some reason, then your online presence will disappear.
For these reasons, I recommend creating your own website. Think of it as a resume for the 21st century: a place to showcase who you are, what you’ve done, and what you want to do.
Creating a personal website can be intimidating. But if you break the process into small steps, it’s easier than you’d think.
To see this full process, check out our ultimate guide to building a personal website. The guide shows you how to build a professional personal website in a few hours, no coding or technical knowledge required.
Once you’ve done that (or if you already have), you can follow the next few steps to make your site easier for people and search engines to find.
Register Your Personal Domain Name
Okay, so this is something you should do before you build your personal website. But I still want to mention it because it’s one of the simplest things you can do to make it easier for people to find you in Google and other search engines.
When I was a college freshman, I registered ransompatterson.com. Within just a few months of doing so, my site showed up when I googled “Ransom Patterson”. And it does so to this day, as you can see below:
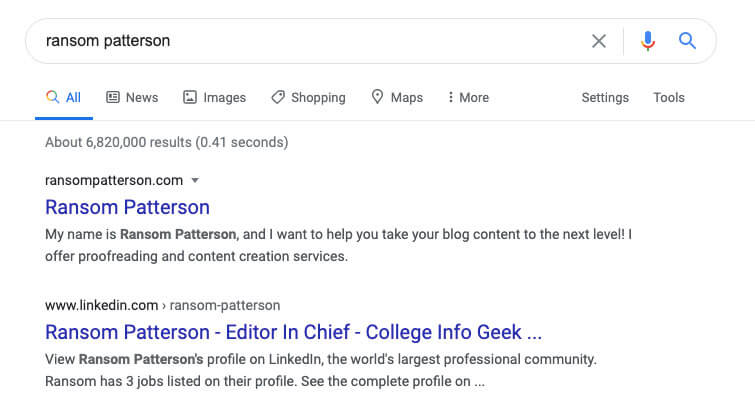
If you want to achieve this, then owning the domain for your name is very helpful.
But what if you have a common name? I realize that not everyone has an unusual name like mine. Even in this case, though, you can still register something that’s as close as possible to your first and last name.
For instance, this website’s founder is named “Thomas Frank”. Not only is this a pretty common name, but it’s also the name of a prominent historian and political analyst. Since “thomasfrank.com” wasn’t available, Thomas searched for variations and registered “thomasjfrank.com”.
No matter your name, you can do something similar. If using your middle name or initial doesn’t work, you can also create a pun on your name and register that URL. For instance, our web developer has “martinboeh.me”, a pun on his name (Martin Boehme) and the .me domain.
Just be creative, and don’t obsess about getting your exact name. As you’ll see in the next few sections, there are plenty of other ways to associate your website with your name.
Write an About Page with Your Name and Relevant Keywords
One of the key components of any personal website is an About page. Your About page is your chance to describe who you are and what you do to anyone who lands on your website. Think of it as your digital “elevator pitch”.
From an SEO perspective, be sure that your About page includes your name and also keywords that describe what you do. If you’ve already written a Summary for your LinkedIn profile, you can use that as a starting place.
For instance, here’s the About page for Ashley Diers, a freelance letterer and illustrator who does graphic design/illustrations for this website:
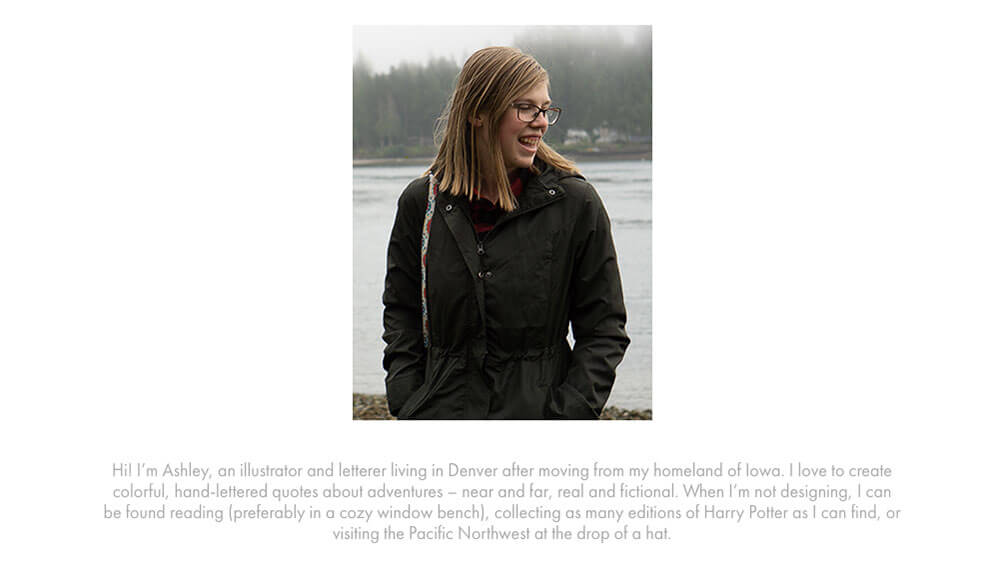
Her About page contains relevant keywords such as “illustrator”, “letterer”, and “designer”. At the same time, it remains interesting and personable.
This is an important balance to strike. While you should include keywords, be sure to incorporate them naturally into what you write. People (and Google) can tell if you’ve written something that’s only trying to appeal to search engines.
Make Your Website Easy to Read
In the product design world, this is called “creating a positive user experience”. And you should view your site in much the same way. When someone lands on your website, is it immediately clear what you do? Is the site well-organized, making it easy for a visitor to find the information they (and you) want?
These may seem like elementary considerations, but it’s easy to lose track of them as you fiddle with your website and tweak the design. Remember that, above all, your website should be clear, easy to read, and easy to navigate.
There are whole websites about this type of “on-page SEO”, but here are a few simple things you can do to make your site friendlier to humans (and search engine algorithms attempting to mimic human perception):
- Avoid walls of text.
- Break up your text with descriptive, keyword-rich subheadings.
- Use bold, italic, and underline formatting sparingly. Just like with exclamation points, they lose their impact if you use them too much.
- Use short sentences and frequent paragraph breaks.
- Include links to other pages on your site (internal links). This makes it easier for people to find what they’re looking for.
- Keep your site navigation simple. Have 4 or 5 pages at most in your navigation menu. For a great example, see my friend Matt’s site.
- Choose a site theme that focuses on simplicity and minimalism. If you’re using WordPress and want some suggestions, see this section of our personal website guide.
Fill Out the Meta Information for Your Pages
This topic is a bit more advanced, but it can make a huge difference to how (and how often) your site appears in Google searches.
Meta information refers to the info about your site that people see when your site appears in a search result.
The two main pieces of meta information you should worry about are the meta title and meta description.
The meta title is the “title” that shows up for your page in a Google search. The meta description is the snippet of text that appears under the title. Here’s a diagram showing both:
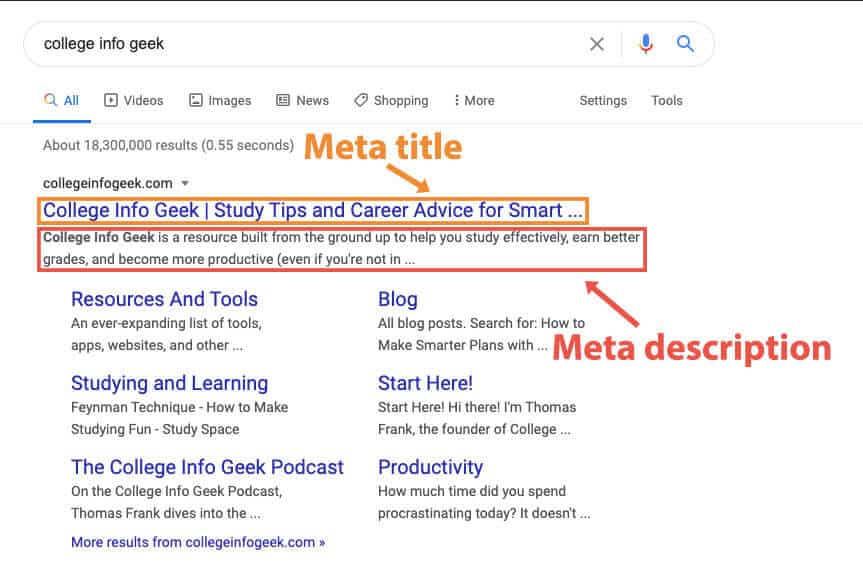
This info helps humans using Google quickly see what the page in question is about. And it helps search engines display the page in the first place.
To boost the chances of your website appearing in Google, make sure to write relevant, compelling meta descriptions and meta titles for the pages on your site. At the very least, you should fill this out for your Home and/or About page (for many personal sites, the About page is also the Home page).
How to Add Meta Information in WordPress and Other Website Builders
If you’re using WordPress, then the easiest way to add a meta title and description is with the free Yoast SEO plugin. Once you install Yoast, it adds this box to the bottom of every page/post in the WordPress editor:
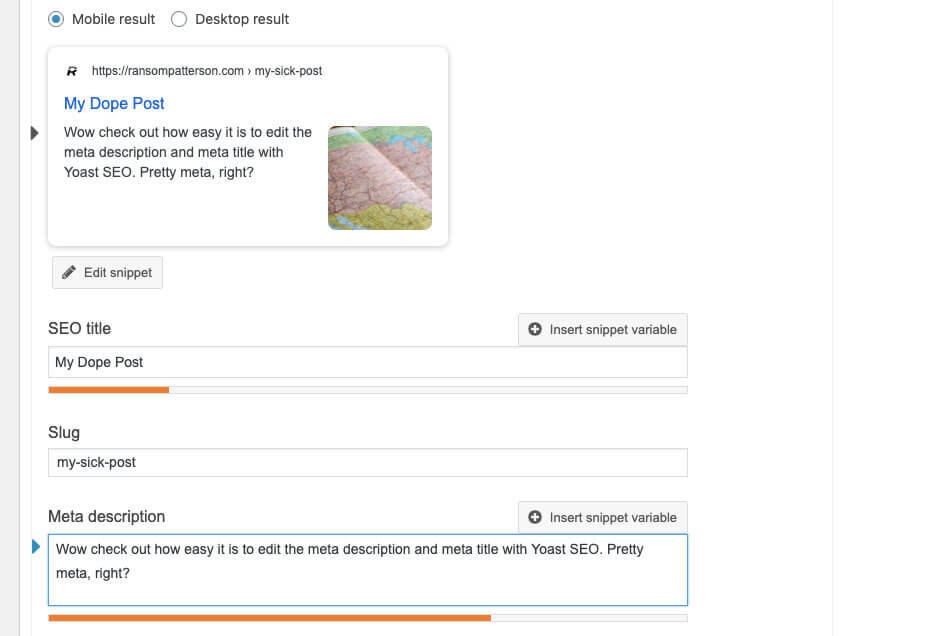
Using this, you can quickly edit the meta title and meta description. Note that if you don’t specify this information, Google will generate it using the content on your page. This isn’t necessarily bad, but it also isn’t necessarily the information (or keywords) that you want to highlight.
If you aren’t using WordPress, your website builder will have similar features for defining the meta description and meta title (if it doesn’t, then you should find a different tool). Here are links to instructions for editing the meta description and meta title in several common website builders:
Add Descriptive Alt Text to Your Images
If you made it through the last section, then you must be really serious about SEO. Great! The next thing you can do to improve your site’s visibility is to add descriptive alt text to your images.
Without getting too into the weeds of HTML, the alt text (also called the alt tag or alt attribute) is a piece of HTML you can add to an image to describe what the image is.
But why would you need this? Isn’t it obvious what the image is from looking at it?
It might be obvious to you, but there are still two good reasons to add alt text to your images:
Alt Text Increases Accessibility
Alt text (and other HTML tags) help people with visual impairments navigate your site. Screen reading software can detect alt tags and then read them aloud. If you don’t include descriptive alt text, then people with visual impairments will have a poor experience on your site.
Plus, if the link to your image is somehow broken or someone is accessing your site on a slow internet connection, alt text offers an alternative for the web browser to display (which is why it’s called “alt” text).
Alt Text Helps with SEO
In addition to helping people with visual impairments navigate your site, alt text helps search engines understand the contents of the images on your page. Search engines can’t actually “see” images, so alt text is important to help them make sense of them.
Furthermore, if the alt text contains relevant keywords, it can improve the page’s rank for certain keywords. (“Rank” refers to the position a page occupies in Google search results. Higher is better).
However, you need to be careful. You can’t just use any words you want in the alt text and expect your page to rank. Doing so is a form of “keyword stuffing.” If Google detects this, it can hurt your site’s rank.
When it comes to your personal website, however, you have a great opportunity to include relevant, keyword-rich alt text. The most obvious way is to fill out the alt text for your headshot or other photos of you. For instance, you could give your headshot the alt text of “[YOUR NAME] headshot [YEAR]”.
And if you have images of work you’ve done, you have a similar opportunity to include keywords in the alt text. For instance, a website designer could have an image of a site they designed with alt text like “ramen shop website design”.
So how do you edit your images’ alt text? While you can add the information directly to a page’s HTML, this is unnecessary in most modern website building tools.
Here’s how to add alt text to images in several popular website builders:
Speed Up Your Website
Have you ever waited for a page to load and then given up because it was taking too long? Certainly, and no one can blame you.
Not only do slow websites create a poor user experience, but Google has also stated that site speed is a factor in page rankings (though creating relevant, high-quality content is still more important).
So for the sake of both a better user experience and improved SEO, you should make your website as fast as possible. Here are some things you can do to speed up your site:
Optimize Image Size
Most of your website consists of text, which doesn’t take up a lot of file space and is thus quick for web browsers to load.
Images, on the other hand, can have very large file sizes. This makes them a common culprit for slow websites.
Ideally, you should use as few images as possible; no images will always load faster than even the best-optimized images.
In the real world, however, there are many good reasons to use images. At the very least, your personal website will contain a headshot and probably some images of your work. But you should still make sure these images load as quickly as possible.
As we already mentioned, smaller image file size = faster page load time. So your goal is to decrease the file size of your images as much as possible without sacrificing image quality.
Luckily, there are many plugins and websites that use advanced image processing algorithms to do this for you.
If you’re using WordPress, you can use a free plugin like Smush (which we use on this website).
If you’d rather not mess with plugins, you can also optimize the image with an image editor. Photoshop, for instance, has a “Save for Web” option that I use on all images I add to this site.
And if you don’t have or don’t want to pay for Photoshop, you can use a website like TinyPNG for free image compression.
Remove Unnecessary Plugins
This is mostly aimed at WordPress users, though it applies to other website management systems.
Go through your plugins and delete any that you aren’t using or that aren’t really necessary. You can even do a Google search for the “plugin name + slowing down site” to see if the plugin has known site speed issues.
The broad principle here is that the more code a site has to use to display a page, the longer it will take to load.
Remove Social Sharing Buttons and Pop-Ups
This next suggestion is a little controversial, but I encourage you to consider it.
Back when I was learning how to create a blog, the common advice was to add social sharing buttons to every page of your site.

And, in a similar vein, to include pop-ups to capture email addresses.
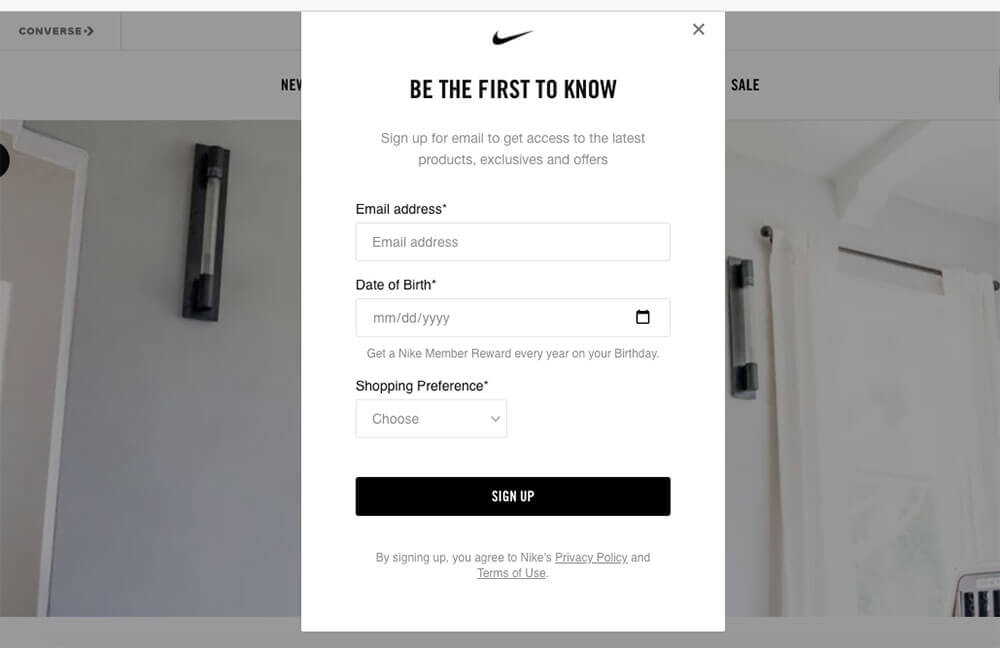
While neither of these features is “wrong” per se, I’ve since decided that they’re not worth the harm they do to site speed and user experience.
Displaying those social sharing buttons requires a plugin that includes extra code. Loading all that code can drag down your site speed. And I also think those buttons are generally unnecessary. If someone thinks your content is worth sharing, they’ll find a way to share it.
Pop-ups can be a trickier topic. The marketing research overwhelmingly tells us that they work. At least, they accomplish the goal of collecting more email addresses.
But again, is it worth the downsides? Pop-ups are super annoying (which is why they’re so effective). And they also require extra code that can slow down your site. So in my mind, they’re not worth it (particularly on a personal website).
Simplify
Above all, you should go through your site, examine each element, and ask, “Do I need this? Does it improve the user experience?” If the answer is no, then you should get rid of it.
Much of the advice in the previous section comes from my friend Matt’s Page Speed for Bloggers course. If you want to create a blazing fast website, you should give his course a look.
Personal SEO FAQ
To conclude this guide, I want to address a few common questions we get about building an online presence.
How do you approach personal SEO if you anticipate changing your last name?
A podcast listener submitted this question to us, and this article seemed like a fitting place to address it. If you think you may change your last name (for marriage or other reasons), how should you go about creating an online presence?
Anna (artist, author, and editor of the CIG podcast) had some very helpful answers that I’m going to include here (edited for brevity and clarity). For the full exchange, check out the original Twitter thread.
So first off, I’m not actually sure whether or not I plan to change my maiden name when Tom and I get married.
But let’s assume that I would:
- I’ve already thought ahead a bit about this and decided that for my novels, I will be using a pen name similar but different from both my own maiden name and my prospective last name.
- For my art brand, I don’t use my name at all. My artist name is “It’s Raining Color”. When I talk about myself in regards to artwork, I just go by “Anna.”
I’ve done both of these partially because it’s what I wanted but also partially because I did anticipate the possibility of a last name change.
If I had been using my first/last name as my brand and decided to change my last name, I would either:
- Not bother changing it even if it’s not my legal name anymore.
- Come up with a different brand, either using my legal name or something completely different.
Ultimately, it depends on what the person thinks is right for them.
How important is social media for personal SEO?
Social media can be a way to build an online following, promote your work, and create the habit of regularly sharing content.
However, I generally think you’re better off putting that energy into creating and publishing work on a platform that you own (i.e, a personal website).
Not only does it give you more control, but it also has greater longevity compared to social posts that disappear into the digital ether.
And from a personal SEO perspective, having your own website is far more valuable (given the choice, Google will usually show your website before your social media profiles).
Finally, even a basic website is far more impressive to a prospective employer than your social media feed.
How much time should I spend promoting myself?
You may have heard the advice that you should spend 20% of your time creating and 80% of your time promoting. This always seemed like terrible advice to me, and I don’t recommend it (especially when you’re getting started).
Assuming that your goal is to do great work, you should spend most of your time creating it. I suppose if your goal is to “famous,” you’d want to put more time into self-promotion, but I can’t help you there.
How long will it take for my website to show up in Google?
If you recently created a personal website, you may notice it doesn’t appear when you google your name. This is normal. Even if you do everything I recommend in this guide, it will still take Google some time to “index” your site and display it in search results.
Unfortunately, there isn’t a definitive answer to how long this will take. It could be a few weeks, a few months, or even a few years. For instance, it took Thomas several years to rank number one for “Thomas Frank”.
Overall, don’t worry about it. The work you put into creating your online presence will still pay off when you have a website and high-quality LinkedIn profile to use in job applications and interviews.
Personal SEO Is a Process
I hope this article has shown you how to start building an optimized, discoverable online presence.
Remember that this takes time; be patient.
Also, don’t feel like you have to implement every tip in this guide at once. It took me years to learn and apply this info, and I’m still learning new things every day. Good luck on the journey!
Image Credits: smartphone showing google search result