

If you’re reading this article, then you’re likely familiar with social media channels like Facebook, Twitter, Pinterest, Instagram, and TikTok. You probably even have an account with a few of these, and maybe you spend time on one of these platforms instead of studying.
But what if there were a way you could be on social media and advance your future career prospects? That’s exactly what we’ll cover in today’s post, which is all about LinkedIn.
We’ll explore why LinkedIn matters as a student, how to create your LinkedIn profile (including some LinkedIn summary examples for students), how to use LinkedIn to network, and how to use LinkedIn to find jobs and internships.
5 Reasons Students Should Be on LinkedIn
LinkedIn is the social network people love to make fun of. And sure, much of the criticism is fair.
LinkedIn is a tool, one that you can use to advance your career (the subject of this post) or waste massive amounts of time. It’s all about how you use it.
Used correctly, however, LinkedIn can have immense benefits for you as a student. Here are a few reasons why:
1. LinkedIn Helps You Establish an Online Presence
Unless you’re trying to join an industry so clandestine that it has no internet presence whatsoever, you need to be online in order to connect with potential employers.
While the best way to do this is to create a personal website, LinkedIn is an easy way to establish an internet presence that people can see when they search for your name in Google or want to connect with you after a networking event.
And unlike your Frozen fanfic Tumblr, your LinkedIn profile is a social media account you want potential employers to find when they search for you.
For example, here’s what happens when I Google my name (using Incognito Mode to ensure that the results aren’t biased):
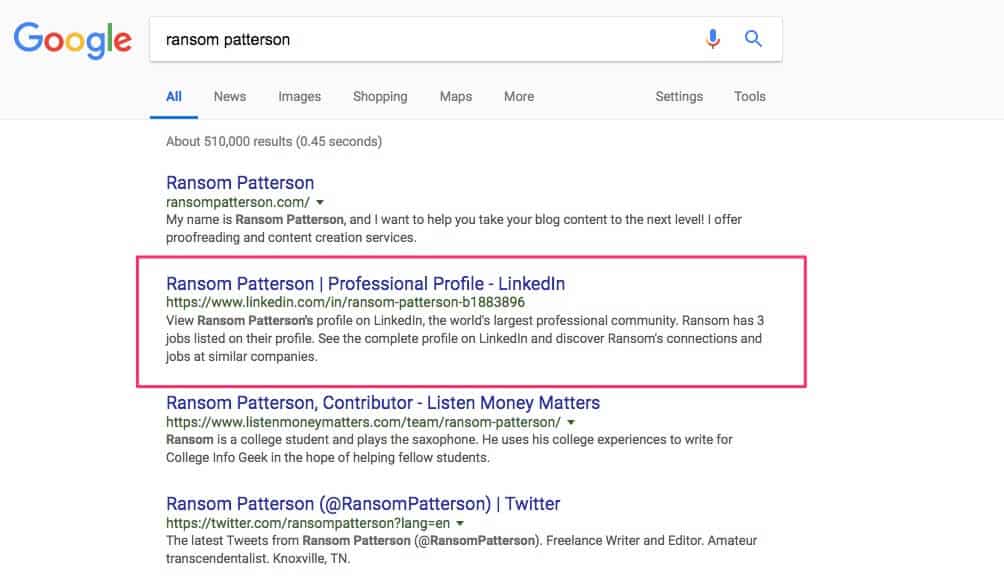
While my personal website comes up first (all according to plan), you can see that my LinkedIn profile shows up second. And if I didn’t have a personal website, then my LinkedIn profile would likely be the first result for my name.
Granted, I have a pretty unique name, but it still demonstrates the power of LinkedIn for helping you create a personal brand online.
2. LinkedIn Can Supplement (or Even Replace) Your Resume
If you don’t have a resume, then stop reading this article immediately and don’t return until you’ve created one (here’s how). Like it or not, resumes are still an essential part of applying for a job. The introduction of LinkedIn, however, has changed the game a bit.
While many employers still want a PDF copy of your resume, plenty are also happy to use your LinkedIn profile instead. And even if they do want a more traditional resume, employers will likely still review your LinkedIn profile to get a broader picture of your experience, professionalism, and skills.
Therefore, why not give yourself the extra competitive edge and make a LinkedIn profile?
3. You Can Use LinkedIn to Apply for Jobs
Some employers now go a step further than asking for your LinkedIn profile in place of a resume and require you to use LinkedIn to apply for the job.
Because of this reality, you must ensure you have a quality LinkedIn profile ready to go before you need it to apply for a job.
4. LinkedIn Lets You Research Prospective Employers
Employers may be using LinkedIn to learn more about you, but you can also turn the tables and use LinkedIn to research them. Some companies are better about updating their LinkedIn pages than their official website, and you can also use LinkedIn to learn more about the people who will be interviewing/hiring you.
Of course, don’t be creepy about it, but use LinkedIn to find out if the company would be a good fit for you to begin with. Companies also tend to post press releases and other news on their LinkedIn pages, which can serve as a conversation starter and major credibility booster during a job interview.
5. LinkedIn Helps You Connect with Alumni from Your College
Finally, you should be on LinkedIn in order to connect with the vast network of people you already have something in common with.
That’s right, I’m talking about alumni from your college. Alumni who are far more senior in their careers (or even own their own companies). Alumni who would love to give career advice to a student like you (or maybe even offer you an internship).
These are people that would ordinarily be difficult to reach, but through the magic of LinkedIn, they’re just a message away (we’ll cover how to use LinkedIn for networking in a bit).
How to Create Your LinkedIn Profile (and Mistakes to Avoid)
Now that you understand why it’s so important to have a LinkedIn profile, we can move to the part where most students get stuck: creating one.
And not just creating any old LinkedIn profile — creating a high-quality profile that will impress recruiters.
Don’t worry. It’ll be easy if you follow these steps:
1. Use a Professional Picture
The picture is the first impression people will have of your LinkedIn profile. And the only thing worse than no picture is a bad picture. You don’t need to have a professional photoshoot, but make sure that you avoid the following things in your LinkedIn profile picture:
- Inappropriate attire. You don’t have to wear a suit, but you definitely shouldn’t be in your bathing suit, either. How formally you dress depends on what kind of industry you’re going for. For example, investment bankers are going to dress up a bit more than web designers (on average). If you have any doubt, err on the side of “business casual” at least.
- Poor quality photo. Don’t use pictures that are blurry, grainy, dark, blown out, or that otherwise make it difficult to see you. It makes you look lazy and careless.
- Poorly cropped photo. Don’t use a picture that was taken from too far away, and please don’t use a picture of multiple people cropped to show just your face (save that for your dating profile).
- Outdated photo. This becomes more of an issue as you advance in your career. But even as a college student, the way you look can change a lot from freshman to senior year of college. Try to keep your photo as current as possible. This can also apply if you had facial hair in the picture and then shaved it all off (or vice versa).
What’s the easiest way to avoid a bad LinkedIn profile picture? Have your college career center take it for you. This isn’t an option at every college. But even at my ~2,000-student liberal arts college in rural Ohio, the career center had a photographer available for a couple hours every Wednesday to take LinkedIn photos. Yours probably has something similar.
If not, then here’s another cheap/free option: ask around your college class’s Facebook group or art department to find a photography student who wants the practice/portfolio material. Just offer to buy them lunch in exchange, and they should be happy to help.
2. Write Your Intro
Once you have the profile picture, you can get to work creating your profile. LinkedIn will guide you through this process, but you should take some of its suggestions with a grain of salt.
In particular, LinkedIn will tell you how “complete” your profile is. You don’t need to worry about it being 100% complete, as you run the risk of adding too much information and overwhelming anyone who tries to read it.
The one section you should be sure to fill out, however, is your intro. This is what people see when they first go to your profile page. You should spend the majority of your initial setup time working on this section. After that, you can add further details as necessary.
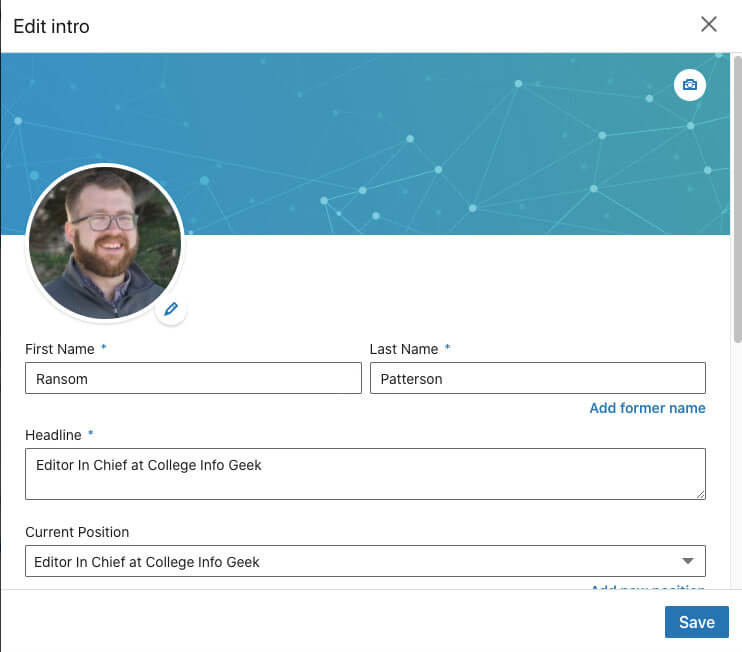
To get to the intro section, click the little pencil icon next to your profile:
Once you click that, you’ll see the following screen:
When you scroll down, you’ll see options for adding additional info (I’ve redacted the private info in mine, but the boxes in yours should be blank):
Let’s go through each of these boxes one-by-one.
1. First Name and Last Name
Mostly self-explanatory. You’re not required to use your legal first name if there’s a different name you’d prefer people call you. Just make sure you use that name consistently across all application materials and communications with prospective employers.
2. Headline
Use this field to give a super brief explanation of what you do/want to do. If you don’t fill this out, LinkedIn will automatically use your current job title and employer. This can be okay, but leaving it on the default is a wasted opportunity to make a compelling first impression. After all, you have 120 characters, so use them!
What should you include in your headline? Start with a description of what you do, and then make it more specific. For example, let’s say you’re an RA. By default, LinkedIn might write something like “Resident Advisor at Iowa State University”.
Nothing wrong with writing it that way, but compare that to a rewritten version that focuses on the results of what you do: “Fostering Intellectual and Personal Growth as an Iowa State Resident Advisor” (and that’s still only 76 characters. Boom!).
By taking a little extra time to write a headline that’s more specific than the default, you’ll be able to stand out from all the other students who’ve had the same basic jobs or internships.
3. Current Position
This section allows you to show people where you currently work and what you do there. Note that it’s fine to include internships here (yes, even unpaid ones), as long as you’re currently doing them.
But let’s say you just started a new part-time job or freelance position. How do you go about adding and describing that? Here’s what you do.
First, click on “Add new position”:

From there, you’ll see the following screen:
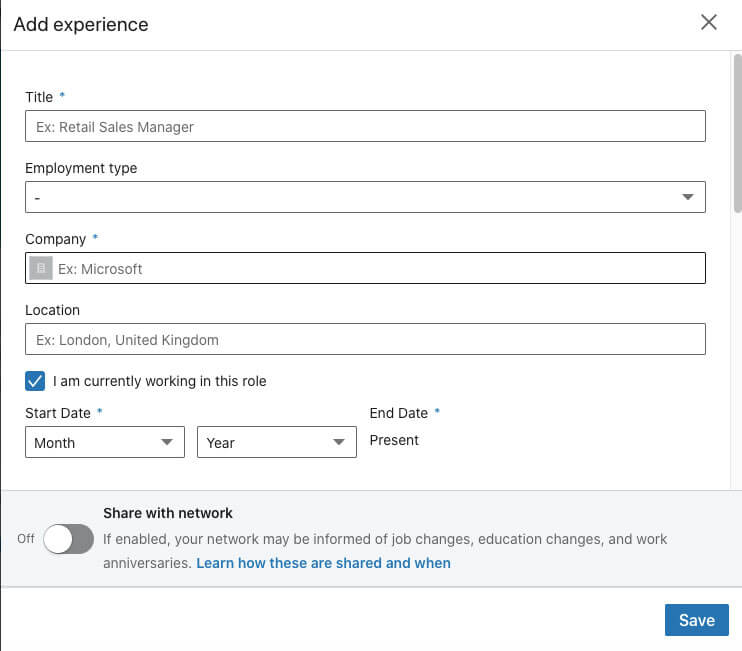
Filling out this information is fairly straightforward. Just use your actual job title, search for the name of the company, add a location, and then choose the dates you worked there (or click “I currently work here” if that applies).
Optionally, you can note the type of employment (part-time, full-time, freelance, apprenticeship, etc.).
Once you have that basic info filled out, you should write a description of the job. This can be much the same as your resume. But as with a resume, don’t only include what your job duties are — write about your accomplishments, your results. That’s what future employers care about.
From there, you can choose to update your headline and notify people in your network about the job change. As a student, you don’t need to be too concerned about notifying people, as it’s unlikely you’ve worked at any particular company for very long.
As a professional, however, you need to be careful who you notify. You certainly don’t want to notify your current employer of a new position before you’ve submitted your resignation (or, at least, you don’t want them to find out via LinkedIn before you’ve told them).
The same principles apply to previous work experience. Be honest, and focus on the results of what you did rather than the job duties.
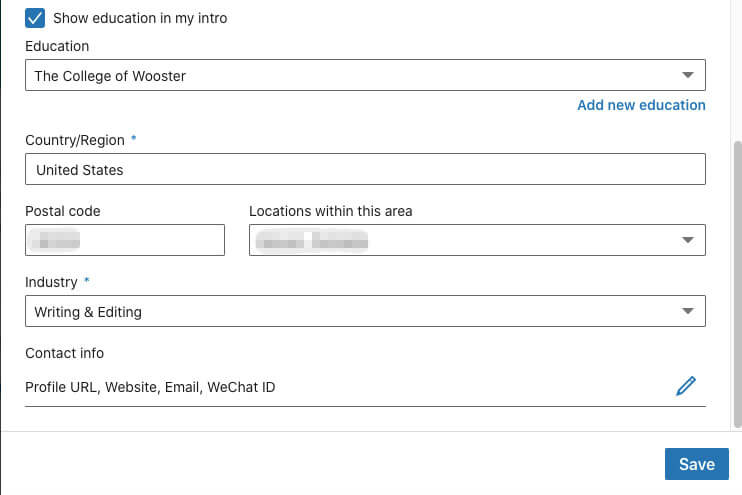
4. Education
This section is essential; do not neglect it. If you’ve graduated, you can put the years you were in college; otherwise, you can put your expected graduation year. This shows employers that you have or will have a college education. But even more so, including your college (or even high school) is a powerful tool for networking, as we’ll explore later on.
5. Country/Region, Postal code, and Locations within this area
At minimum, you’re required to put your country/region. But I’d recommend that, as long as you’re comfortable doing so, you also put more specific location info.
Don’t worry, your postal code won’t appear on your public profile. But it will help LinkedIn suggest job or internship opportunities within your area, as well as assist you in joining relevant local groups.
6. Industry
Just pick whichever industry is closest to the one you do (or want to) work in. If you can’t find a perfect match, that’s okay. What you write in your headline and summary are what people pay attention to. Adding your industry just helps LinkedIn suggest jobs and also aids recruiters in finding you.
7. Contact Info
This is a quick step that a lot of people overlook, but I suggest you take a couple seconds to add any contact info you’re comfortable including.
To do this, click the pencil icon under the “Contact info” section:
You’ll then see a screen like the following:
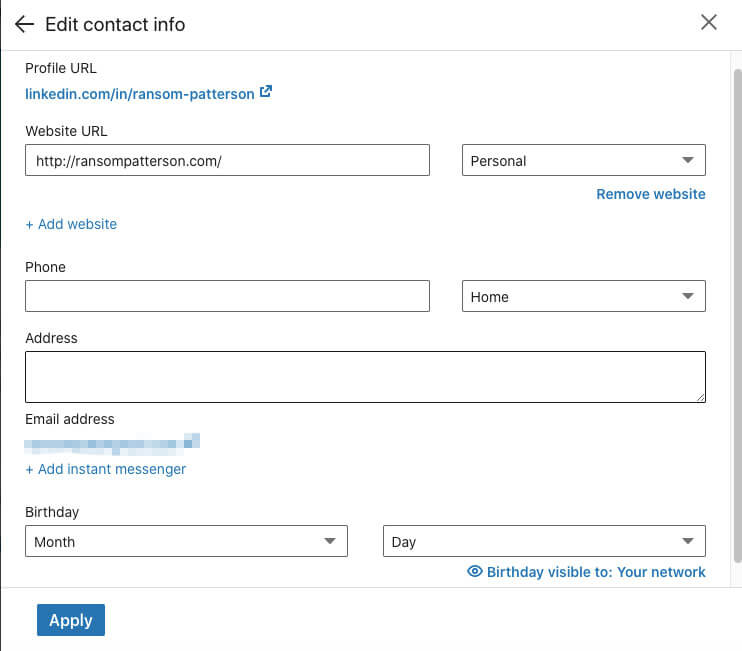
Fill out as little or as much as you want. I recommend including at least your personal website and email address.
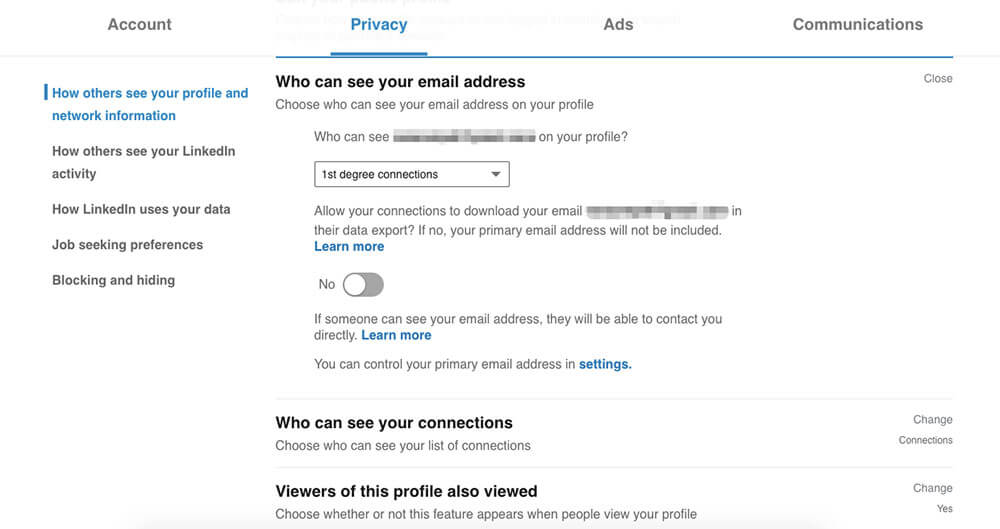
If you decide to include your email address, be sure your privacy settings are set so that only 1st-degree connections (people you’ve connected with directly) can view your email address.
To do this, go to the Privacy Settings page, click “Who can see your email address,” and select “1st degree connections”:
3. Write an Excellent Summary
Of all the sections of your LinkedIn profile, the summary is the most intimidating (talking about yourself is hard). But don’t skip it! The summary is a chance to tell a more detailed story about yourself and your career while also showcasing your writing skills. Trust me: if you can write an essay or lab report, you can write a LinkedIn summary.
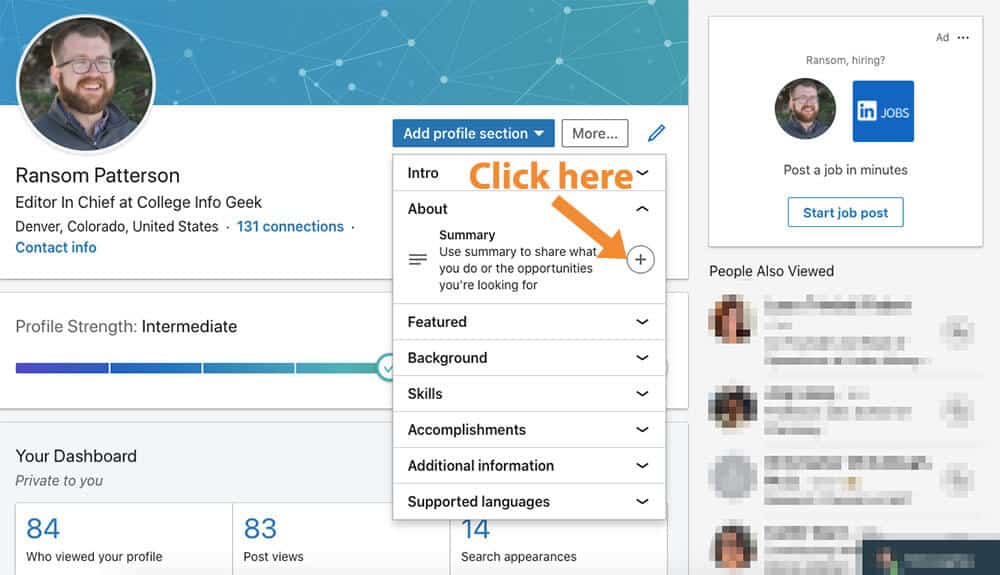
To start writing a summary for your profile, click “Add profile selection”, select the “About” tab, and then click the “+” icon next to “Summary”:
You should now see a blank box like the one below:
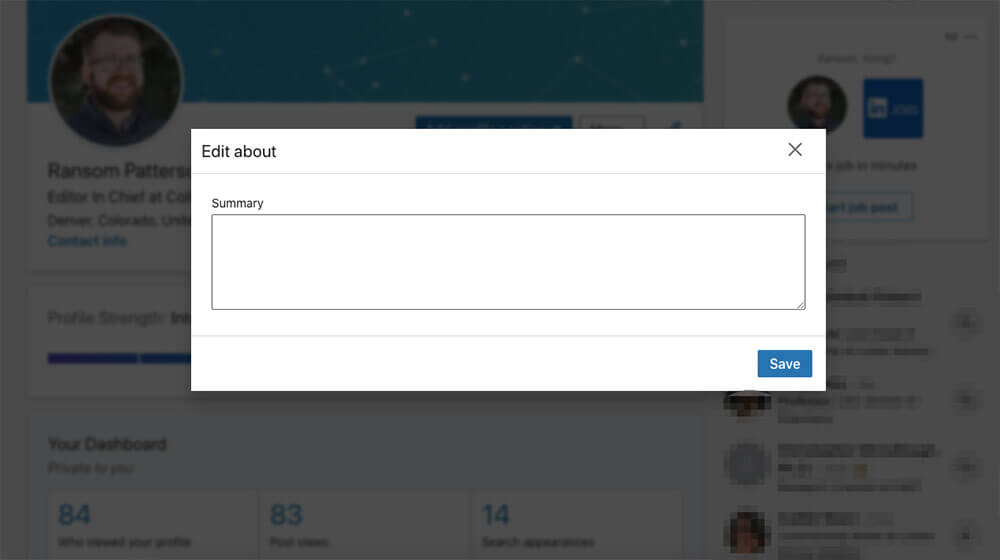
But what should you put in this scary blank box? Here are the essential steps for writing a great LinkedIn summary as a student:
0. Don’t Use the Summary LinkedIn Generates
LinkedIn can now generate a summary for you based on your existing profile information. While this sounds great in theory, the results are less than spectacular. Here’s the summary LinkedIn generated for me:
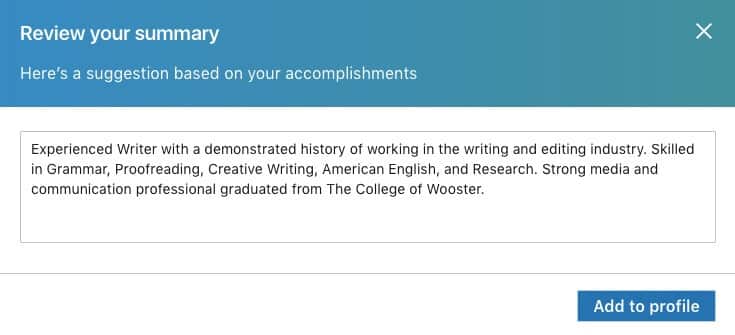
Unsurprisingly, this sounds like something a computer wrote. Humans don’t talk this way, and neither should you. So skip the default summary, and use our tips to write one from scratch.
1. Write in the First Person
The first person is when you use words like “I”, “me”, and “my”. I hope you wouldn’t describe yourself in the third person in an interview, so don’t do it in your LinkedIn summary either.
2. Don’t Make it Too Long
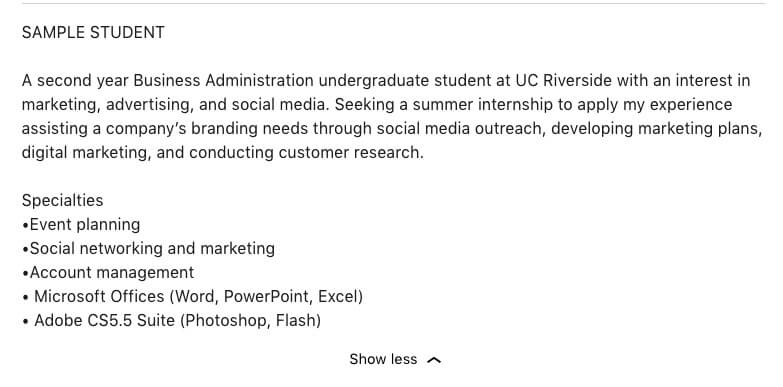
You have 2,000 characters to use in this section, but that doesn’t mean you need to use all of them. Three paragraphs are plenty, especially since as a student you don’t have decades of job experience to summarize.
Here’s an example of a real student summary that’s the perfect length:
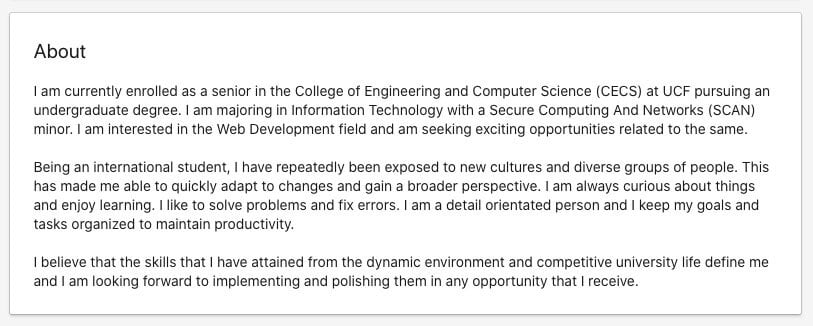
As you can see, it’s possible to convey the important information without writing a novel.
3. Use White Space
You may not have noticed it consciously, but this article uses lots of white space. None of the paragraphs are more than a few sentences long. This makes the article much easier to read (especially if you’re on a mobile device). You should follow the same principle when writing your LinkedIn summary.
Big walls of text are hard to skim and make it look like you’re rambling. Whereas shorter paragraphs with plenty of white space look approachable and allow a recruiter to get a quick glance at who you are without having to slog through one endless block of words.
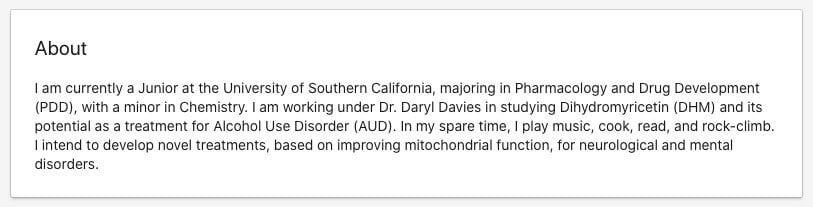
4. Treat It Like a Cover Letter
When you’re applying for a job, the purpose of a cover letter is to show the employer things about you that they couldn’t learn just from reading your resume. Writing a cover letter that just summarizes your resume is boring and a wasted opportunity to show employers that you’re more than just a list of qualifications.
You should take the same approach with your LinkedIn summary. Use the summary to tell a brief career story (even if it’s just about the career you aspire to have). Here’s an example taken from another real student profile:
5. Proofread, Proofread, Proofread
You wouldn’t submit an essay or job application full of typos and grammar errors, right? You should take your LinkedIn summary just as seriously, as it can do far more damage to your professional reputation than an isolated essay or job application that only one professor or company sees. Your LinkedIn summary is available for the entire world to view, after all.
Once you’ve written your summary, don’t post it without running it through a program such as Grammarly and getting a trusted friend, professor, or mentor to look it over.
Ideally, find someone who works in an industry that interests you and get them to proofread it and offer feedback. (If you don’t know anyone in a relevant industry, don’t worry. We’ll discuss how to use LinkedIn to connect with such people later on in this post).
Here are some mistakes to watch out for (including ones that spell-checking programs don’t always catch):
- Spelling of company names – If you worked at a particular company and you want to mention it in your summary, ensure you spell the company name correctly. For instance, people often misspell “WordPress” as “WordPress”. Spell-checking programs often won’t catch errors like this, particularly if the company in question isn’t well-known.
- Your vs you’re – This is an easy mistake to make when you’re typing fast (I did it many times when writing this post). Most word processing programs will catch it, but sometimes one will slip through the cracks.
- There, their, and they’re – Probably the best example of why English spelling is horrible, these three words are easy to mix up when typing.
- Its vs it’s – Another common error that I’ve even seen seep into published online articles.
6. Include Keywords
Like all of business these days, hiring is becoming increasingly data-driven. What this means for you is that recruiters will use particular keywords to filter through LinkedIn profiles in order to find potential job candidates.
According to the documentation for LinkedIn Recruiter (the part of LinkedIn that lets recruiters search for job candidates using profile information), LinkedIn will search “all relevant places on a candidate’s profile that skills may exist (i.e. Summary, Experience, etc.).” This means that you should include your relevant skills in your Summary, not just in the Skills section of your profile.

Of course, as we said before, you don’t just want to list your skills. Rather, you should weave the skills keywords into a narrative about where you are in your career currently (and where you’d like to be in the future).
Just because recruiters are using computers to search for your profile, that doesn’t mean you should write a profile that only computers can read. At least until we reach the singularity, humans are still the ones making the ultimate hiring decisions.
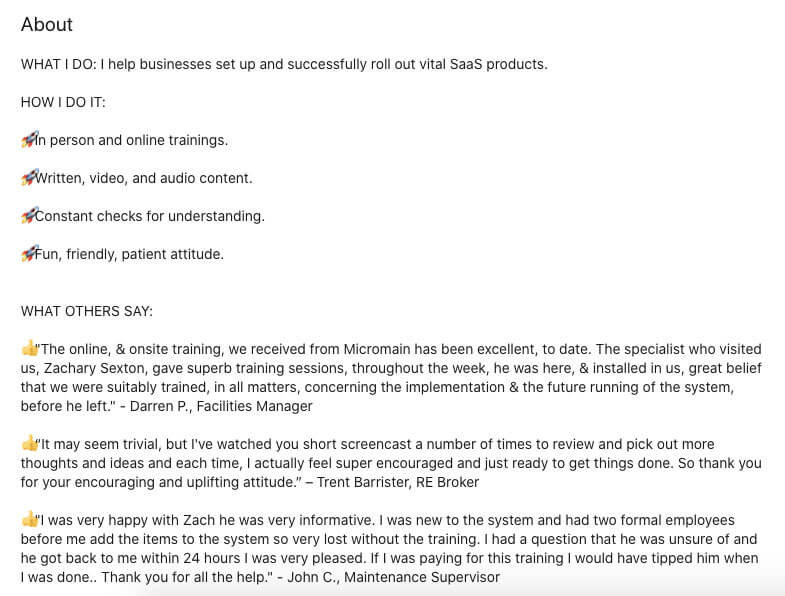
Here’s an example from my friend Zach Sexton’s LinkedIn profile. Zach isn’t a student, but his summary is a fine example of how to exemplify your skills through a compelling narrative:
7. Describe Your Accomplishments
If a recruiter wants to see what job titles you’ve had or where you worked, they can look at the Experience section of your profile. What you can’t express in other parts of your profile is what you accomplished in the jobs you worked. So use your summary to convey this information.
For example, let’s say you had an internship at a design firm. You didn’t get to have a lot of responsibility (mostly you scanned documents and got people coffee), but near the end of your time at the company, your supervisor finally let you do some mockups for a client website.
This is the aspect of your internship that you should focus on, on how you created mockups for a client website designed to serve 100,000 customers in the United States (not on how you got coffee and learned about the value of hard work).
More generally, any time you can tie the work you did to hard numbers related to business success, include that in your summary. Did you help create a new process that boosted lead generation by 10%? That’s an accomplishment right there, and it’s a lot more compelling than a generic list of skills or personal qualities.
4. Add Your Experience
Once you’ve written a kickass summary, it’s time to add your experience. Now, maybe you’re thinking, But I don’t have any experience. I’m still a lowly college student.
Odds are, however, you have something you can add here.
A lot of students freak out about this section and think that they need to have a dozen positions with impressive titles. This couldn’t be further from the truth.
Remember: Recruiters know that you’re a college student. So you don’t need to write a LinkedIn profile that makes it sound like you’ve been working in business for ten years.
Of course, if you have done something really impressive such as intern at a high profile company or start your own business, put that in your Experience section by all means. But don’t think you have to sound older or more accomplished than you are.
Here are some things you can include in the experience section:
- Internships, both paid and unpaid.
- Part-time jobs
- Entrepreneurial or freelance work
Want to add volunteer experience? LinkedIn has a separate section for that, which we’ll discuss below.
5. List Your Skills

After you add your experience, you can plug in a few key skills. LinkedIn allows you to add up to 50, but I’d advise against that.
Why? We need to be clear about what “skills” are for the purpose of jobs. A skill is not something you read about once, or have practiced for a few minutes. For example, I can play a few chords on the guitar, but I would not list it as a skill.
How do you determine if you should list something as a skill?
Here’s a good rule of thumb: if you’re not prepared to demonstrate a skill in an interview, don’t list it in your LinkedIn profile. Taking two semesters of Spanish is not the same as being fluent in Spanish; using Photoshop to make a couple funny pictures to amuse your friends does not mean you should claim you can use Photoshop for work.
And whatever you do, do not lie about having a skill. Your future employer will find out — it’s just a question of when. Plus, starting your job on the basis of a lie is just a crappy thing to do.
6. Claim Your Custom URL
We already mentioned the power of LinkedIn for establishing an online presence; this tip will help you optimize that process. To help your LinkedIn profile rise to the top when someone searches for your name, we recommend claiming your custom URL.
This won’t always be possible, especially if you have a common name like “Thomas Frank” (to use a random example).
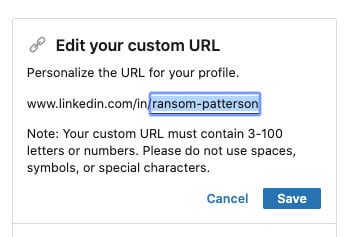
But it’s worth looking into, as even if the URL for your name is already taken, you can still customize your URL to be something easier to remember and find than “www.linkedin.com/ransom-patterson-acbedgfh13abw2443142fdfsfa”.
To customize the URL for your LinkedIn profile, go to your LinkedIn page and click on “Edit public profile & URL”:
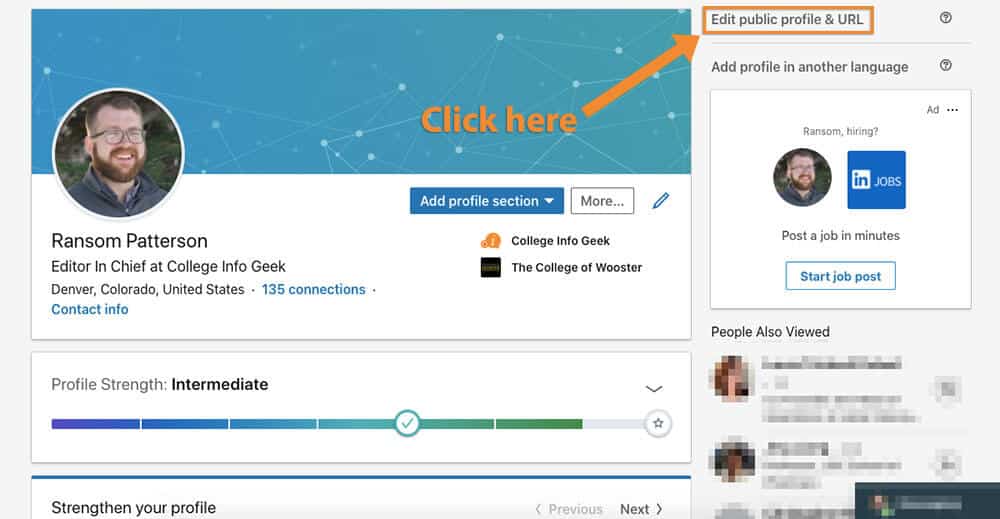
You should see a page that looks like the one below. On that page, click the pencil icon underneath “Edit your custom URL”:
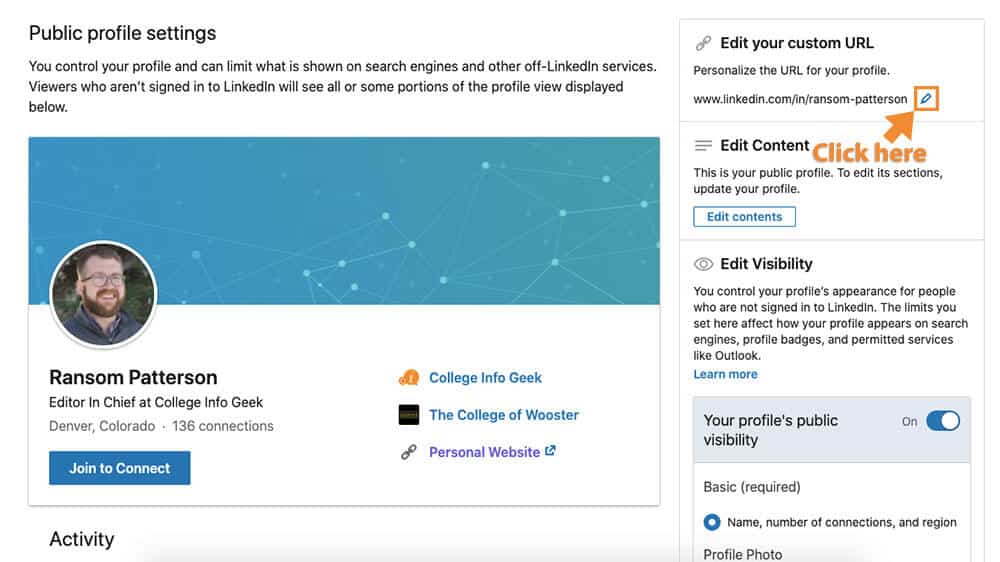
Once you click that, you can type in the URL of your choosing:
If you try to pick a URL that isn’t available, LinkedIn will alert you:

For more information on how to customize your LinkedIn URL, visit the official documentation.
7. Add Additional Profile Sections As Relevant
If you’ve made it this far, congrats! You’re nearly done creating your profile. Before you finish, however, there are a few more sections you should consider filling out. These sections aren’t essential, but they can be a useful addition to your profile. The sections are as follows:
Volunteer Experience
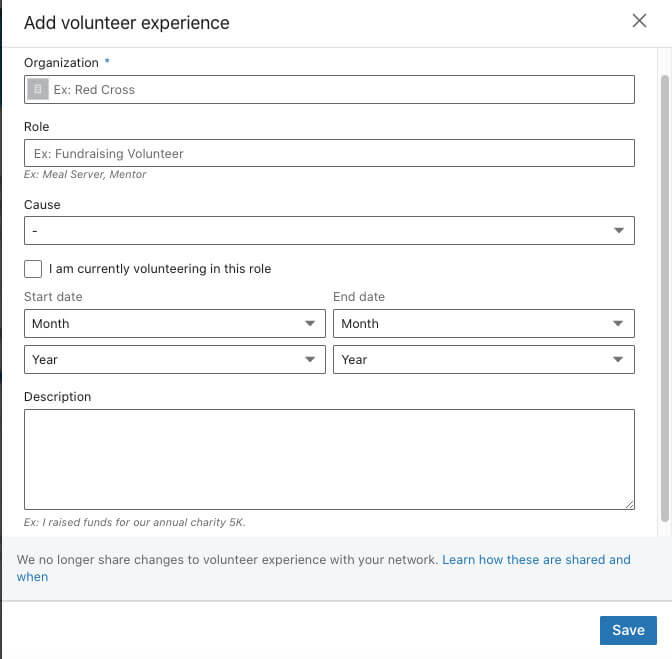
While it isn’t a “job,” volunteer experience can still teach you lots of valuable skills and impress potential employers.
In recognition of this, LinkedIn has a section for including your volunteer experience. As you can see from the photo above, you can add similar information to the Work Experience section.
And as with work experience or skills, only include volunteer experience you actually have.
Accomplishments
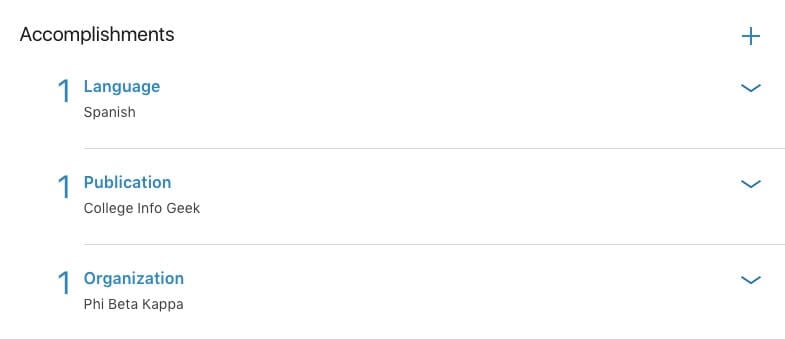
The Accomplishments section is a catch-all for things that don’t fit in the rest of your profile. If any of them apply to you, by all means add them. The Accomplishments section lets you showcase:
- Publications – If you worked on a paper that was published in an academic journal, had something published in a campus publication, or just published something online, you can list it here.
- Patents – Probably not the case for most students (or most people), but you never know.
- Courses – Take a course outside of your college major? This is the place to include it. Make sure that this course is something that goes above and beyond your normal college coursework (i.e., don’t include general education or summer courses that are required for graduation).
- Projects – Work on a cool side project? Show it off (you can include a URL and also add ongoing projects).
- Honors & Awards – Add any awards you have received for academic or extracurricular pursuits.
- Test Scores – I would recommend skipping this section unless you have a very high score and it’s directly relevant to a career or educational opportunity that you’re pursuing. For example, if you have a high GRE score and are applying to graduate school, go ahead and list it.
- Languages – If you speak a language well enough to have at least a basic conversation, then include it here. If your proficiency is lower than basic conversational, I’d suggest you omit it from your profile, as it’s unlikely to be useful for any job duties.
- Organizations – This is where you can list any honor societies, Greek organizations, or professional organizations you’re a member of.
Add a Profile in Another Language
If you speak another language at a high level (i.e., nearly native or bilingual) and are pursuing employment opportunities that you will conduct primarily in that language, then you can create a profile in another language to increase your visibility to potential employers.
This is not something you should do unless you speak this other language well enough to use it for high-level professional interactions and are looking for jobs that require it. For most people reading this article, you’re better off listing your language proficiency under the “Accomplishments” and “Skills” section of your profile.
Here are LinkedIn’s official instructions for adding a profile in another language.
8. Update Your Profile Regularly
Okay, so you’ve followed all the advice above and have an exceptional profile to show for it. Now, all you need to do is keep your profile up to date.
After all, you don’t want your profile to show your most recent work experience as the fast food job you had in high school if you’ve since done an internship with a consulting firm. And you especially don’t want it to say you currently work or intern somewhere you no longer do.
Luckily, this is an easy issue to avoid. Just use your task management app to set up a recurring task that says something like “Update LinkedIn profile”. Since we (assume) you aren’t changing jobs constantly, it’s safe to set this sort of task to recur every few months or so.
How to Use LinkedIn to Network
Now that you’ve created your LinkedIn profile, let’s put it to work for you. Here’s what you need to know to use LinkedIn to make the connections that will help you find internships, jobs, and other cool opportunities.
1. Be Professional
The topics of discussion and overall tone for LinkedIn are generally more serious and straightforward than other social media platforms.
This doesn’t mean you have to sound or look like a corporate robot, but it does mean that LinkedIn is probably not the best place to share your thoughts on your favorite sports team or video game. (Unless you’re trying to work in sports or video games, in which case that could be appropriate).
Likewise, don’t use LinkedIn to express your political opinions, shower thoughts, or social commentary. Save that for Facebook and Twitter.
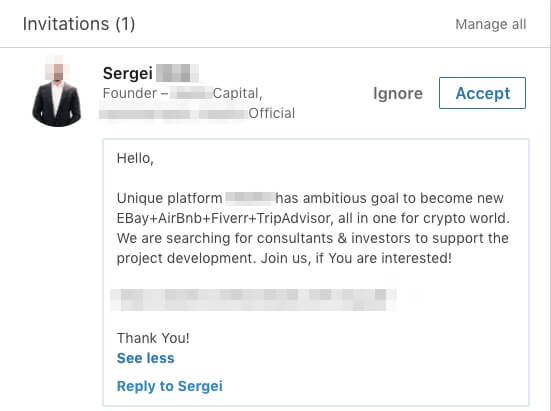
2. Connect with as Many People as Possible
Don’t be annoying or weird, but don’t be afraid to accept connection requests or offer to connect with the people LinkedIn suggests. You never know who might be valuable to know.
Connecting doesn’t cost you anything, so it can’t hurt. I’d say that in general, you don’t have to know someone as well to connect with them on LinkedIn as you would to add them on Facebook. And what’s more, LinkedIn works to connect you with people with whom you already have a connection.
When you do connect with someone, however, make sure to personalize the default message that LinkedIn uses for connection requests. You don’t have to make it elaborate or long, but do make it personal. If you can explain (or remind) someone why it makes sense to connect with you, they’ll be more likely to accept.
Whatever you do, don’t be like this guy that tried to connect with me the other day:
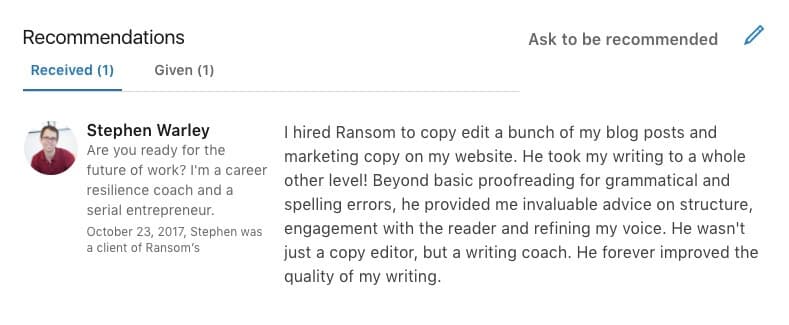
3. Get Recommendations
We’ve talked before about the value of letters of recommendation for job applications or other opportunities. In a similar vein, LinkedIn has a built-in feature that lets you get recommendations from people you’ve worked with or for.
Recommendations aren’t the most essential part of your profile, but getting a couple genuine ones can help boost your credibility. After all, what someone else says about your work means more than anything you could say, provided the recommendation comes from a credible source.
To ensure your recommendations are credible, ask former employers, coworkers, or even professors to write them. Recommendations that come from your family or friends are obviously going to be biased, so avoid those. It is fine, however, to work something out where you and a former or current coworker “trade” recommendations (provided that the information is honest, of course).
For example, you can see in the image below how a former client and I have written recommendations for each other based on our experience working together.
4. Don’t Obsess Over Endorsements
Once you’ve connected with a few people on LinkedIn and added some skills, you’ll likely get a couple of endorsements, as well as suggestions to endorse people you know.
What are endorsements?
As LinkedIn explains, “When a connection endorses your skills, it contributes to the strength of your profile, and increases the likelihood that you’ll be discovered for opportunities related to the skills you possess.”
In other words, endorsements are a way to boost your credibility for certain skills. At least, that’s the theory. In practice, I wouldn’t worry about getting endorsements for every skill you list on your profile.
After all, we’ve already emphasized the importance of only including skills you can actually perform. Because of this, any extra validation from your network is icing on the cake, but not critical for your career success.
And beyond that, you should never forget that goal of using LinkedIn is to connect with people who can help you achieve your professional goals. Time you spend seeking out endorsements is likely time you could spend doing more productive activities.
5. Join and Contribute to Relevant Groups
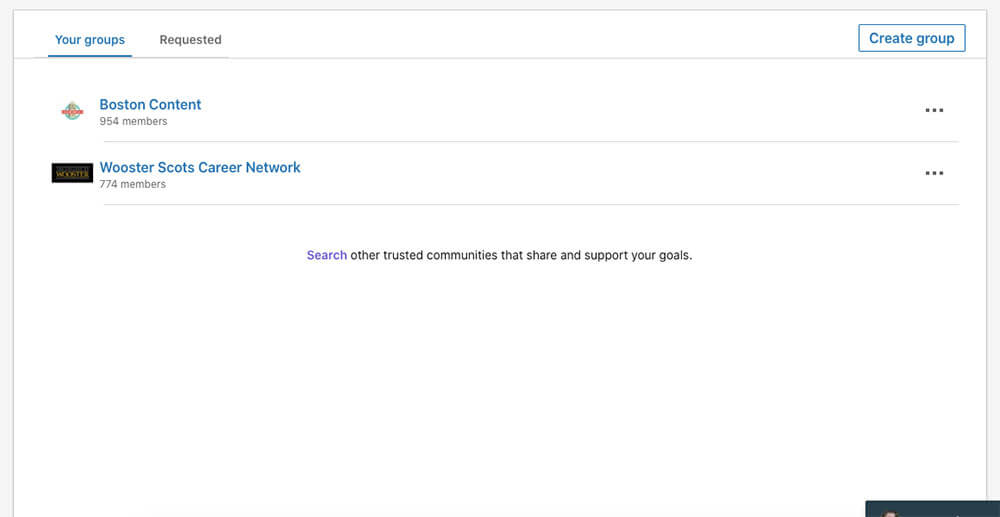
LinkedIn Groups let you connect with people who share your professional background, are alumni of your college, or just have a common interest. They’re one of the quickest ways to grow your network once you’ve already connected with people you know.
To get started finding groups, look for one associated with your college. Depending on the size of your school, there may also be a group for your major. You can also join local groups relevant to your interests or professional goals (especially if you go to school in a larger city).
6. Use LinkedIn to Complement Events
If you’ve read any of our other articles on networking and finding a great job, you know how important it is to get out and attend career fairs and other events around your college/town. LinkedIn is a great way to make sure that all the time you put into attending the event and presenting yourself well doesn’t go to waste.
So once you’ve met some interesting people and exchanged business cards, you can use LinkedIn to follow up later. Be sure to do this as close to the event as possible (ideally the same day) so that you’re still fresh in the person’s mind.
Just search for the person’s name and then send them a message reminding them of how you met at the event, enjoyed talking, and would love to connect in order to stay in touch.
How to Use LinkedIn to Find Jobs and Internships
LinkedIn is excellent for forging new connections, but it’s also a powerful tool for finding jobs and internships. Here are several ways you can find professional opportunities through LinkedIn:
1. Search LinkedIn Jobs
The most straightforward way to find opportunities through LinkedIn is to search LinkedIn Jobs.
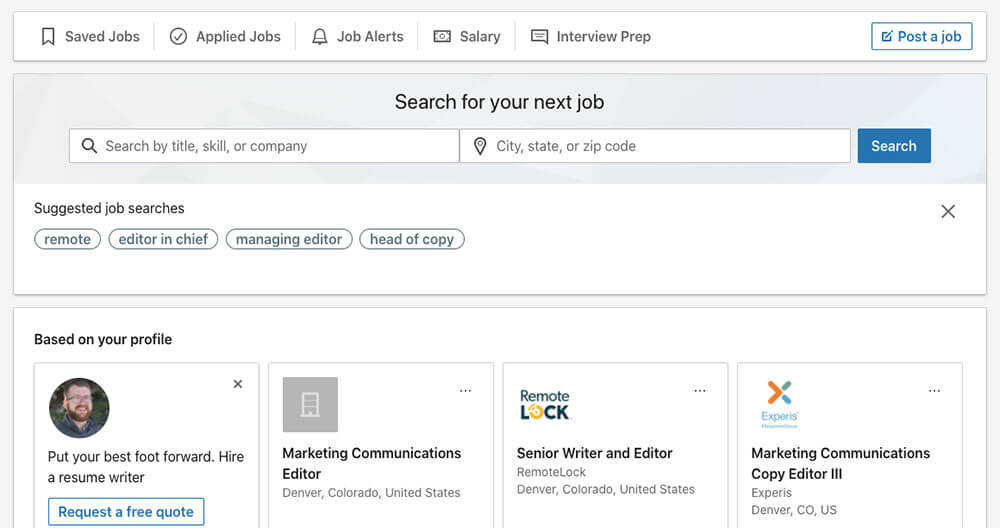
To get started, go to the LinkedIn Jobs page. By default, this page will show you jobs for which LinkedIn thinks you might be qualified based on your listed experience, skills, and interests. The recommendations aren’t always perfect, but they’re a place to get started and can help build your awareness of the companies out there.
To get more targeted with your search, you can search for jobs based on location and job title. For instance, here’s what I get when I search for “marketing” with the location set to “Nashville”:
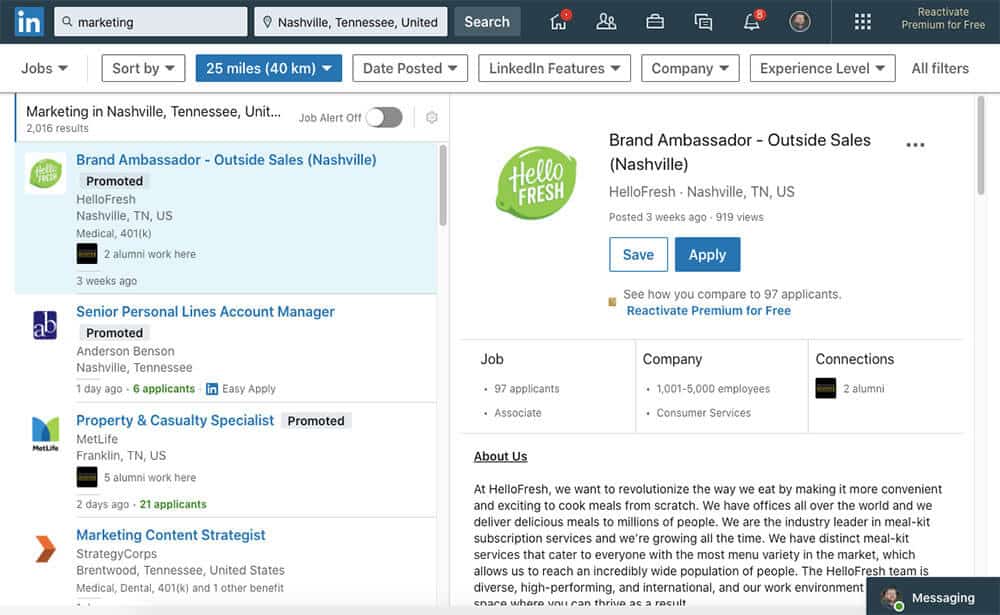
From this screen, you can filter your post based on additional criteria such as “Date Posted”, “Experience Level”, and “Company”. You can also sort based on specific LinkedIn features such as “Under 10 Applicants”, “In Your Network”, and “Easy Apply”. The “Experience Level” option can be especially helpful for students, as you can use it to show only internships.
2. Reach Out to Key Employees
You can also use LinkedIn to complement your job search on other platforms.
If you’re applying for an opportunity that you learned about on a job board, search LinkedIn to see if you can use it to get in contact with anyone associated with the organization. It doesn’t have to be the person who’s in charge of hiring (although if it is, even better), but look for someone you know who knows a person from the organization.
If you do find someone, ask if they can introduce you. They’ll usually be happy to do so. Especially if you use the phrase “I’m a student”. People love helping students.
3. Create Your Own Opportunities
Finally, you can use LinkedIn to create your own opportunities. Once you’ve built up some connections, you can reach out directly and ask if the person’s company is hiring interns for the upcoming summer. Just be sure to ask well in advance of the summer (I recommend as early as the fall semester).
This technique is super powerful, as it can allow you to find job and internship opportunities that aren’t listed on the job boards. These positions not only have way less competition, but they can also be a lot more educational/interesting than an internship you found through more traditional means.
Go Dominate LinkedIn
Phew! If you made it all the way to the end, then you’re clearly a boss. You now know everything you need to create a LinkedIn profile that will get results, as well as how to use LinkedIn to find the opportunities you want.
But all of this information will remain just that if you don’t take action. LinkedIn exists to help you make real connections with real people. So what are you waiting for?
Stop reading this article, get out there, and start networking!
Image Credits: featured image