
Your email inbox is out of control, even though it feels like all you do is answer emails.
You’re not alone in feeling this way. According to a report from McKinsey, the average knowledge worker spends around 28% of the workweek reading and answering email.
This is an absurd amount of time to spend on something that stresses you out while also creating little of value.
So let’s fix it. Here’s how to quickly get through all of your email (also known as “inbox zero”) so that you can spend your time on more useful pursuits.
Process Email at a Set Time Each Day
How many times per day do you check email? It’s probably more than you think. It’s tempting to switch back and forth between your email inbox and whatever other work you’re doing. After all, what if someone needs you for an urgent task?
While this is an admirable attitude, it will destroy your productivity. The best way to create meaningful work is to focus your whole attention on one task.
If you switch your attention to your email, it will take your brain some time to refocus on what you were originally doing (this is known as a “switching cost”).
So instead of looking at your email several times a day, have one set time each day to process all of your emails. This way, you won’t interrupt a more productive task to “glance at your inbox.” Plus, you’ll avoid procrastinating on email and letting unanswered messages pile up.
Note: This tactic only works if you disable email notifications. Otherwise, your email can still interrupt more important tasks.
Unless you’re in a position where you need email to make quick decisions, you shouldn’t have notifications enabled for them. Important as your job may be, it’s unlikely to be that important.
Looking for a better email client? Check out our top 7 picks.
Archive or Delete Messages When You’re Done with Them
Now that you have a set time to process email each day, let’s move to taming that inbox. We’ll start with a tip that sounds obvious but makes a huge difference: archive or delete messages when you’re done with them.
It’s easy to treat your inbox as an archive, but this is what leads to a cluttered inbox. Your inbox should be for items that you need to take action on. Once you’ve taken an action, delete or archive the message in question.
Ruthlessly Unsubscribe from Newsletters and Marketing Messages
Archiving and deleting messages is key to keeping your inbox clear. But you should also take steps to reduce the number of messages that make it to your inbox in the first place.
Marketing messages and newsletters are some of the biggest sources of inbox clutter. Sure, some of these messages are valuable and worth keeping around.
But if you find yourself continually deleting/archiving the same messages without reading them, it’s a sign you should unsubscribe from them.
If you really want to keep an archive of a particular newsletter, then you can create a filter to automatically archive it. This way, you have copies of the newsletter for reference but get rid of the inbox clutter. If you’re not familiar with filters, we’ll cover them in a later section.
Pro Tip: If you’ve unsubscribed from a newsletter but are still getting emails, just mark the email as spam to avoid getting any further messages. Don’t feel bad about doing this; federal law requires marketers to make it easy to unsubscribe.
Don’t Use Your Inbox as a Task Manager
Using your inbox as an archive is bad, but using it as a task manager is even worse. It’s easy to fall into this trap. You see an email and think, “I have to respond to this.” However, responding requires you to take a few other steps that you don’t have time for right now. So you put off responding “until later,” and the unanswered emails pile up.
Luckily, it’s easy to eliminate this problem: use a task list. Here’s how to use your email inbox and task list together:
Clear Out the Junk
To start, clear out your inbox of any items that don’t require action. This means archiving or deleting.
Sometimes people have trouble deciding if they should archive or delete messages. To fix this, I have a simple rule. If I ever think I’ll need something again, I’ll archive it.
Modern email programs have so much storage that it’s unlikely I’ll ever fill up the archive. And if I do for some reason, I can clear it out later.
Take Action on Quick Tasks
Once you’ve archived or deleted all emails that don’t require action, you can move to processing the next type of email. These are the messages you can take action on in 5 minutes or less.
Generally, “taking action” will mean sending a response, though it could mean doing another quick task related to the email.
So why not add these items to your task list? You could, but you can usually just do the task in the amount of time it would take you to add it to your to-do list. By doing the item now, you save time in the long run.
Add Longer Tasks to Your To-Do List
Even after removing messages that require no action and taking action on quick tasks, you’ll likely have a few emails that require more time or steps to act on.
These are the emails that you should get out of your inbox and onto your task list. As far as adding email items to your task list, you have a few options.
The simplest is to copy the email directly into your task program (using either the subject line or another relevant piece of information from the email).
Copying the email will work, but it can get clunky if you have lots of emails to go through. Plus, it can create tasks that are hard to understand when you return to them later. To avoid this problem, you can use a task manager that lets you turn emails into tasks.
Most major task managers offer this kind of functionality, often with a browser extension that lets you turn an email into a task with just a few clicks. Todoist, for instance, offers a Gmail extension that puts an “Add to Todoist” button at the top of each email.
All you have to do is click that button in order to turn any email into a Todoist task:
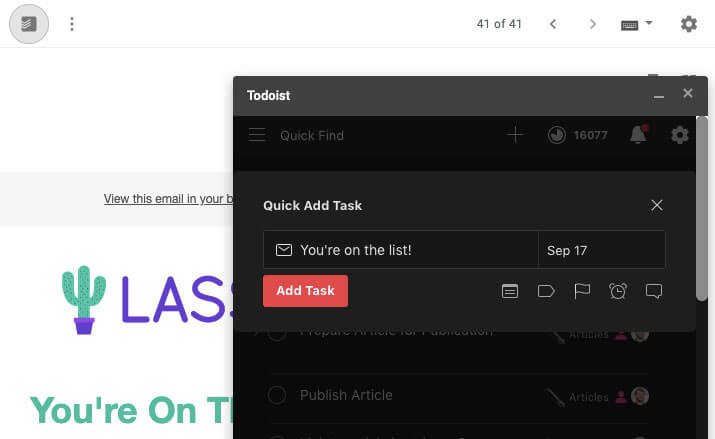
Plus, any tasks you create in this way include a link to the original email, letting you review it later when you’re taking action on it.
Whatever method you use, just remember to keep your inbox for communication and your task list for things you need to do.
Use Tags and Search Harmoniously
Lots of email productivity guides focus on the importance of using tags to organize archived emails. The logic is that your email should be organized similar to the file structure on your computer: logical and hierarchical.
In our experience, however, this method is overkill. You’ll usually end up spending a lot of time on creating and managing all your tags with little pay-off.
Why? Because most email programs have gotten so good at searching messages that tags are irrelevant. If you need to find a message from the archive, just search for something related to the subject or sender.
I only recommend using tags for very important messages. For instance, Thomas has a tag for all receipt emails he receives. This makes sure he can find receipts when doing business bookkeeping each month.
If you receive any email that you need to be sure you can find later, feel free to make tags for it. But for most other cases, tagging is overkill.
Create Filters
If you don’t know about email filters, then I’m about to blow your mind. All email programs let you create rules that automatically apply actions to emails based on certain conditions.
This sounds complicated, but it’s quite simple in practice. For instance, let’s say you subscribe to a bunch of newsletters. They arrive throughout the week, but you don’t have time to read them until the weekend.
You could manually archive each of these emails as it arrives. But there’s a much more efficient way: creating a filter.
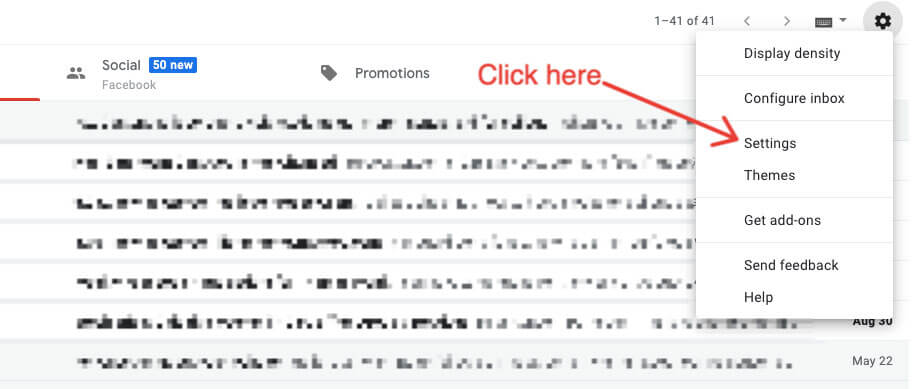
Here’s how to create a filter in Gmail:
1. Go to the “Settings” menu
Click the Settings icon:
Then, click where it says “Settings”.
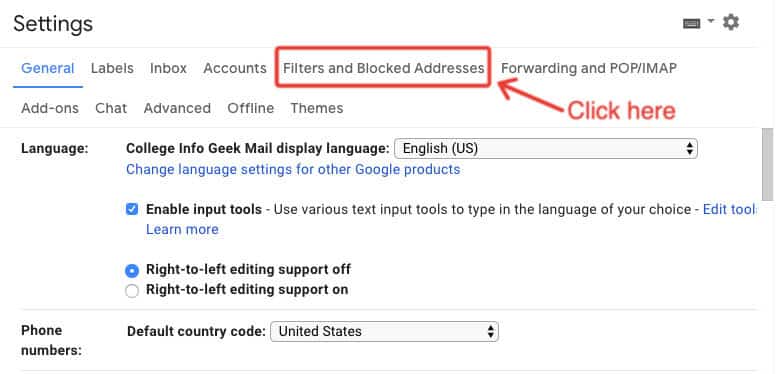
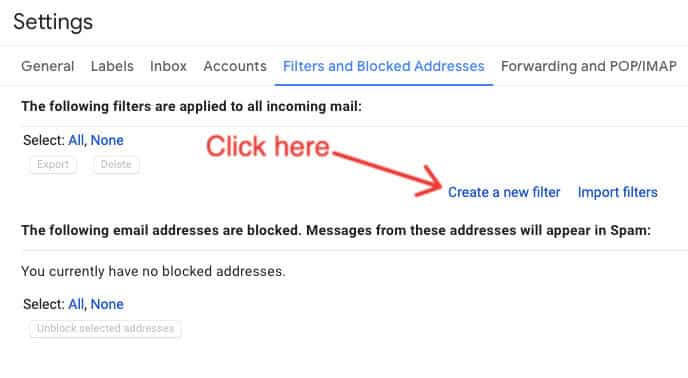
2. Click “Filters and Blocked Addresses”
Now click on the tab that says “Filters and Blocked Addresses”.
3. Click “Create a new filter”
Click the “Create a new filter” button.
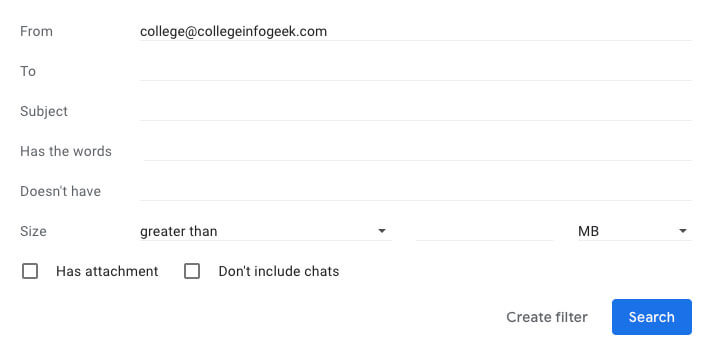
4. Choose your filter parameters
Now, it’s time to choose what condition(s) you’ll use to filter emails. In Gmail, you have the following options:
- From — Who sent you the email
- To — The email address the email is being sent to
- Subject — The subject of the email
- Has the words — Words that the email includes
- Doesn’t have — Words the email doesn’t have
- Size — The size of the email (in MB, KB, or bytes)
- Has attachment — Does the email have an attachment?
The most useful filters tend to be “From” and “Subject,” as you can use them to quickly identify who’s sending the email and for what purpose. I don’t tend to use the other filters very much.
For demonstration purposes, let’s assume I want to filter all emails that come from a specific address. To do that, I just type the email address into the “From” field:
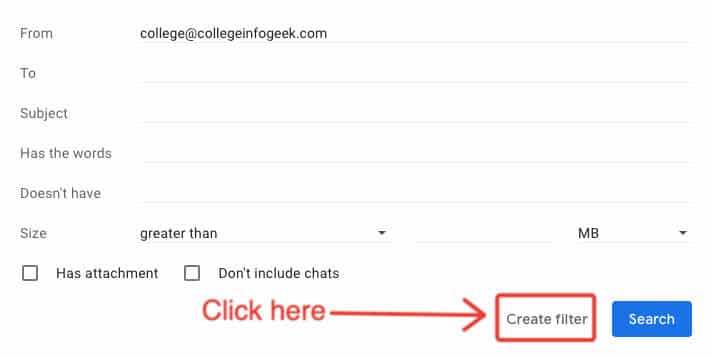
Once you’ve chosen your conditions, click “Create filter” to move on to the next step:
5. Choose an action
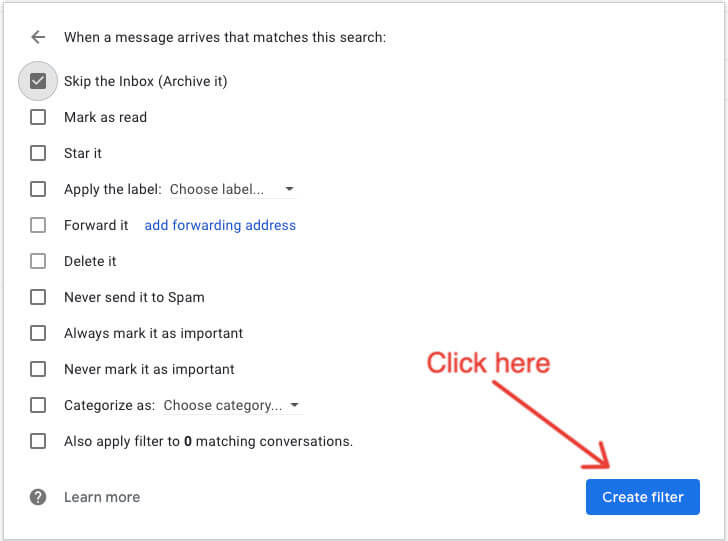
After you’ve set up the conditions for your filter, you need to choose something for your filter to do. You’ll do this by clicking one of the options under “When a message arrives that matches this search:”
- Skip the Inbox (Archive it)
- Mark as read
- Star it
- Apply the label:
- Forward it
- Delete it
- Never send it to Spam
- Always mark it as important
- Never mark it as important
- Categorize as:
- Also apply filter to x matching conversations. (Where x is the number of conversations that match your filter criteria).
Returning to our example of automatically archiving newsletters, I’ll choose “Skip the Inbox (Archive it)”:
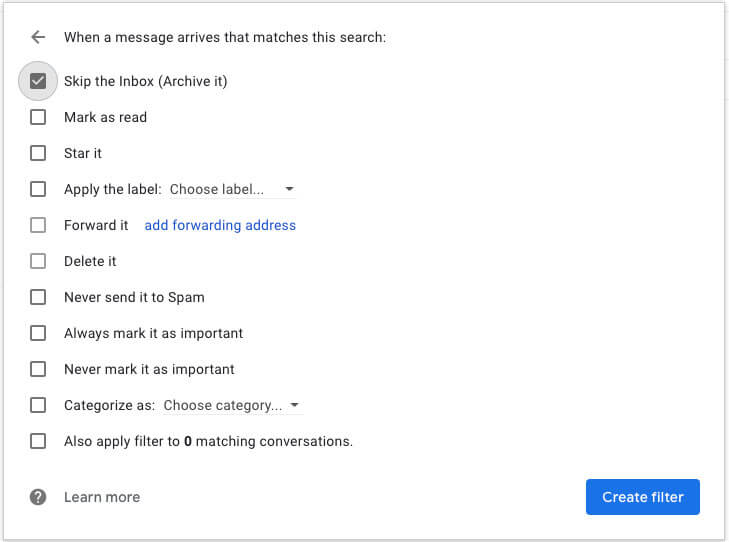
Now that I’m done, all that’s left is to click “Create filter”:
Again, you have a lot of control here, but I generally use the “Skip the Inbox” and “Apply the label:” filters the most.
“Never send it to Spam” can also be useful if you’re forwarding email from another address and want to make sure that the emails don’t get stuck in your spam filter.
Use Separate Emails for Logins and Correspondence
This next tip is more about security than productivity, but it’s important to mention.
Because your correspondence email address is visible (and essentially public), it’s a security vulnerability. If someone gets access to it, they could potentially send password reset requests or even hack certain accounts.
To protect against this hazard, you should have a separate email address that you use for signing into things. Don’t use this email to communicate with coworkers, family, or friends; keep it a secret.
This way, if a hacker gets your correspondence email address, they can’t use it to hack your accounts.
Using a separate login email address also keeps your correspondence inbox free of junk related to logins and passwords, freeing up time for more important email.
Just be sure to maintain access to your login email in case you need to reset passwords or update login/payment information.
Write Clear Emails
Having an efficient system for processing email will massively reduce the time you spend in your inbox. However, the way you write emails can also reduce the amount of time you have to spend on email in the first place.
Many email messages only exist because someone didn’t give clear instructions or information from the start. This means most emails where someone asks, “Can you clarify this?”
Sometimes, these types of emails are unavoidable (I’ve sent my fair share of them). But in many cases, writing your emails with potential questions in mind can save everyone lots of back and forth.
So every time you sit down to write an email, ask yourself, “What questions can I anticipate?” And before you send an email, read over it and look for anything that might be unclear to the person receiving it.
This only takes a minute or two, but it can save you hours of email writing in the long run.
Embrace Inbox Zero
Email can feel like a hydra — for each message you answer, two more take its place. But you now have the tactics you need to get your inbox under control. I hope you use your newfound time for something more productive or enjoyable.
Of course, getting your inbox under control is just one part of becoming an organized, productive person.
For more organization and productivity tips, check out these guides: