My dorm-design philosophy is this: things that touch the floor are bad. Now, while that’s not to say you should attempt to create a Swiss Family Robinson-style treehouse in your room, it’s pretty easy to agree that anything that sits on the floor takes up valuable space that could be used for yoga, stationary cycling, or counting laundered money. Therefore, things like combination refrigerator-microwaves and stackable containers are a godsend to the college student who’s been forced to get in touch with his inner sardine.
However, there is one dorm staple that beats the pants off of all other items when it comes to space saving – the loft bed. Though it may make you more susceptible to the old alarm-clock-and-ceiling one-two punch, a loft bed frees up approximately 21 square feet of floor space in your room. Winner winner, chicken dinner.
If you’re just putting up a loft and shoving all your crap under it, though, you’re wasting more potential than Lance Armstrong riding a Wal-Mart special. Lofts give you a sturdy piece of furniture with plenty of wooden beams – it’d be silly not to hang stuff off of them! That’s precisely the idea I got when I came home this summer and needed to build a desk. Instead of buying PVC pipe to build a standing desk, I picked up some chains and built a hanging desk. Now, not only do I have a cool-looking desk, but I also have all the floor space I would have had with no desk at all.
“My dorm room already comes with a desk!” you might complain – and that’s true for me as well. However, for those of you who have the luxury of being able to store that cookie-cutter monstrosity, or for those who, like me, brought their loft home for the summer, this tutorial should be of much usefulness. Here’s how to build a jaw-droppingly simple hanging desk in less than 15 minutes and for around $45 (YMMV).
Grab Your Materials
First, go to the store. Home Depot, Lowes, whatever – you’re going to need some stuff. By the way, I’m not including the time it takes you to buy the materials in the build time – “How to build a hanging desk in 48 minutes, give or take 12 depending on the traffic” just doesn’t have the right spark for this post’s title. Anyway, you will need four items:
- A piece of hardboard. Like, the high-density fiberboard stuff. Don’t use particle board; that’s asking for trouble. Dimensions should be approximately 4ft x 2ft x 1in (the thickness is key – needs to be strong enough for all your stuff plus the weight of your arms. Err on the side of overkill here.)
- Four 4-foot long sections of chain. I used Tenso Chain (the kind where each link is a double loop) because it’s strong and really cheap. Whatever you get, make sure it’s rated to at least 150 pounds to be safe. Tenso is rated at 244.
- Rope. The type or thickness doesn’t really matter – just get what’s cheap. This won’t be bearing any weight, so you could even use spare yarn from your mom’s knitting supplies (Bonus: use enough and she can’t make you another horrid sweater for Christmas)
- S-hooks or spring links to hold the chain.
Pay no attention to the fact that I’m using both S-hooks and spring links for mine – Home Depot simply didn’t have enough of either for me to use just one.
Build the Hanging Desk
Next, you need to drill a hole in each corner of the board for the chains to loop through. To do this, grab a power drill with the largest drill bit you can find and drill four holes in each corner as close to each other as you can. Then angle the drill bit to clear out the excess wood to make one big hole. The holes will end up looking pretty sketchy, but they work. If you happen to have a drill press lying around, this process might be even easier.
Now that you have your sketchy-looking holes drilled, loop a chain though each hole and secure it with an S-hook or spring link. Put the chains through the board first before hanging them from the bed; it’s much easier this way.
Loop the chain though a whole and secure it. (Yeah, I took this after the desk was built. Deal with it.)
Lying on your floor should be what looks like a wood-colored Spongebob with chain limbs. Now your need to prepare your bed. Take off your mattress and whatever else is up there so it’s easier to hang the desk.
Now start hanging the desk. The easiest way to do this is go diagonally: hang one end, then do the opposite end. This way, the desk will be suspended after hanging only two chains. Hook up the other two and your desk will be secure. The great thing about chains is that they have links – simply adjust which link each hook is attached to until the desk is level and at the correct height.
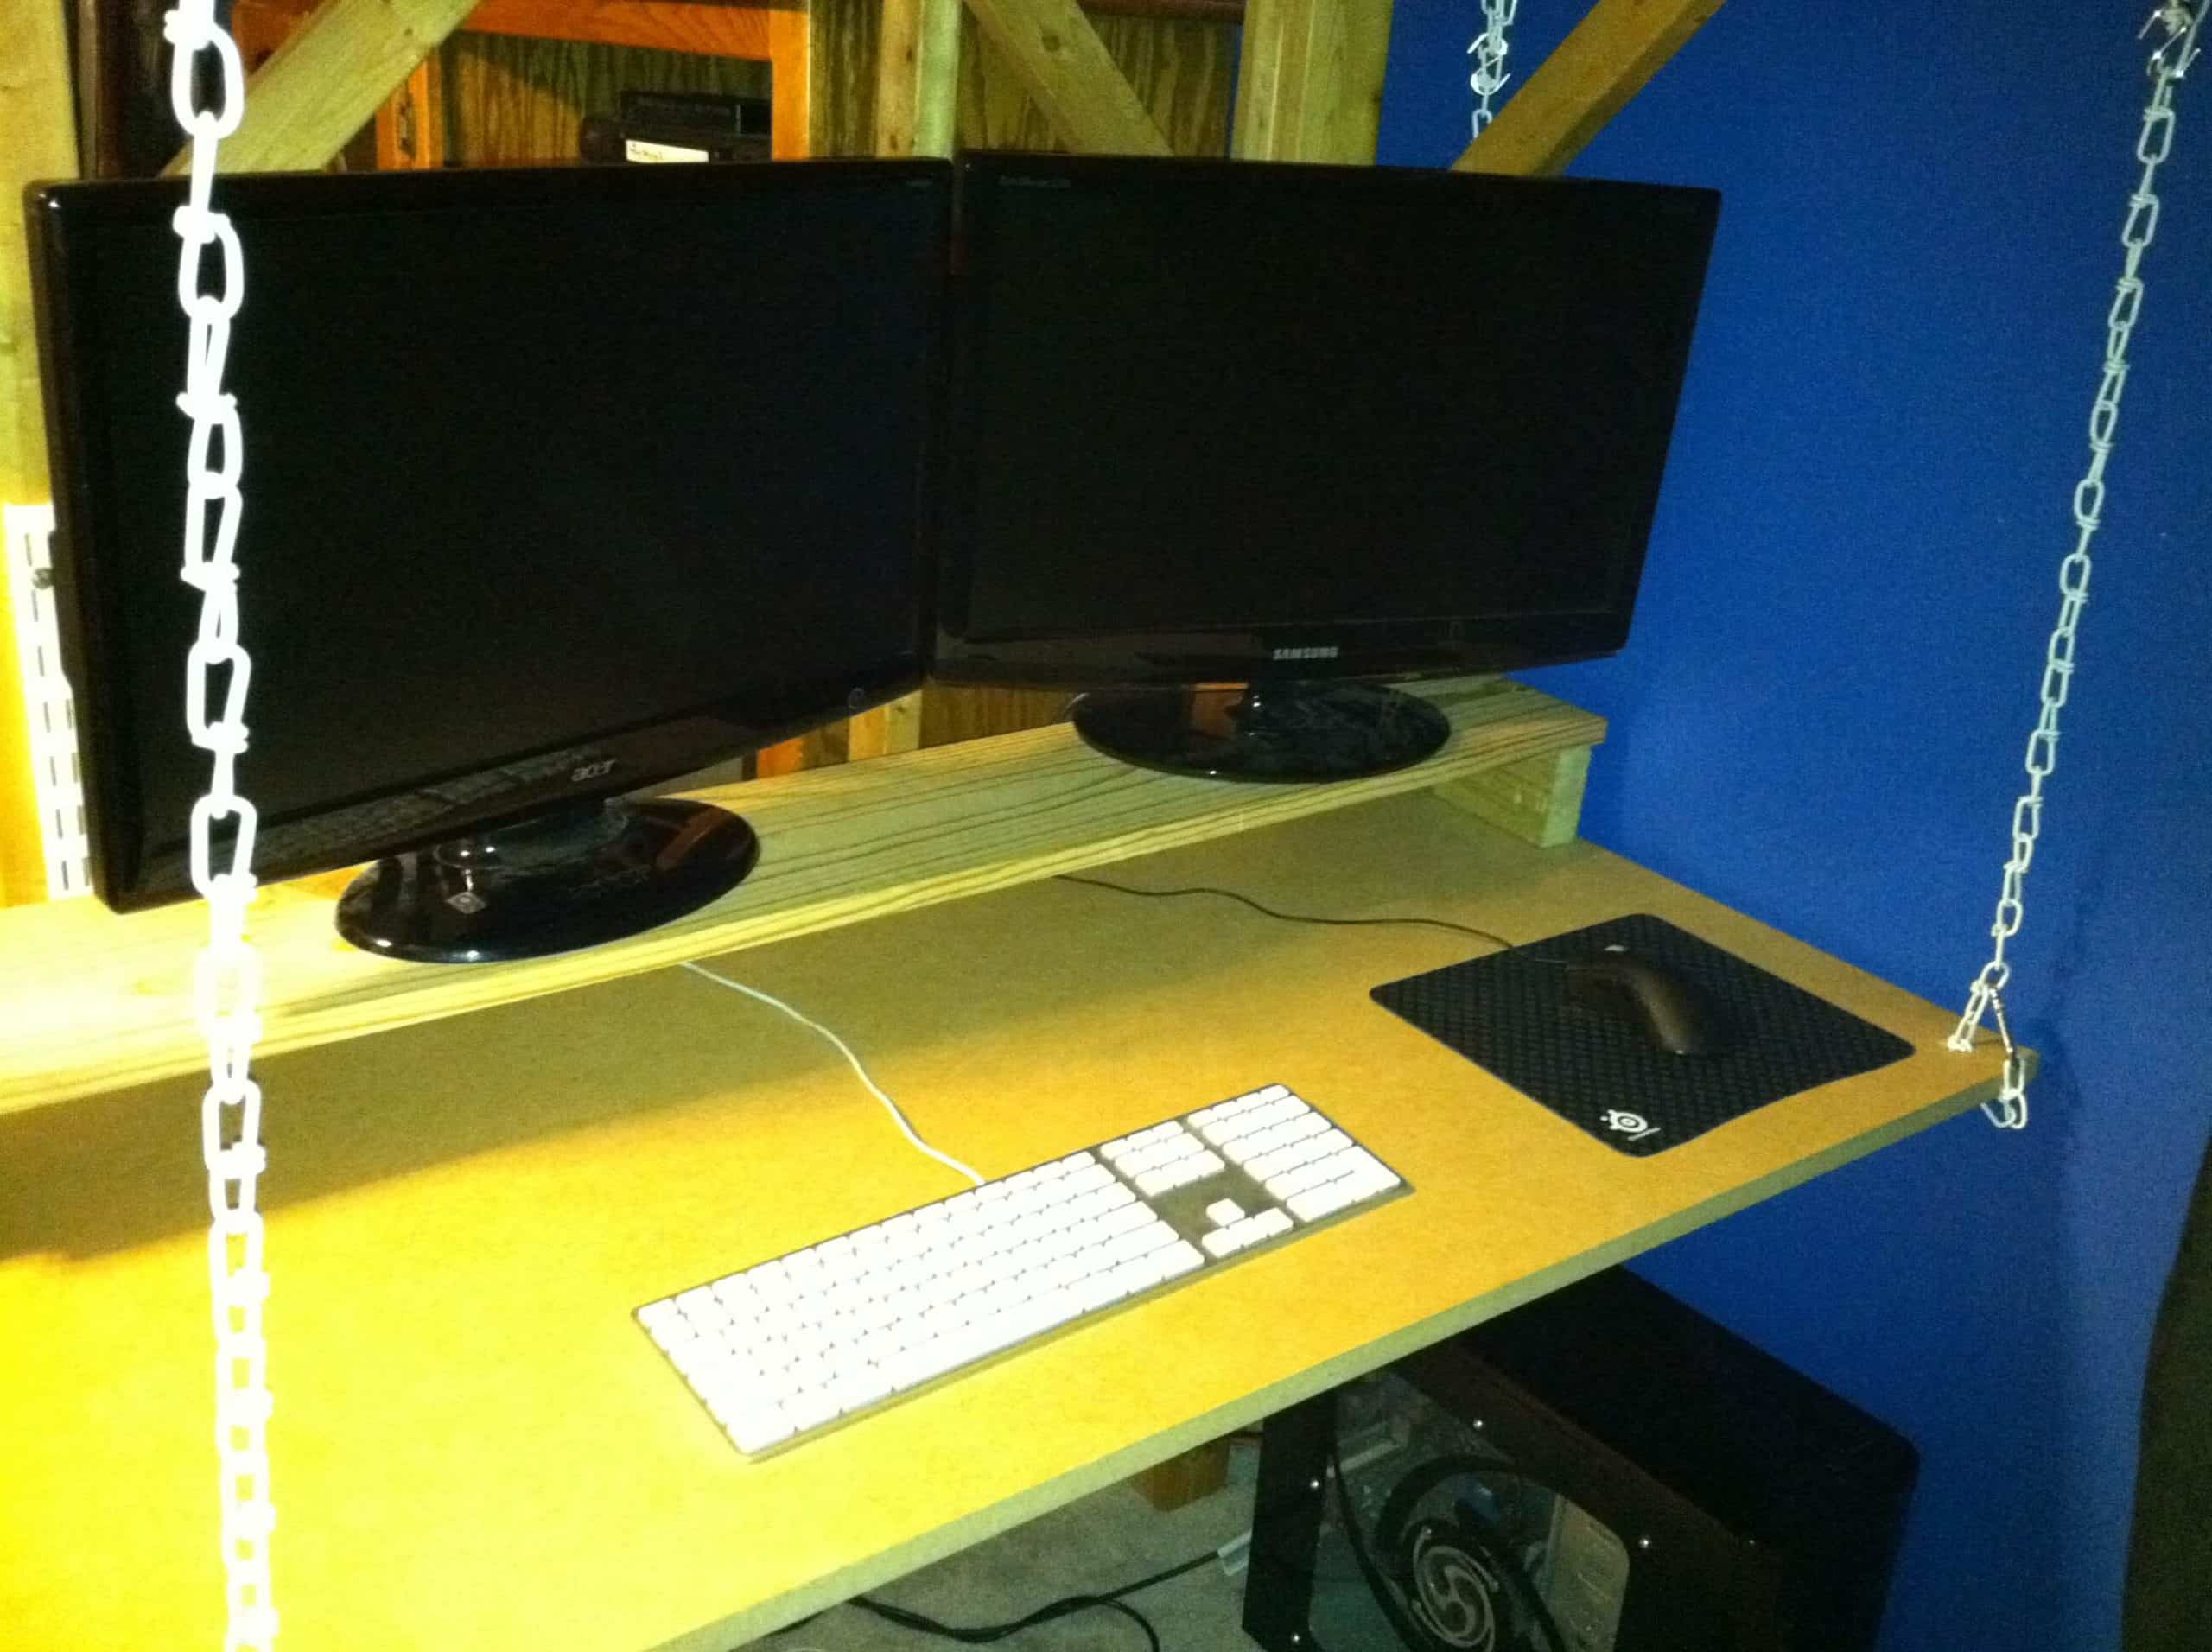
Now you have a hanging desk! It should look like this:
Left like this, however, the desk would swing. This is a bad thing. To fix this, you’ll need to fasten the desk to the two bedposts it rests against. First press the desk up the the bedposts at the position you want; then, drill a hole in the desk right in front of each post.
Now, use the rope to tie the desk to each post. This will prevent the desk from swinging.
You’re done! If you have big monitors like I do, feel free to toss a monitor shelf up there. Enjoy your hanging desk!
What other dorm-DIY projects have you come up with? Tell us about them in the comments!
UPDATE: If you’re skeptical about the desk’s strength, the proof is in the pudding
Did you like this post? If so, please share it using the buttons at the left!


ps. where can i get a shirt with this sweet bat on it?
You mean the Zubat comment avatar? Haha I can’t believe anyone actually wants that on a shirt. Alright, just for you, I made a RedBubble profile where you can buy it. Sorry I can’t make it any cheaper – http://www.redbubble.com/people/tomfrankly/works/9905878-shitty-zubat-ya-swag
I’m a single Mom with no skills what-so-ever in building or fixing stuff. I am going to try to build this for my 5 year old before he starts kindergarten. He’ll think it’s cool! Thanks!
No problem! This is actually really easy to build. After you drill the holes, you don’t even need tools anymore!
Damn, that is one of the coolest looking room mods I’ve seen. Great work Thomas!
Thanks! It was pretty easy to build, actually.
You need to realize that a lot of what college dorm life is about is bringing back the ladies to your room… Hanging something from a bunk bed is a little risky. Be careful that any swaying from above doesn't shimmy those monitors right off the desk!
That's what the rope is for – it completely prevents swinging. Anyway, if you're getting that crazy in a loft bed, I'd be more worried about the bed's integrity rather than the desk
*be sure to secure any ledgers for any project to studs, of course!
I've built myself three different loft bed arrangements in the past few years, and was hopping anxious to post a comment about the holes you drilled….
Poster "Early" totally nailed what I wanted to suggest here, but I'm pretty sure I can still out-comment him on a few points:
IF you can borrow or rent a crimper, aviation cable is THE WAY to hang stuff. It looks super tidy, and you get it in weight ratings that will blow your mind (yes, "blow you mind" is a technical term; I'm Canadian!) without it looking like anything more than yarn. Very fun to suspend stuff with.
Also, what I've found to work really well for myself was to build a deck platform that is exactly the same dimensions as my mattress. While not feasible for everyone, I simply take two ledgers (lengths of 2×4 cut at length appropriate), and screw these in a corner (har har har), then shoulder my deck/mattress platform up. I then have used either a 4×4 post cut to the same height as the top of the ledgers, or a 2×4 to prop under the unsupported corner of this. Then fiddle about squaring up that one leg, and double check that your bed platform is level, and toss in some "toe-nailed" long screws (Robertson, of course!). Once you have your deck platform, it's only a matter of a few screws, a level, and a tape measure to put your bed in any corner.
I've moved mine a couple times, and it's currently seated with the top of the mattress 7 feet off the floor, secure as hell. I switched to just a 2×4 when I decided to mount it this high up, as a 4×4 post would have been a bit pricey.
Works great, and moving is much more simple and compact, not having to disassemble much at all.
Cheers from Canuck Land.
That's a great idea! However, while it works perfectly in a room that lets you drill into studs, it's less practical in a dorm where you're not supposed to drill into the wall. I've got some pretty cool alternative loft ideas myself, though: one way to sort-of do what you're talking about is to basically build a frame around the room so no bedposts are in the middle of the floor, and then hang the bed (or two) off of it. Another cool idea is to build a false floor and put the bed underneath, and then have your desk or couch on top of it. This is what I'll be doing next semester (the loft bed is staying home).
I definitely agree with your when it comes to using aviation cable. The only reason I didn't use it was because I was too lazy to learn how to secure the ends together – chain is pretty self-explanatory! Good idea though!
Wish you thought of the eye-bold idea before, don't yah? I guess it's a good version 1 and version 2 will be better. You could also use from metal hose clamps to give it more stability instead of the ropes.(screw it to the desk then tighten it around the post) Still it's a great idea.
That is a good idea! The one problem I had with the ropes was keeping them tight while tying the knot. Metal hose clamps would do a much better job
your bed looks hand made too, is it and what are the dimensions, I'm interested in building my own
It is handmade, but we ordered it from ebay six years ago. I will say that bed is overkill if your dorm comes with a bed already – it’s much easier to build a bed that simply holds up the metal frame. I built one for a friend that cost exactly $30. I’ll work on a tutorial at some point for that, but for now here’s the dimensions:
Post height: 5 foot
Bed length: 6 foot 5 inches
Bed width: 3 foot 1.5 inches
Rather than drill "sketchy-looking" holes, you could drill clean holes and use eye-bolts to connect the chain to the desk. Doesn't much matter either way, of course…
You are absolutely right. I was just making due with the stuff I bought – I'm pretty bad at planning for what I need when I walk into the Home Depot. It's more a "look and the shelves and let my imagination run" kind of deal
Hello college info geek.
just found you via problogger forum. Now following
xo
Glad you found it! What's your name on the forum? I haven't been on for a while